
Building a Module
خطر
This tutorial is outdated. We recommend reading Server framework 101 instead.
هشدار
This tutorial requires having installed Odoo
Start/Stop the Odoo server
Odoo uses a client/server architecture in which clients are web browsers accessing the Odoo server via RPC.
Business logic and extension is generally performed on the server side, although supporting client features (e.g. new data representation such as interactive maps) can be added to the client.
In order to start the server, simply invoke the command odoo-bin in the shell, adding the full path to the file if necessary:
odoo-bin
The server is stopped by hitting Ctrl-C twice from the terminal, or by
killing the corresponding OS process.
Build an Odoo module
Both server and client extensions are packaged as modules which are optionally loaded in a database.
Odoo modules can either add brand new business logic to an Odoo system, or alter and extend existing business logic: a module can be created to add your country's accounting rules to Odoo's generic accounting support, while the next module adds support for real-time visualisation of a bus fleet.
Everything in Odoo thus starts and ends with modules.
Composition of a module
An Odoo module can contain a number of elements:
- Business objects
Declared as Python classes, these resources are automatically persisted by Odoo based on their configuration
- Object views
Definition of business objects UI display
- Data files
XML or CSV files declaring the model metadata :
configuration data (modules parametrization, security rules),
demonstration data
and more
- Web controllers
Handle requests from web browsers
- Static web data
Images, CSS or javascript files used by the web interface or website
ساختار ماژول
Each module is a directory within a module directory. Module directories
are specified by using the --addons-path
option.
نکته
most command-line options can also be set using a configuration file
An Odoo module is declared by its manifest.
A module is also a
Python package
with a __init__.py file, containing import instructions for various Python
files in the module.
For instance, if the module has a single mymodule.py file __init__.py
might contain:
from . import mymodule
Odoo provides a mechanism to help set up a new module, odoo-bin has a subcommand scaffold to create an empty module:
$ odoo-bin scaffold <module name> <where to put it>
The command creates a subdirectory for your module, and automatically creates a bunch of standard files for a module. Most of them simply contain commented code or XML. The usage of most of those files will be explained along this tutorial.
Exercise
Module creation
Use the command line above to create an empty module Open Academy, and install it in Odoo.
Object-Relational Mapping
A key component of Odoo is the ORM layer. This layer avoids having to write most SQL by hand and provides extensibility and security services2.
Business objects are declared as Python classes extending
Model which integrates them into the automated
persistence system.
Models can be configured by setting a number of attributes at their
definition. The most important attribute is
_name which is required and defines the name for
the model in the Odoo system. Here is a minimally complete definition of a
model:
from odoo import models
class MinimalModel(models.Model):
    _name = 'test.model'
Model fields
Fields are used to define what the model can store and where. Fields are defined as attributes on the model class:
from odoo import models, fields

class LessMinimalModel(models.Model):
    _name = 'test.model2'

    name = fields.Char()
Common Attributes
Much like the model itself, its fields can be configured, by passing configuration attributes as parameters:
name = fields.Char(required=True)
Some attributes are available on all fields, here are the most common ones:
string(unicode, default: field's name)The label of the field in UI (visible by users).
required(bool, default:False)If
True, the field can not be empty, it must either have a default value or always be given a value when creating a record.help(unicode, default:'')Long-form, provides a help tooltip to users in the UI.
index(bool, default:False)Requests that Odoo create a database index on the column.
Simple fields
There are two broad categories of fields: "simple" fields which are atomic values stored directly in the model's table and "relational" fields linking records (of the same model or of different models).
Example of simple fields are Boolean,
Date, Char.
Reserved fields
Odoo creates a few fields in all models1. These fields are managed by the system and shouldn't be written to. They can be read if useful or necessary:
id(Id)The unique identifier for a record in its model.
create_date(Datetime)Creation date of the record.
create_uid(Many2one)User who created the record.
write_date(Datetime)Last modification date of the record.
write_uid(Many2one)user who last modified the record.
Special fields
By default, Odoo also requires a name field on all models for various
display and search behaviors. The field used for these purposes can be
overridden by setting _rec_name.
Exercise
Define a model
Define a new data model Course in the openacademy module. A course has a title and a description. Courses must have a title.
Data files
Odoo is a highly data driven system. Although behavior is customized using Python code part of a module's value is in the data it sets up when loaded.
نکته
some modules exist solely to add data into Odoo
Module data is declared via data files, XML files with
<record> elements. Each <record> element creates or updates a database
record.
<odoo>

        <record model="{model name}" id="{record identifier}">
            <field name="{a field name}">{a value}</field>
        </record>

</odoo>
modelis the name of the Odoo model for the record.idis an external identifier, it allows referring to the record (without having to know its in-database identifier).<field>elements have anamewhich is the name of the field in the model (e.g.description). Their body is the field's value.
Data files have to be declared in the manifest file to be loaded, they can
be declared in the 'data' list (always loaded) or in the 'demo' list
(only loaded in demonstration mode).
Exercise
Define demonstration data
Create demonstration data filling the Courses model with a few demonstration courses.
نکته
The content of the data files is only loaded when a module is installed or updated.
پس از انجام برخی تغییرات، فراموش نکنید از odoo-bin -u openacademy برای ذخیرهٔ تغییرات در پایگاهدادهٔ خود استفاده کنید.
نماهای پایه
نماها روش نمایش رکوردهای یک مدل را تعریف میکنند. هر نوع نما یک حالت بصریسازی را نشان میدهد (یک فهرست از رکوردها، یک نمودار از تجمیع آنها، …). نماها را میتوان بهصورت عمومی از طریق نوع آنها (مثلاً a list of partners) یا بهصورت اختصاصی از طریق شناسهٔ آنها درخواست کرد. برای درخواستهای عمومی، نمای با نوع صحیح و کمترین اولویت استفاده میشود (بنابراین نمای با کمترین اولویت از هر نوع، نمای پیشفرض برای آن نوع است).
ارثبری نما اجازهٔ تغییر نماهای اعلامشده در جای دیگر را میدهد (افزودن یا حذف محتوا).
اعلام عمومی نما
یک نما بهعنوان رکوردی از مدل ir.ui.view اعلام میشود. نوع نما توسط عنصر ریشهٔ فیلد arch تعیین میشود:
<record model="ir.ui.view" id="view_id">
    <field name="name">view.name</field>
    <field name="model">object_name</field>
    <field name="priority" eval="16"/>
    <field name="arch" type="xml">
        <!-- view content: <form>, <list>, <graph>, ... -->
    </field>
</record>
خطر
محتوای نما XML است.
بنابراین فیلد arch باید بهعنوان type="xml" اعلام شود تا بهدرستی تجزیه شود.
نماهای فهرست
نماهای فهرست، که نماهای فهرست نیز نامیده میشوند، رکوردها را در قالب جدولی نمایش میدهند.
عنصر ریشهٔ آنها <list> است. سادهترین شکل نمای فهرست بهسادگی همهٔ فیلدها را برای نمایش در جدول فهرست میکند (هر فیلد بهعنوان یک ستون):
<list string="Idea list">
    <field name="name"/>
    <field name="inventor_id"/>
</list>
نماهای فرم
فرمها برای ایجاد و ویرایش رکوردهای منفرد استفاده میشوند.
عنصر ریشهٔ آنها <form> است. آنها از عناصر ساختاری سطح بالا (گروهها، نوتبوکها) و عناصر تعاملی (دکمهها و فیلدها) تشکیل شدهاند:
<form string="Idea form">
    <group colspan="4">
        <group colspan="2" col="2">
            <separator string="General stuff" colspan="2"/>
            <field name="name"/>
            <field name="inventor_id"/>
        </group>

        <group colspan="2" col="2">
            <separator string="Dates" colspan="2"/>
            <field name="active"/>
            <field name="invent_date" readonly="1"/>
        </group>

        <notebook colspan="4">
            <page string="Description">
                <field name="description" nolabel="1"/>
            </page>
        </notebook>

        <field name="state"/>
    </group>
</form>
Exercise
سفارشیسازی نمای فرم با استفاده از XML
نمای فرم خود را برای شیء Course ایجاد کنید. دادههای نمایشدادهشده باید نام و توضیحات دوره باشد.
Exercise
نوتبوکها
در نمای فرم Course، فیلد توضیحات را زیر یک تب قرار دهید، بهگونهای که افزودن تبهای دیگر بعداً، حاوی اطلاعات اضافی، آسانتر باشد.
نماهای فرم میتوانند از HTML خالص نیز برای طراحیهای انعطافپذیرتر استفاده کنند:
<form string="Idea Form">
    <header>
        <button string="Confirm" type="object" name="action_confirm"
                invisible="state != 'draft'" class="oe_highlight" />
        <button string="Mark as done" type="object" name="action_done"
                invisible="state != 'confirmed'" class="oe_highlight"/>
        <button string="Reset to draft" type="object" name="action_draft"
                invisible="state not in ['confirmed', 'done']" />
        <field name="state" widget="statusbar"/>
    </header>
    <sheet>
        <div class="oe_title">
            <label for="name" class="oe_edit_only" string="Idea Name" />
            <h1><field name="name" /></h1>
        </div>
        <separator string="General" colspan="2" />
        <group colspan="2" col="2">
            <field name="description" placeholder="Idea description..." />
        </group>
    </sheet>
</form>
نماهای جستجو
نماهای جستجو، فیلد جستجوی مرتبط با نمای فهرست (و سایر نماهای تجمیعشده) را سفارشی میکنند. عنصر ریشهٔ آنها <search> است و از فیلدهایی تشکیل شدهاند که مشخص میکنند روی کدام فیلدها میتوان جستجو کرد:
<search>
    <field name="name"/>
    <field name="inventor_id"/>
</search>
اگر هیچ نمای جستجویی برای مدل وجود نداشته باشد، Odoo یکی تولید میکند که فقط اجازهٔ جستجو روی فیلد name را میدهد.
Exercise
جستجوی دورهها
اجازهٔ جستجوی دورهها بر اساس عنوان یا توضیحات آنها را بدهید.
روابط بین مدلها
یک رکورد از یک مدل ممکن است به یک رکورد از مدل دیگری مرتبط باشد. برای مثال، یک رکورد سفارش فروش به یک رکورد کلاینت که حاوی دادههای کلاینت است، مرتبط است؛ همچنین به رکوردهای خط سفارش فروش خود مرتبط است.
Exercise
ایجاد یک مدل session
برای ماژول Open Academy، یک مدل برای sessions در نظر میگیریم: یک session نمونهای از یک دوره است که در زمان مشخصی برای مخاطبان مشخصی تدریس میشود.
یک مدل برای sessions ایجاد کنید. یک session دارای یک نام، یک تاریخ شروع، یک مدت زمان و تعداد صندلی است. یک اکشن و یک آیتم منو برای نمایش آنها اضافه کنید. مدل جدید را از طریق یک آیتم منو قابل مشاهده کنید.
فیلدهای رابطهای
فیلدهای رابطهای رکوردها را به هم پیوند میدهند، چه از یک مدل (سلسلهمراتب) و چه بین مدلهای مختلف.
انواع فیلدهای رابطهای عبارتند از:
Many2one(other_model, ondelete='set null')یک پیوند ساده به یک شیء دیگر:
print(foo.other_id.name)
همچنین ببینید
One2many(other_model, related_field)یک رابطهٔ مجازی، معکوس یک
Many2one. یکOne2manyبهعنوان یک ظرف رکوردها رفتار میکند، دسترسی به آن منجر به یک مجموعهٔ (احتمالاً خالی) از رکوردها میشود:for other in foo.other_ids: print(other.name)
خطر
از آنجایی که یک
One2manyیک رابطهٔ مجازی است، باید یک فیلدMany2oneدرother_modelوجود داشته باشد، و نام آن بایدrelated_fieldباشدMany2many(other_model)رابطهٔ چندگانهٔ دوطرفه، هر رکوردی در یک طرف میتواند به هر تعداد رکورد در طرف دیگر مرتبط باشد. بهعنوان یک ظرف رکوردها رفتار میکند، دسترسی به آن نیز منجر به یک مجموعهٔ احتمالاً خالی از رکوردها میشود:
for other in foo.other_ids:
    print(other.name)
Exercise
روابط Many2one
با استفاده از یک many2one، مدلهای Course و Session را اصلاح کنید تا رابطهٔ آنها با سایر مدلها را منعکس کنند:
یک دوره دارای یک کاربر responsible است؛ مقدار آن فیلد یک رکورد از مدل درونساخت
res.usersاست.یک session دارای یک instructor است؛ مقدار آن فیلد یک رکورد از مدل درونساخت
res.partnerاست.یک session با یک course مرتبط است؛ مقدار آن فیلد یک رکورد از مدل
openacademy.courseاست و الزامی است.نماها را سازگار کنید.
Exercise
روابط معکوس one2many
با استفاده از فیلد رابطهای معکوس one2many، مدلها را اصلاح کنید تا رابطهٔ بین دورهها و sessionها را منعکس کنند.
Exercise
روابط چندگانهٔ many2many
با استفاده از فیلد رابطهای many2many، مدل Session را اصلاح کنید تا هر session را به مجموعهای از attendees مرتبط کند. شرکتکنندگان توسط رکوردهای partner نمایش داده میشوند، بنابراین به مدل درونساخت res.partner مرتبط خواهیم شد. نماها را بر این اساس سازگار کنید.
وراثت
ارثبری مدل
Odoo دو مکانیسم inheritance را برای گسترش یک مدل موجود به روش ماژولار ارائه میدهد.
اولین مکانیسم ارثبری به یک ماژول اجازه میدهد رفتار یک مدل تعریفشده در ماژول دیگر را اصلاح کند:
افزودن فیلدها به یک مدل،
بازنویسی تعریف فیلدها روی یک مدل،
افزودن محدودیتها به یک مدل،
افزودن متدها به یک مدل،
بازنویسی متدهای موجود روی یک مدل.
مکانیسم ارثبری دوم (تفویض) اجازه میدهد هر رکوردی از یک مدل به یک رکورد در مدل والد پیوند داده شود، و دسترسی شفاف به فیلدهای رکورد والد را فراهم میکند.
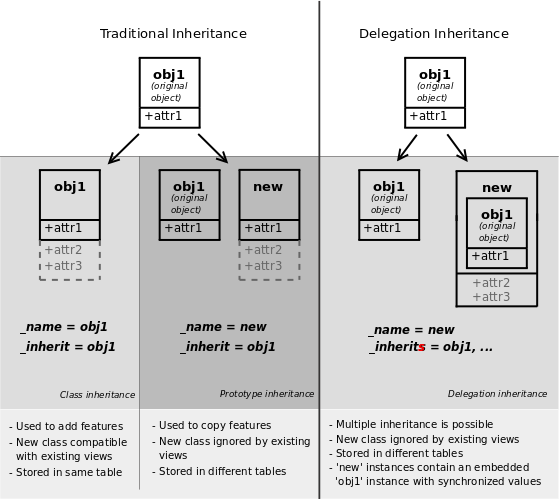
همچنین ببینید
_inherit_inherits
ارثبری نما
بهجای اصلاح نماهای موجود در جای خود (با بازنویسی آنها)، Odoo ارثبری نما را فراهم میکند که در آن نماهای «extension» فرزند روی نماهای ریشه اعمال میشوند، و میتوانند محتوا را از والد خود اضافه یا حذف کنند.
یک نمای extension با استفاده از فیلد inherit_id به والد خود ارجاع میدهد، و بهجای یک نمای منفرد، فیلد arch آن از هر تعداد عنصر xpath تشکیل شده است که محتوای نمای والد خود را انتخاب و تغییر میدهند:
<!-- improved idea categories list -->
<record id="idea_category_list2" model="ir.ui.view">
    <field name="name">id.category.list2</field>
    <field name="model">idea.category</field>
    <field name="inherit_id" ref="id_category_list"/>
    <field name="arch" type="xml">
        <!-- find field description and add the field
             idea_ids after it -->
        <xpath expr="//field[@name='description']" position="after">
          <field name="idea_ids" string="Number of ideas"/>
        </xpath>
    </field>
</record>
exprیک عبارت XPath که یک عنصر منفرد در نمای والد را انتخاب میکند. اگر با هیچ عنصری یا بیش از یکی مطابقت نداشته باشد، خطا میدهد
positionعملیات قابل اعمال روی عنصر مطابقتیافته:
insideبدنهٔ
xpathرا در انتهای عنصر مطابقتیافته الحاق میکندreplaceعنصر مطابقتیافته را با بدنهٔ
xpathجایگزین میکند، و هر رخداد گرهٔ$0در بدنهٔ جدید را با عنصر اصلی جایگزین میکندbeforeبدنهٔ
xpathرا بهعنوان یک همرده قبل از عنصر مطابقتیافته درج میکندafterبدنهٔ
xpathsرا بهعنوان یک همرده بعد از عنصر مطابقتیافته درج میکندattributesویژگیهای عنصر مطابقتیافته را با استفاده از عناصر ویژهٔ
attributeدر بدنهٔxpathتغییر میدهد
نکته
هنگام مطابقت با یک عنصر منفرد، میتوان ویژگی position را مستقیماً روی عنصری که قرار است یافت شود تنظیم کرد. هر دو ارثبری زیر نتیجهٔ یکسانی خواهند داد.
<xpath expr="//field[@name='description']" position="after">
    <field name="idea_ids" />
</xpath>

<field name="description" position="after">
    <field name="idea_ids" />
</field>
Exercise
تغییر محتوای موجود
با استفاده از ارثبری مدل، مدل Partner موجود را اصلاح کنید تا یک فیلد بولین
instructorو یک فیلد many2many که با رابطهٔ session-partner مطابقت دارد، اضافه شودبا استفاده از ارثبری نما، این فیلدها را در نمای فرم partner نمایش دهید
دامنهها
در Odoo، دامنههای جستجو مقادیری هستند که شرایط روی رکوردها را کدگذاری میکنند. یک دامنه یک فهرست از معیارهاست که برای انتخاب زیرمجموعهای از رکوردهای یک مدل استفاده میشود. هر معیار یک سهگانه با یک نام فیلد، یک عملگر و یک مقدار است.
برای مثال، هنگامی که روی مدل Product استفاده شود، دامنهٔ زیر همهٔ services را با قیمت واحد بیش از 1000 انتخاب میکند:
[('product_type', '=', 'service'), ('unit_price', '>', 1000)]
بهطور پیشفرض معیارها با یک AND ضمنی ترکیب میشوند. عملگرهای منطقی & (AND)، | (OR) و ! (NOT) را میتوان برای ترکیب صریح معیارها استفاده کرد. آنها در موقعیت پیشوندی استفاده میشوند (عملگر قبل از آرگومانهای خود درج میشود بهجای بین آنها). برای مثال، برای انتخاب محصولاتی که «services هستند OR قیمت واحدی دارند که NOT بین 1000 و 2000 است»:
['|',
    ('product_type', '=', 'service'),
    '!', '&',
        ('unit_price', '>=', 1000),
        ('unit_price', '<', 2000)]
یک پارامتر domain میتواند به فیلدهای رابطهای اضافه شود تا رکوردهای معتبر برای رابطه را هنگام تلاش برای انتخاب رکوردها در رابط کلاینت محدود کند.
Exercise
دامنهها روی فیلدهای رابطهای
هنگام انتخاب مدرس برای یک Session، تنها مدرسان (شرکایی که instructor آنها روی True تنظیم شده است) باید قابل مشاهده باشند.
Exercise
دامنههای پیچیدهتر
دستهبندیهای جدید شرکا Teacher / Level 1 و Teacher / Level 2 را ایجاد کنید. مدرس یک جلسه میتواند یا یک مدرس باشد یا یک معلم (در هر سطحی).
فیلدهای محاسبهشده و مقادیر پیشفرض
تا کنون فیلدها مستقیماً در پایگاهداده ذخیره و از آن بازیابی میشدند. فیلدها میتوانند computed (محاسبهشده) نیز باشند. در این حالت، مقدار فیلد از پایگاهداده بازیابی نمیشود بلکه بهصورت آنی با فراخوانی یک متد از مدل محاسبه میشود.
برای ایجاد یک فیلد محاسبهشده، یک فیلد بسازید و ویژگی compute آن را به نام یک متد تنظیم کنید. متد محاسبه باید بهسادگی مقدار فیلد را روی هر رکوردی در self تنظیم کند.
خطر
self یک مجموعه است
شیء self یک recordset است، یعنی یک مجموعهٔ مرتب از رکوردها. این شیء از عملیات استاندارد Python روی مجموعهها مانند len(self) و iter(self) و همچنین عملیات اضافی روی مجموعهها مانند recs1 + recs2 پشتیبانی میکند.
پیمایش روی self رکوردها را یکبهیک میدهد، که هر رکورد خود یک مجموعهٔ به اندازهٔ ۱ است. شما میتوانید با استفاده از نمادگذاری نقطهای، مانند record.name، به فیلدهای رکوردهای منفرد دسترسی پیدا کنید یا به آنها مقدار بدهید.
import random
from odoo import models, fields, api

class ComputedModel(models.Model):
    _name = 'test.computed'

    name = fields.Char(compute='_compute_name')

    def _compute_name(self):
        for record in self:
            record.name = str(random.randint(1, 1e6))
وابستگیها
مقدار یک فیلد محاسبهشده معمولاً به مقادیر فیلدهای دیگر در رکورد محاسبهشده وابسته است. ORM انتظار دارد که توسعهدهنده این وابستگیها را روی متد محاسبه با دکوراتور depends() مشخص کند. وابستگیهای دادهشده توسط ORM برای راهاندازی محاسبهٔ مجدد فیلد هر زمان که برخی از وابستگیهای آن تغییر کرده باشد استفاده میشوند:
from odoo import models, fields, api

class ComputedModel(models.Model):
    _name = 'test.computed'

    name = fields.Char(compute='_compute_name')
    value = fields.Integer()

    @api.depends('value')
    def _compute_name(self):
        for record in self:
            record.name = "Record with value %s" % record.value
Exercise
فیلدهای محاسبهشده
درصد صندلیهای اشغالشده را به مدل Session اضافه کنید
آن فیلد را در نماهای لیست و فرم نمایش دهید
فیلد را بهصورت یک نوار پیشرفت نمایش دهید
مقادیر پیشفرض
به هر فیلدی میتوان یک مقدار پیشفرض داد. در تعریف فیلد، گزینهٔ default=X را اضافه کنید که در آن X یا یک مقدار literal در Python (بولین، عدد صحیح، اعشاری، رشته) است، یا تابعی است که یک recordset را میگیرد و مقداری را برمیگرداند:
name = fields.Char(default="Unknown")
user_id = fields.Many2one('res.users', default=lambda self: self.env.user)
توجه
شیء self.env به پارامترهای درخواست و سایر چیزهای مفید دسترسی میدهد:
self.env.crیاself._crشیء cursor پایگاهداده است؛ این شیء برای پرسوجو از پایگاهداده استفاده میشود
self.env.uidیاself._uidشناسهٔ پایگاهدادهٔ کاربر فعلی است
self.env.userرکورد کاربر فعلی است
self.env.contextیاself._contextدیکشنری زمینه (context) است
self.env.ref(xml_id)رکورد متناظر با یک شناسهٔ XML را برمیگرداند
self.env[model_name]یک نمونه از مدل دادهشده را برمیگرداند
Exercise
اشیاء فعال – مقادیر پیشفرض
مقدار پیشفرض start_date را بهعنوان امروز تعریف کنید (به
Dateمراجعه کنید).یک فیلد
activeبه کلاس Session اضافه کنید و جلسات را بهطور پیشفرض فعال تنظیم کنید.
Onchange
مکانیسم «onchange» راهی برای رابط کلاینت فراهم میکند تا هر زمان که کاربر مقداری را در یک فیلد وارد کرد، بدون ذخیرهٔ چیزی در پایگاهداده، فرم را بهروزرسانی کند.
برای مثال، فرض کنید یک مدل سه فیلد amount، unit_price و price دارد، و میخواهید قیمت روی فرم را زمانی که هر یک از فیلدهای دیگر تغییر کرد بهروزرسانی کنید. برای دستیابی به این هدف، یک متد تعریف کنید که در آن self رکورد را در نمای فرم نشان میدهد، و آن را با onchange() دکوره کنید تا مشخص کنید روی کدام فیلد باید فعال شود. هر تغییری که در self ایجاد کنید روی فرم منعکس خواهد شد.
<!-- content of form view -->
<field name="amount"/>
<field name="unit_price"/>
<field name="price" readonly="1"/>
# onchange handler
@api.onchange('amount', 'unit_price')
def _onchange_price(self):
    # set auto-changing field
    self.price = self.amount * self.unit_price
    # Can optionally return a warning and domains
    return {
        'warning': {
            'title': "Something bad happened",
            'message': "It was very bad indeed",
        }
    }
برای فیلدهای محاسبهشده، رفتار onchange ارزشگذاریشده درونساخت است، همانطور که با کار با فرم Session قابل مشاهده است: تعداد صندلیها یا شرکتکنندگان را تغییر دهید، و نوار پیشرفت taken_seats بهطور خودکار بهروزرسانی میشود.
Exercise
هشدار
یک onchange صریح اضافه کنید تا دربارهٔ مقادیر نامعتبر، مانند تعداد صندلی منفی، یا تعداد شرکتکنندگان بیشتر از تعداد صندلی، هشدار دهد.
محدودیتهای مدل
Odoo دو راه برای راهاندازی ثوابت تأییدشده بهصورت خودکار ارائه میدهد: Python constraints و SQL constraints. به همین ترتیب، میتوانید SQL indexes پیچیدهتری اضافه کنید.
یک محدودیت Python بهصورت متدی تعریف میشود که با constrains() دکوره شده و روی یک recordset فراخوانی میشود. این دکوراتور مشخص میکند کدام فیلدها در محدودیت دخیل هستند، تا محدودیت زمانی که یکی از آنها تغییر کرد بهصورت خودکار ارزیابی شود. انتظار میرود متد در صورتی که ثابت آن برآورده نشود، یک استثنا ایجاد کند:
from odoo.exceptions import ValidationError

@api.constrains('age')
def _check_something(self):
    for record in self:
        if record.age > 20:
            raise ValidationError("Your record is too old: %s" % record.age)
    # all records passed the test, don't return anything
Exercise
افزودن محدودیتهای Python
محدودیتی اضافه کنید که بررسی میکند مدرس در میان شرکتکنندگان جلسهٔ خودش حضور نداشته باشد.
محدودیتها و ایندکسها با استفاده از موارد زیر تعریف میشوند: Constraint، Index و UniqueIndex.
Exercise
افزودن محدودیتهای SQL
با کمک PostgreSQL's documentation، محدودیتهای زیر را اضافه کنید:
بررسی کنید (CHECK) که توضیحات دوره و عنوان دوره متفاوت باشند
نام دوره را UNIQUE (یکتا) کنید
Exercise
تمرین ۶ - افزودن گزینهٔ duplicate
از آنجایی که محدودیتی برای یکتایی نام دوره اضافه کردیم، دیگر امکان استفاده از تابع «duplicate» وجود ندارد ().
متد «copy» خود را دوباره پیادهسازی کنید که اجازه میدهد شیء Course را تکرار کنید و نام اصلی را به «Copy of [original name]» تغییر دهید.
نماهای پیشرفته
نماهای فهرست
نماهای لیست میتوانند ویژگیهای تکمیلی بپذیرند تا رفتار آنها بیشتر سفارشی شود:
decoration-{$name}اجازه میدهد سبک متن یک ردیف را بر اساس ویژگیهای رکورد متناظر تغییر دهید.
Values are Python expressions. For each record, the expression is evaluated with the record's attributes as context values and if
true, the corresponding style is applied to the row. Here are some of the other values available in the context:uid: the id of the current user,today: the current local date as a string of the formYYYY-MM-DD,now: same astodaywith the addition of the current time. This value is formatted asYYYY-MM-DD hh:mm:ss.
{$name}میتواندbf(font-weight: bold)،it(font-style: italic)، یا هر bootstrap contextual color (danger،info،muted،primary،successیاwarning) باشد.<list string="Idea Categories" decoration-info="state=='draft'" decoration-danger="state=='trashed'"> <field name="name"/> <field name="state"/> </list>
editableیا
"top"یا"bottom". نمای لیست را قابل ویرایش در همان مکان میکند (بهجای اینکه مجبور به رفتن از طریق نمای فرم باشید)، مقدار، موقعیتی است که ردیفهای جدید در آن ظاهر میشوند.
Exercise
رنگآمیزی لیست
نمای لیست Session را بهگونهای تغییر دهید که جلساتی که کمتر از ۵ روز طول میکشند آبی رنگ شوند، و آنهایی که بیش از ۱۵ روز طول میکشند قرمز شوند.
تقویمها
رکوردها را بهعنوان رویدادهای تقویم نمایش میدهد. عنصر ریشهٔ آنها <calendar> است و رایجترین ویژگیهای آنها عبارتند از:
colorنام فیلد استفادهشده برای تقسیمبندی رنگ. رنگها بهطور خودکار به رویدادها توزیع میشوند، اما رویدادهایی که در یک قسمت رنگی هستند (رکوردهایی که مقدار یکسانی برای فیلد
@colorخود دارند) رنگ یکسانی خواهند گرفت.date_startفیلد رکورد که تاریخ/زمان شروع رویداد را نگهداری میکند
date_stop(اختیاری)فیلد رکورد که تاریخ/زمان پایان رویداد را نگهداری میکند
stringفیلد رکورد برای تعریف برچسب هر رویداد تقویم
<calendar string="Ideas" date_start="invent_date" color="inventor_id">
    <field name="name"/>
</calendar>
Exercise
نمای تقویم
یک نمای Calendar به مدل Session اضافه کنید که به کاربر اجازه میدهد رویدادهای مرتبط با Open Academy را مشاهده کند.
نماهای جستجو
عناصر <field> در نمای جستجو میتوانند یک @filter_domain داشته باشند که دامنهٔ تولیدشده برای جستجو روی فیلد دادهشده را بازنویسی میکند. در دامنهٔ دادهشده، self مقدار واردشده توسط کاربر را نشان میدهد. در مثال زیر، از آن برای جستجو روی هر دو فیلد name و description استفاده میشود.
نماهای جستجو همچنین میتوانند حاوی عناصر <filter> باشند، که بهعنوان کلیدهای تغییر وضعیت برای جستجوهای از پیشتعریفشده عمل میکنند. فیلترها باید یکی از ویژگیهای زیر را داشته باشند:
domainدامنهٔ دادهشده را به جستجوی فعلی اضافه میکند
contextزمینهای را به جستجوی فعلی اضافه میکند؛ از کلید
group_byبرای گروهبندی نتایج بر اساس نام فیلد دادهشده استفاده کنید
<search string="Ideas">
    <field name="name"/>
    <field name="description" string="Name and description"
           filter_domain="['|', ('name', 'ilike', self), ('description', 'ilike', self)]"/>
    <field name="inventor_id"/>
    <field name="country_id" widget="selection"/>

    <filter name="my_ideas" string="My Ideas"
            domain="[('inventor_id', '=', uid)]"/>
    <group string="Group By">
        <filter name="group_by_inventor" string="Inventor"
                context="{'group_by': 'inventor_id'}"/>
    </group>
</search>
برای استفاده از یک نمای جستجوی غیرپیشفرض در یک action، باید آن را با استفاده از فیلد search_view_id رکورد action پیوند داد.
action همچنین میتواند مقادیر پیشفرض را برای فیلدهای جستجو از طریق فیلد context خود تنظیم کند: کلیدهای context به شکل search_default_field_name field_name را با مقدار ارائهشده مقداردهی اولیه میکنند. فیلترهای جستجو باید یک @name اختیاری داشته باشند تا مقدار پیشفرض داشته باشند و بهصورت بولین رفتار کنند (آنها فقط میتوانند بهصورت پیشفرض فعال شوند).
Exercise
نماهای جستجو
یک دکمه اضافه کنید تا دورههایی که کاربر فعلی مسئول آنها است را در نمای جستجوی دوره فیلتر کند. آن را بهصورت پیشفرض انتخابشده قرار دهید.
یک دکمه برای گروهبندی دورهها بر اساس کاربر مسئول اضافه کنید.
گانت
هشدار
نمای gantt به ماژول web_gantt نیاز دارد که در نسخهٔ enterprise edition موجود است.
نمودارهای میلهای افقی که معمولاً برای نمایش برنامهریزی و پیشرفت پروژه استفاده میشوند، عنصر ریشهٔ آنها <gantt> است.
<gantt string="Ideas"
       date_start="invent_date"
       date_stop="date_finished"
       progress="progress"
       default_group_by="inventor_id" />
Exercise
نمودارهای Gantt
یک نمودار Gantt اضافه کنید که به کاربر اجازه میدهد زمانبندی جلسات مرتبط با ماژول Open Academy را مشاهده کند. جلسات باید بر اساس مدرس گروهبندی شوند.
نماهای گراف
نماهای گراف اجازهٔ نمای کلی و تحلیل تجمیعی مدلها را میدهند، عنصر ریشهٔ آنها <graph> است.
توجه
نماهای Pivot (عنصر <pivot>) یک جدول چندبعدی است، اجازهٔ انتخاب فیلترها و ابعاد را میدهد تا قبل از حرکت به نمای کلی گرافیکیتر، مجموعهٔ تجمیعی صحیح را دریافت کنید. نمای pivot همان تعریف محتوا را با نماهای graph به اشتراک میگذارد.
نماهای graph دارای ۴ حالت نمایش هستند، حالت پیشفرض با استفاده از ویژگی @type انتخاب میشود.
- Bar (پیشفرض)
نمودار میلهای، بعد اول برای تعریف گروهها روی محور افقی استفاده میشود، ابعاد دیگر میلههای تجمیعشده در هر گروه را تعریف میکنند.
بهطور پیشفرض میلهها در کنار هم قرار دارند، میتوان با استفاده از
@stacked="True"روی<graph>آنها را روی هم قرار داد- Line
نمودار خطی ۲ بعدی
- Pie
نمودار دایرهای ۲ بعدی
Graph views contain <field> with a mandatory @type attribute taking
the values:
row(default)فیلد بهطور پیشفرض باید تجمیع شود
measureفیلد باید تجمیع شود بهجای اینکه روی آن گروهبندی شود
<graph string="Total idea score by Inventor">
    <field name="inventor_id"/>
    <field name="score" type="measure"/>
</graph>
هشدار
Graph views perform aggregations on database values, they do not work with non-stored computed fields.
Exercise
نمای گراف
Add a Graph view in the Session object that displays, for each course, the number of attendees under the form of a bar chart.
کانبان
Used to organize tasks, production processes, etc… their root element is
<kanban>.
A kanban view shows a set of cards possibly grouped in columns. Each card represents a record, and each column the values of an aggregation field.
For instance, project tasks may be organized by stage (each column is a stage), or by responsible (each column is a user), and so on.
Kanban views define the structure of each card as a mix of form elements (including basic HTML) and QWeb Templates.
Exercise
نمای کانبان
Add a Kanban view that displays sessions grouped by course (columns are thus courses).
امنیت
Access control mechanisms must be configured to achieve a coherent security policy.
مکانیسمهای کنترل دسترسی مبتنی بر گروه
Groups are created as normal records on the model res.groups, and granted
menu access via menu definitions. However even without a menu, objects may
still be accessible indirectly, so actual object-level permissions (read,
write, create, unlink) must be defined for groups. They are usually inserted
via CSV files inside modules. It is also possible to restrict access to
specific fields on a view or object using the field's groups attribute.
حقوق دسترسی
Access rights are defined as records of the model ir.model.access. Each
access right is associated to a model, a group (or no group for global
access), and a set of permissions: read, write, create, unlink. Such access
rights are usually created by a CSV file named after its model:
ir.model.access.csv.
id,name,model_id/id,group_id/id,perm_read,perm_write,perm_create,perm_unlink
access_idea_idea,idea.idea,model_idea_idea,base.group_user,1,1,1,0
access_idea_vote,idea.vote,model_idea_vote,base.group_user,1,1,1,0
Exercise
افزودن کنترل دسترسی از طریق رابط Odoo
Create a new user "John Smith". Then create a group "OpenAcademy / Session Read" with read access to the Session model.
Exercise
افزودن کنترل دسترسی از طریق فایلهای داده در ماژول شما
با استفاده از فایلهای داده،
Create a group OpenAcademy / Manager with full access to all OpenAcademy models
Session و Course را برای همهٔ کاربران قابل خواندن کنید
قواعد رکورد
A record rule restricts the access rights to a subset of records of the given
model. A rule is a record of the model ir.rule, and is associated to a
model, a number of groups (many2many field), permissions to which the
restriction applies, and a domain. The domain specifies to which records the
access rights are limited.
Here is an example of a rule that prevents the deletion of leads that are not
in state cancel. Notice that the value of the field groups must follow
the same convention as the method write() of the ORM.
<record id="delete_cancelled_only" model="ir.rule">
    <field name="name">Only cancelled leads may be deleted</field>
    <field name="model_id" ref="crm.model_crm_lead"/>
    <field name="groups" eval="[(4, ref('sales_team.group_sale_manager'))]"/>
    <field name="perm_read" eval="0"/>
    <field name="perm_write" eval="0"/>
    <field name="perm_create" eval="0"/>
    <field name="perm_unlink" eval="1" />
    <field name="domain_force">[('state','=','cancel')]</field>
</record>
Exercise
قاعدهٔ رکورد
Add a record rule for the model Course and the group
"OpenAcademy / Manager", that restricts write and unlink accesses
to the responsible of a course. If a course has no responsible, all users
of the group must be able to modify it.
ویزاردها
Wizards describe interactive sessions with the user (or dialog boxes) through
dynamic forms. A wizard is simply a model that extends the class
TransientModel instead of
Model. The class
TransientModel extends Model
and reuse all its existing mechanisms, with the following particularities:
Wizard records are not meant to be persistent; they are automatically deleted from the database after a certain time. This is why they are called transient.
Wizard records may refer to regular records or wizard records through relational fields(many2one or many2many), but regular records cannot refer to wizard records through a many2one field.
We want to create a wizard that allow users to create attendees for a particular session, or for a list of sessions at once.
Exercise
ویزارد را تعریف کنید
Create a wizard model with a many2one relationship with the Session model and a many2many relationship with the Partner model.
راهاندازی ویزاردها
Wizards are simply window actions with a target
field set to the value new, which opens the view
(usually a form) in a separate dialog. The
action may be triggered via a menu item, but is more generally triggered by a
button.
An other way to launch wizards is through the menu of
a list or form view. This is done through the binding_model_id field of the
action. Setting this field will make the action appear on the views of the model
the action is "bound" to.
<record id="launch_the_wizard" model="ir.actions.act_window">
    <field name="name">Launch the Wizard</field>
    <field name="res_model">wizard.model.name</field>
    <field name="view_mode">form</field>
    <field name="target">new</field>
    <field name="binding_model_id" ref="model_context_model_ref"/>
</record>
نکته
While wizards use regular views and buttons, normally clicking any button in
a form would first save the form then close the dialog. Because this is
often undesirable in wizards, a special attribute special="cancel" is
available which immediately closes the wizard without saving the form.
Exercise
ویزارد را راهاندازی کنید
یک نمای فرم برای ویزارد تعریف کنید.
action برای راهاندازی آن را در زمینهٔ مدل Session اضافه کنید.
Define a default value for the session field in the wizard; use the context parameter
self._contextto retrieve the current session.
Exercise
ثبتنام شرکتکنندگان
Add buttons to the wizard, and implement the corresponding method for adding the attendees to the given session.
Exercise
ثبتنام شرکتکنندگان در چند جلسه
Modify the wizard model so that attendees can be registered to multiple sessions.
بینالمللیسازی
Each module can provide its own translations within the i18n directory, by having files named LANG.po where LANG is the locale code for the language, or the language and country combination when they differ (e.g. pt.po or pt_BR.po). Translations will be loaded automatically by Odoo for all enabled languages. Developers always use English when creating a module, then export the module terms using Odoo's gettext POT export feature ( without specifying a language), to create the module template POT file, and then derive the translated PO files. Many IDE's have plugins or modes for editing and merging PO/POT files.
نکته
The Portable Object files generated by Odoo are published on Odoo's Translations Platform, making it easy to translate the software.
|- idea/ # The module directory
   |- i18n/ # Translation files
      | - idea.pot # Translation Template (exported from Odoo)
      | - fr.po # French translation
      | - pt_BR.po # Brazilian Portuguese translation
      | (...)
نکته
By default Odoo's POT export only extracts labels inside XML files or
inside field definitions in Python code, but any Python string can be
translated this way by surrounding it with the function odoo._()
(e.g. _("Label"))
Exercise
ترجمهٔ یک ماژول
Choose a second language for your Odoo installation. Translate your module using the facilities provided by Odoo.
گزارشگیری
گزارشهای چاپشده
Odoo uses a report engine based on QWeb Templates, Twitter Bootstrap and Wkhtmltopdf.
یک گزارش ترکیبی از دو عنصر است:
an
ir.actions.reportwhich configures various basic parameters for the report (default type, whether the report should be saved to the database after generation,…)<record id="account_invoices" model="ir.actions.report"> <field name="name">Invoices</field> <field name="model">account.invoice</field> <field name="report_type">qweb-pdf</field> <field name="report_name">account.report_invoice</field> <field name="report_file">account.report_invoice</field> <field name="attachment_use" eval="True"/> <field name="attachment">(object.state in ('open','paid')) and ('INV'+(object.number or '').replace('/','')+'.pdf')</field> <field name="binding_model_id" ref="model_account_invoice"/> <field name="binding_type">report</field> </record>
نکته
Because it largerly a standard action, as with ویزاردها it is generally useful to add the report as a contextual item on the list and / or form views of the model being reported on via the
binding_model_idfield.Here we are also using
binding_typein order for the report to be in the report contextual menu rather than the action one. There is no technical difference but putting elements in the right place helps users.A standard QWeb view for the actual report:
<t t-call="web.html_container">
    <t t-foreach="docs" t-as="o">
        <t t-call="web.external_layout">
            <div class="page">
                <h2>Report title</h2>
            </div>
        </t>
    </t>
</t>
the standard rendering context provides a number of elements, the most important being:
docsرکوردهایی که گزارش برای آنها چاپ میشود
userکاربری که گزارش را چاپ میکند
Because reports are standard web pages, they are available through a URL and
output parameters can be manipulated through this URL, for instance the HTML
version of the Invoice report is available through
http://localhost:8069/report/html/account.report_invoice/1 (if account is
installed) and the PDF version through
http://localhost:8069/report/pdf/account.report_invoice/1.
خطر
If it appears that your PDF report is missing the styles (i.e. the text appears but the style/layout is different from the html version), probably your wkhtmltopdf process cannot reach your web server to download them.
If you check your server logs and see that the CSS styles are not being downloaded when generating a PDF report, most surely this is the problem.
The wkhtmltopdf process will use the web.base.url system parameter as
the root path to all linked files, but this parameter is automatically
updated each time the Administrator is logged in. If your server resides
behind some kind of proxy, that could not be reachable. You can fix this by
adding one of these system parameters:
report.url, pointing to an URL reachable from your server (probablyhttp://localhost:8069or something similar). It will be used for this particular purpose only.web.base.url.freeze, when set toTrue, will stop the automatic updates toweb.base.url.
Exercise
ایجاد یک گزارش برای مدل Session
For each session, it should display session's name, its start and end, and list the session's attendees.
داشبوردها
Exercise
تعریف یک داشبورد
Define a dashboard containing the graph view you created, the sessions calendar view and a list view of the courses (switchable to a form view). This dashboard should be available through a menuitem in the menu, and automatically displayed in the web client when the OpenAcademy main menu is selected.
- 1
it is possible to disable the automatic creation of some fields
- 2
writing raw SQL queries is possible, but requires care as it bypasses all Odoo authentication and security mechanisms.