
استرالیا
مهم
Odoo در حال حاضر در فرآیند تطابق با STP Phase 2 و SuperStream قرار دارد. بهمحض اینکه شرکتها بتوانند از Odoo بهعنوان یک پلتفرم یکپارچه برای حقوق و دستمزد استفاده کنند، اعلامیهای منتشر خواهد شد.
راهاندازی کارمندان
تنظیمات کارمند
با رفتن به یک کارمند ایجاد کنید. به تب تنظیمات بروید و بخش Australian Payroll را پیکربندی کنید، برای مثال بررسی کنید که آیا غیر مقیم هستند، آیا از Tax-free Threshold بهرهمند میشوند، TFN Status آنها، نوع کارمند و غیره.
اطلاعات خصوصی کارمند
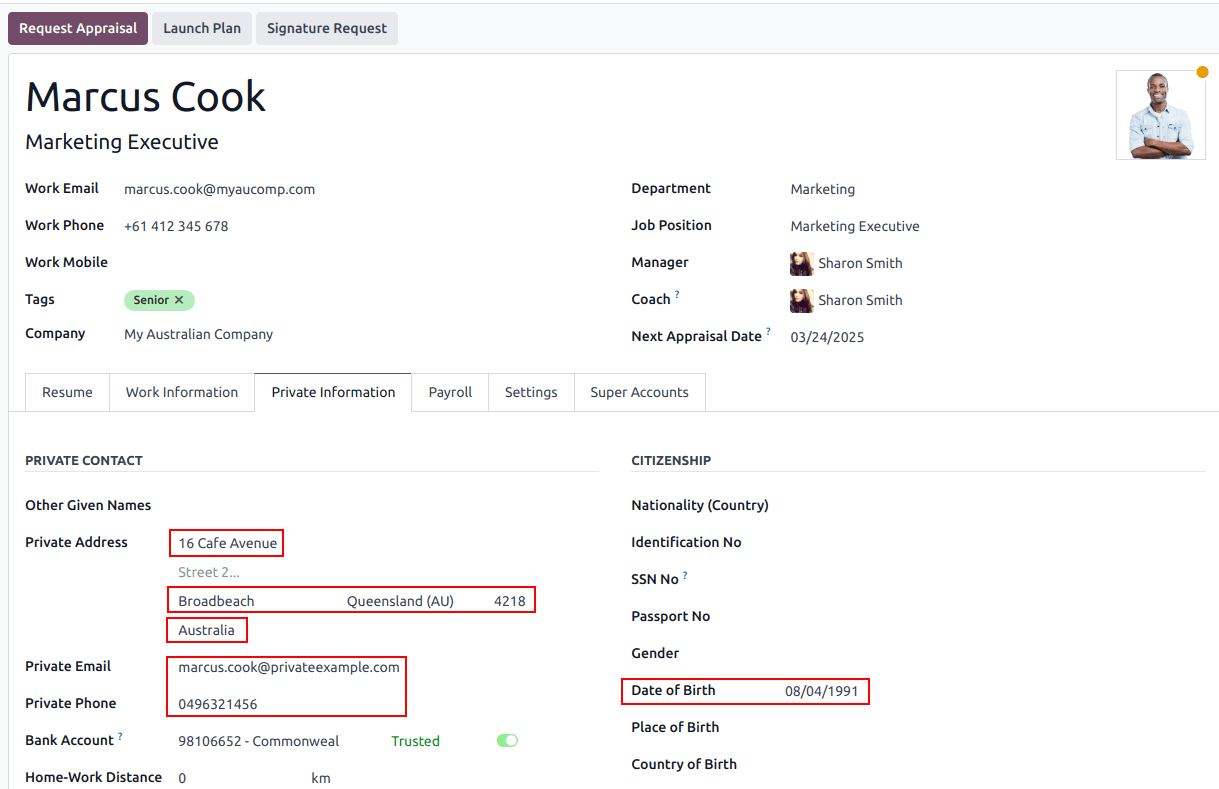
علاوه بر این، برخی اطلاعات شخصی کارمند برای انطباق حقوق و دستمزد با Single Touch Payroll و برای پردازش پرداختهای بازنشستگی (superannuation) موردنیاز است. تب اطلاعات خصوصی کارمند را باز کنید و فیلدهای زیر را پر کنید:
آدرس خصوصی
ایمیل شخصی
تلفن شخصی
تاریخ تولد
توجه
Odoo در مراحل مختلف فرآیند به شما یادآوری میکند که دادههای موردنیاز را تکمیل کنید.
حسابها و صندوقهای بازنشستگی
میتوانید جزئیات بازنشستگی کارمندان جدید را زیر تب Super Accounts کارمند اضافه کنید. روی افزودن یک سطر کلیک کنید و مطمئن شوید که تاریخ Member Since، Member Number و Super Fund را وارد میکنید.
نکته
اگر سهمهای یک کارمند باید همزمان به چند صندوق ارسال شوند، از فیلد Proportion استفاده کنید.
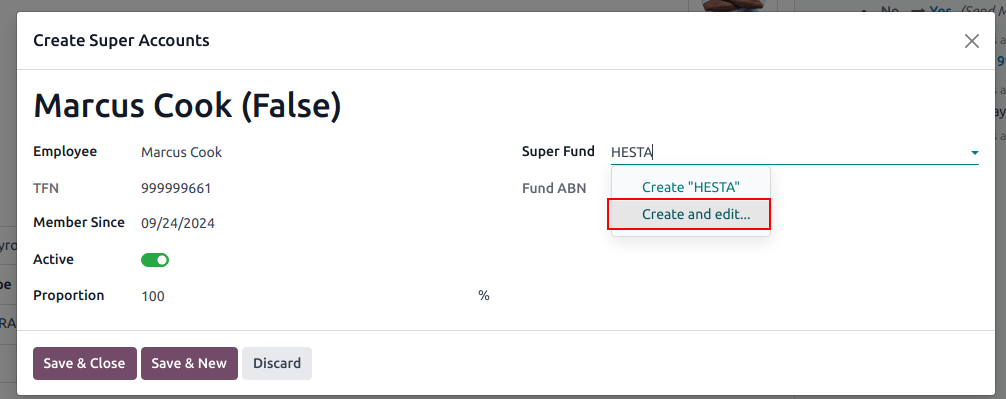
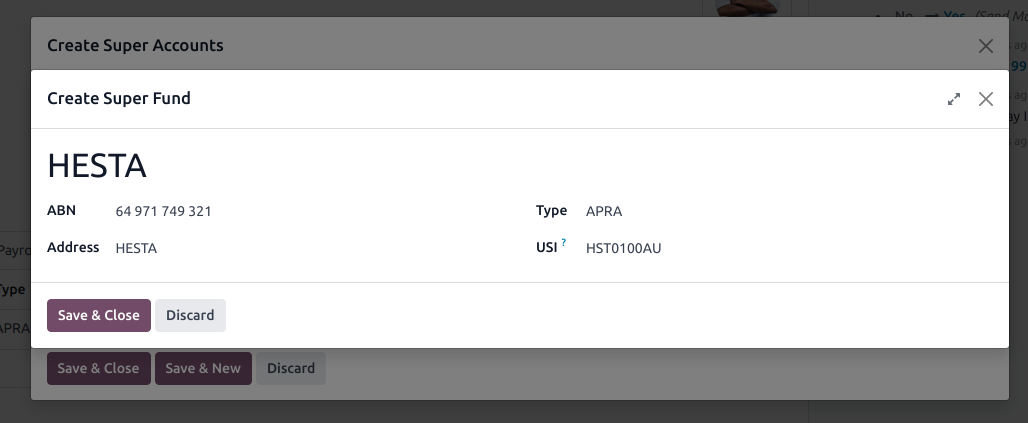
برای ایجاد یک Super Fund جدید، شروع به تایپ نام آن کنید و روی Create and edit... کلیک کنید. موارد زیر آن را پر کنید:
نشانی
ABN
نوع (APRA / SMSF)
شناسهٔ یکتا (USI برای APRA، ESA برای SMSF)
(تنها برای SMFS) حساب بانکی
نکته
همهٔ حسابها و صندوقهای بازنشستگی را با رفتن به یا مدیریت کنید.
مهم
Odoo در حال حاضر در فرآیند تطابق با SuperStream قرار دارد.
قراردادها
پس از ایجاد کارمند، قرارداد استخدامی او را با کلیک روی دکمهٔ هوشمند قراردادها یا با رفتن به ایجاد کنید.
توجه
در هر زمان فقط یک قرارداد میتواند برای هر کارمند فعال باشد. با این حال، میتوان به یک کارمند در طول دوره اشتغالش قراردادهای متوالی اختصاص داد.
ایجاد قرارداد استخدامی: گامهای پیشنهادی
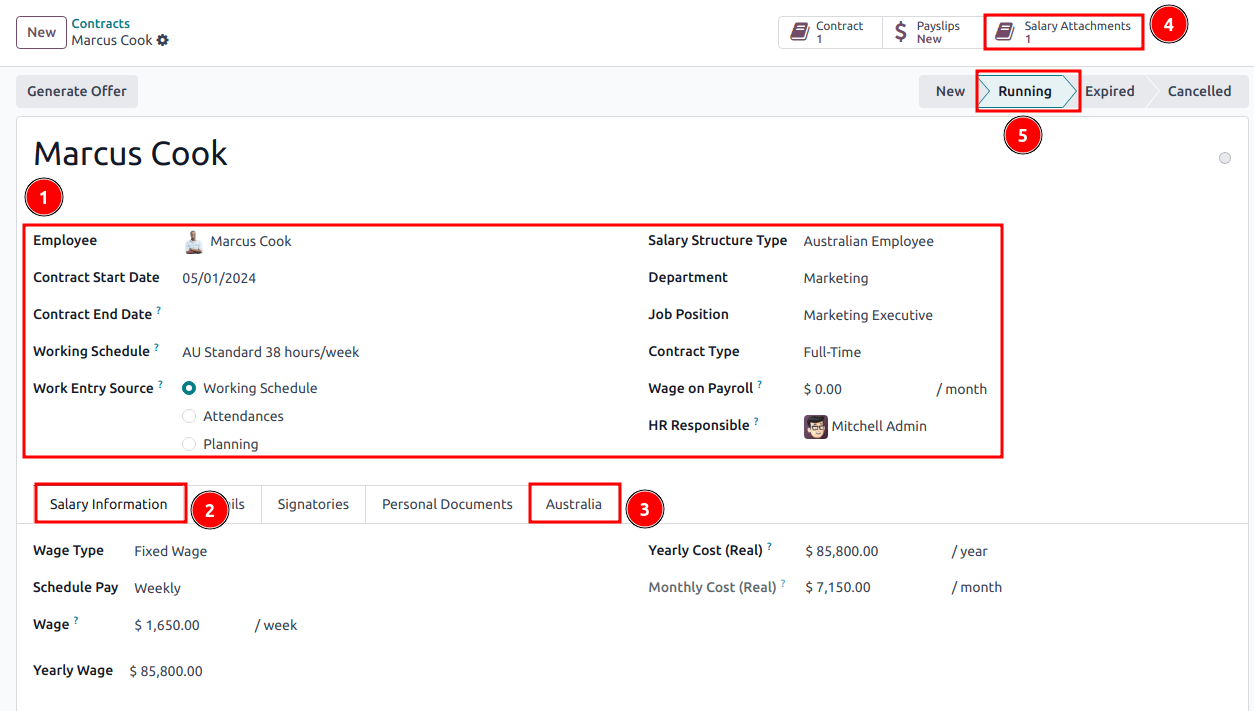
۱. اطلاعات پایه قراردادی
تاریخ شروع قرارداد و برنامهی زمانی کار (ثابت یا انعطافپذیر برای کارگران موقت) را انتخاب کنید.
نوع ساختار حقوقودستمزد را روی Australian Employee نگه دارید. این ساختار همهٔ جدولهای مالیاتی ATO را پوشش میدهد.
(در صورت استفاده از اپلیکیشن حضور و غیاب یا برنامهریزی) منبع ورودی کار را انتخاب کنید تا نحوهٔ محاسبهٔ ساعات و روزهای کاری در فیش حقوقی کارمند مشخص شود.
برنامهی زمانی کار: ورودیهای کاری بهصورت خودکار بر اساس برنامهٔ کاری کارمند و از تاریخ شروع قرارداد ایجاد میشوند.
Example
یک کارمند هفتهای ۳۸ ساعت کار میکند، قراردادش از ۰۱/۰۱ آغاز میشود، تاریخ امروز ۱۶/۰۱ است و کاربر یک دور پرداخت از ۱۴/۰۱ تا ۲۰/۰۱ تولید میکند. در صورت عدم استفاده از مرخصی بدون حقوق، ساعات کاری روی فیش حقوقی بهصورت خودکار ۳۸ ساعت (۵ * ۷.۳۶ ساعت) محاسبه خواهد شد.
حضور و غیاب: برنامهٔ کاری نادیده گرفته میشود و ورودیهای کاری فقط پس از ثبت ورود و خروج در اپلیکیشن حضور و غیاب ایجاد میشوند. توجه کنید که حضور و غیاب را میتوان وارد کرد.
برنامه ریزی: برنامهٔ کاری نادیده گرفته میشود و ورودیهای کاری از شیفتهای برنامهریزیشده در اپلیکیشن برنامهریزی تولید میشوند.
مهم
تایمشیتها در Odoo تأثیری بر ورودیهای کاری ندارند. اگر نیاز به وارد کردن تایمشیتها در Odoo دارید، آنها را بهجای آن از طریق وارد کنید.
۲. تب اطلاعات حقوق
نوع دستمزد: برای کارمندان تماموقت و نیمهوقت دستمزد ثابت ماهانه و برای کارگران موقت دستمزد ساعتی را انتخاب کنید. مورد دوم به شما اجازه میدهد درصدی برای Casual Loading اضافه کنید.
توجه
برای کارگران ساعتی، فیلد دستمزد ساعتی نباید شامل بار موقتی (casual loading) باشد.
پرداخت برنامهریزی شده: در استرالیا، فقط فرکانسهای دور پرداخت زیر پذیرفته میشوند: روزانه، هفتگی، دو هفته (یا دوهفتهای)، ماهانه و فصلی.
دستمزد /period: بر اساس فرکانس پرداخت، دستمزدی به قرارداد اختصاص دهید. روی فیشهای حقوقی، نرخهای سالانه و ساعتی متناظر بهصورت خودکار محاسبه خواهند شد.
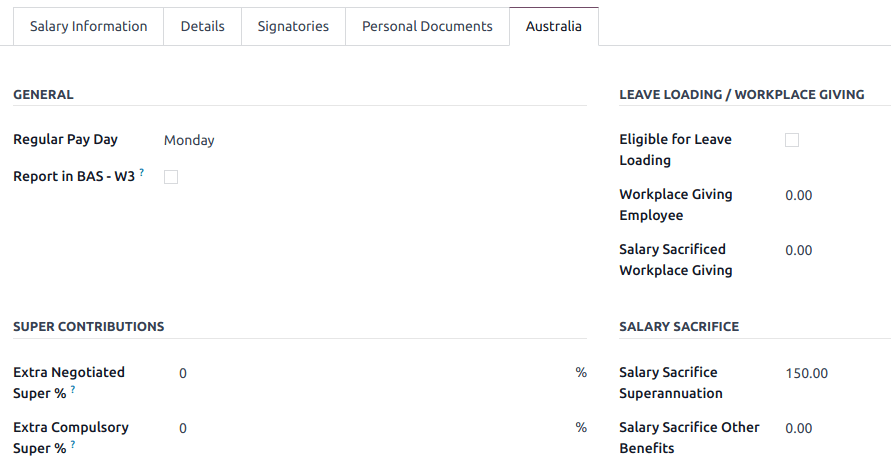
۳. تب استرالیا
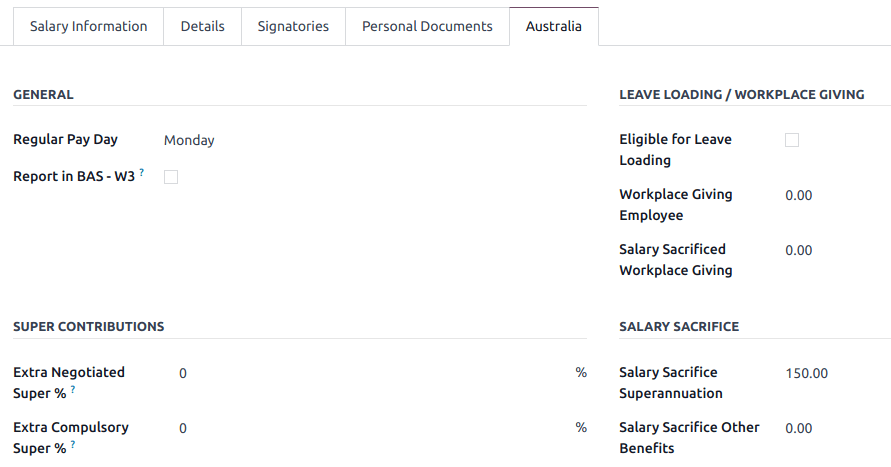
عمومی
در صورت ارتباط، Regular Pay Day را اضافه کنید.
اگر میخواهید مبالغ کسر PAYG را بهجای بخش W2، در بخش W3 از BAS اضافه کنید، Report in BAS - W3 را فعال کنید (برای اطلاعات بیشتر به صفحهٔ وب ATO دربارهٔ کسر PAYG مراجعه کنید).
Leave loading / workplace giving
تعریف کنید که آیا کارمندان شما Eligible for Leave Loading هستند یا خیر.
مبلغ Workplace Giving Employee را در ازای کسورات تعیین کنید.
مبلغ Salary Sacrificed Workplace Giving را تعیین کنید (مثلاً دریافت یک مزایا بهجای یک کسر).
Super contributions
Extra Negotiated Super % را علاوه بر super guarantee اضافه کنید.
Extra Compulsory Super % را مطابق با توافقات صنعتی یا تعهدات جوایز اضافه کنید.
Salary sacrifice
Salary Sacrifice Superannuation به کارمندان اجازه میدهد بخشی از حقوق خود را به نفع کمکهای بازنشستگی قابل گزارش کارفرما (RESC) فدا کنند.
Salary Sacrifice Other Benefits به آنها اجازه میدهد بخشی از حقوق خود را برای شکل دیگری از مزایا فدا کنند (برای اطلاعات بیشتر به صفحهٔ وب ATO دربارهٔ فدا کردن حقوق برای کارمندان مراجعه کنید).
توجه
از Odoo 18، فدا کردن حقوق برای سایر مزایا در حال حاضر بر گزارشدهی مالیات مزایای جانبی (FBT) تأثیری ندارد.
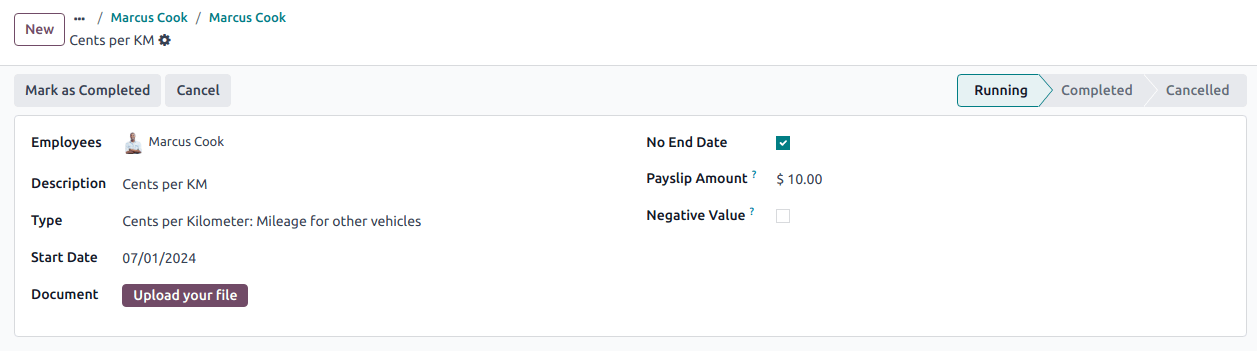
۴. ضمائم حقوق
اگر کارمند قرار است در هر دور پرداخت، پرداختهای تکراری اضافی دریافت کند، چه بهصورت نامحدود و چه برای تعداد مشخصی از دورهها، روی دکمهٔ هوشمند پیوست های حقوق و دستمزد در قرارداد کلیک کنید. یک نوع و یک توضیحات انتخاب کنید.
توجه
حدود ۳۲ نوع ضمیمهٔ حقوق تکراری برای استرالیا وجود دارد. اینها بیشتر به کمکهزینهها و حمایت از فرزند مربوط میشوند. برای اطلاعات بیشتر دربارهٔ اینکه آیا کمکهزینههای صنعت شما قابل پوشش هستند، با ما تماس بگیرید.
۵. اجرای قرارداد
پس از تکمیل همهٔ اطلاعات، مرحلهٔ قرارداد را از جدید به در حال اجرا تغییر دهید.
آمادهسازی اجراهای پرداخت
عادی
اجراهای پرداخت با رفتن به ایجاد میشوند. پس از کلیک روی جدید، یک نام دستهای وارد کنید، یک دوره انتخاب کنید و روی ایجاد فیشهای حقوق کلیک کنید.
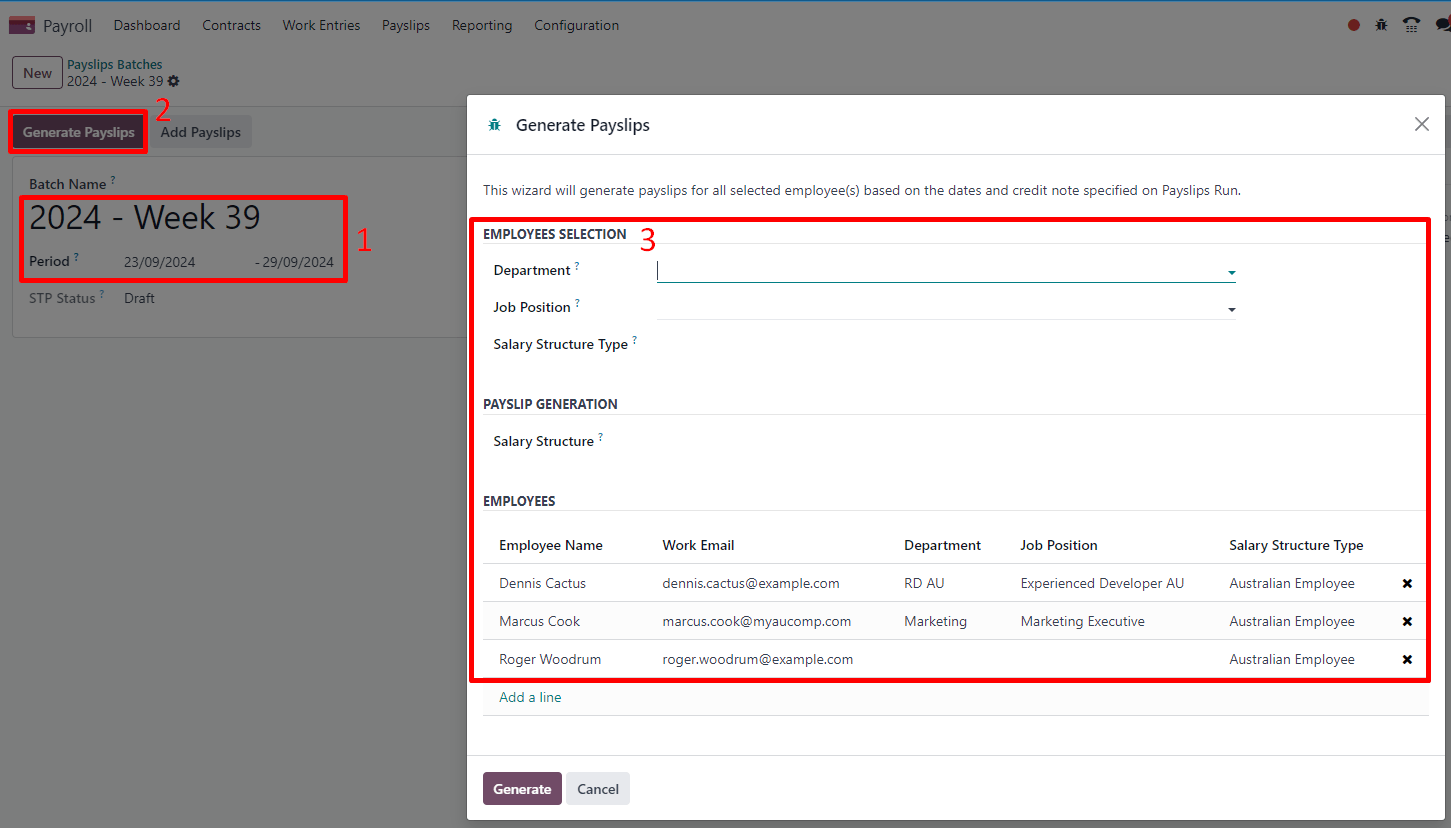
کارمندان یک اجرای پرداخت را میتوان بر اساس دپارتمان و موقعیت شغلی فیلتر کرد. هیچ محدودیتی برای تعداد فیشهای حقوقیای که میتوان در یک دسته ایجاد کرد وجود ندارد. پس از کلیک روی ایجاد، برای هر کارمند یک فیش حقوقی در مرحلهٔ در انتظار ایجاد میشود، که در آن میتوان آنها را پیش از اعتبارسنجی بررسی و اصلاح کرد.

در نمای فرم فیش حقوقی، دو نوع ورودی وجود دارد:
روزهای کارکرد بر اساس منبع ورودی کاری تنظیمشده روی قرارداد کارمند محاسبه میشوند. ورودیهای کاری را میتوان پیکربندی کرد بر اساس انواع مختلف: حضور و غیاب، اضافهکاری، نرخ شنبه، نرخ یکشنبه، نرخ تعطیلات رسمی و غیره.
سایر ورودیها پرداختها یا مبالغ منفردِ انواع مختلف (کمکهزینهها، مبالغ یکجا، کسورات، پرداختهای خاتمهٔ کار، مرخصیها و غیره) هستند که ارتباط کمی با ساعات کارکرد در طول دورهٔ پرداخت جاری دارند. ضمائم حقوق پیکربندیشدهٔ پیشین صرفاً ورودیهای دیگرِ تکراری متصل به یک قرارداد هستند.
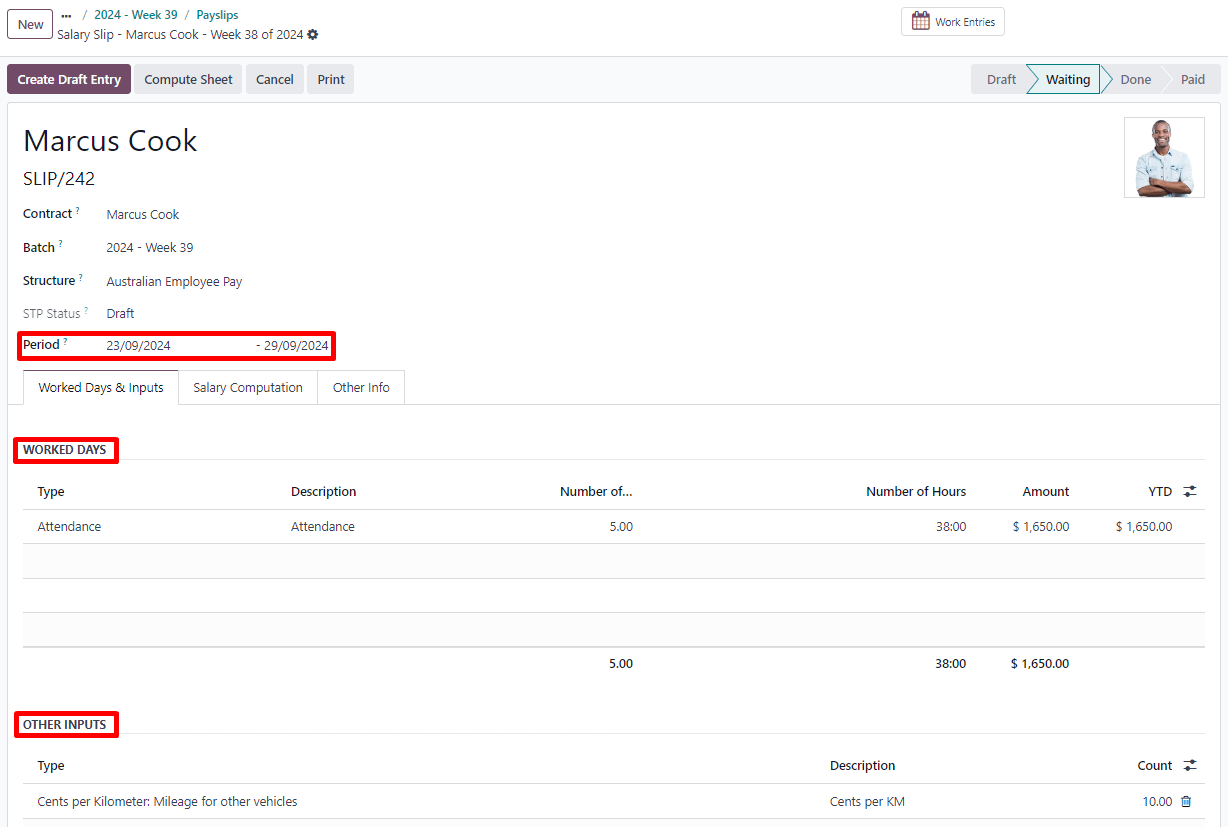
زیر تب محاسبه حقوقودستمزد، Odoo قواعد فیش حقوقی را بهطور خودکار بر اساس کارمندان، قراردادها، ساعات کارکرد، سایر انواع ورودی و ضمائم حقوق محاسبه میکند.
ساختار حقوق Australian Employee دارای ۳۵ قاعدهٔ فیش حقوقی است که بهطور خودکار محاسبه و بهصورت پویا بر اساس ورودیهای فیش حقوقی نمایش داده میشوند.
Example
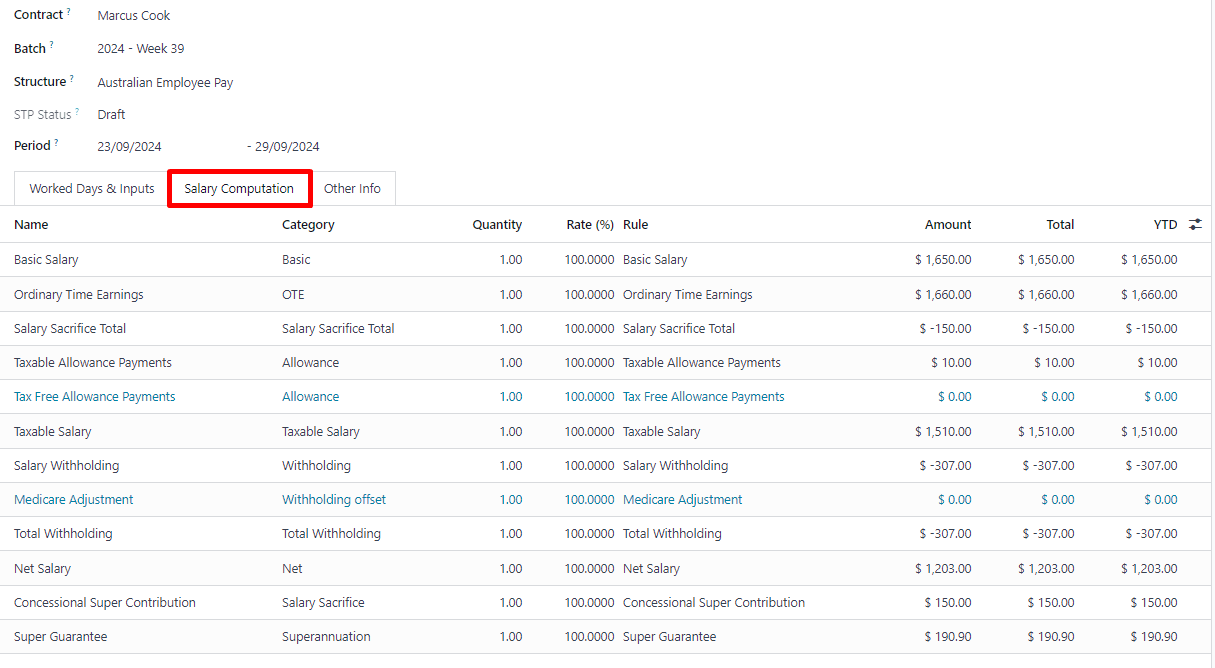
قواعد زیر برای آن دورهٔ پرداخت در مثال بالا اعمال میشوند:
Basic Salary: حقوق ناخالص پیش از فدا کردن
Ordinary Time Earnings: مبلغی که درصد ضمانت بازنشستگی باید روی آن اعمال شود
Salary Sacrifice Total: شامل ۱۵۰ دلار فداشده به بازنشستگی
Taxable Allowance Payments: شامل کمکهزینهٔ ۱۰ دلاری (سنت به ازای هر کیلومتر در این مورد)
Taxable Salary: مبلغ حقوق ناخالص منهای مبالغ غیرمشمول مالیات
Salary Withholding و Total Withholding: مبالغی که باید از حقوق مشمول مالیات کسر شوند
خالص حقوق و دستمزد: دستمزد خالص کارمند
Concessional Super Contribution: در این سناریو، مبلغ فداشده به بازنشستگی، که علاوه بر ضمانت بازنشستگی به صندوق بازنشستگی کارمند قابل پرداخت است
Super Guarantee: از اول ژوئیهٔ ۲۰۲۴، بهصورت ۱۱٫۵ درصد از مبلغ درآمد زمان عادی محاسبه میشود
توجه
از Odoo 18، جدیدترین نرخهای جدول مالیاتی (۲۰۲۴-۲۰۲۵) برای همهٔ قواعد و محاسبات حقوق بهروزرسانی شدهاند.
خارج از چرخه
در استرالیا، فیشهای حقوقیای که بدون یک دسته ایجاد میشوند، اجراهای خارج از چرخه در نظر گرفته میشوند. آنها را با رفتن به ایجاد کنید. همان قواعد فیش حقوقی اعمال میشوند، اما روشی که این فیشهای حقوقی در چارچوب Single Touch Payroll (STP) به ATO ارسال میشوند کمی متفاوت است.
مهم
از Odoo 18، افزودن یک فیش حقوقی خارج از چرخه به یک دستهٔ موجود توصیه نمیشود.
نهاییسازی اجراهای پرداخت
اعتبارسنجی فیشهای حقوقی
پس از اینکه همهٔ دادههای فیش حقوقی درست تشخیص داده شدند، روی ایجاد سند پیشنویس روی دستهٔ فیش حقوقی کلیک کنید. این کار را میتوان بهدلایل کنترلی فیشبهفیش نیز انجام داد.
این چند تأثیر دارد:
علامتگذاری دسته و فیشهای حقوقی آن بهعنوان انجام شده.
ایجاد یک سند حسابداری پیشنویس به ازای هر فیش حقوقی یا یک سند برای کل دسته، بسته به تنظیمات حقوق و دستمزد شما. در این مرحله، حسابداران میتوانند اسناد را ثبت کنند تا روی ترازنامه، گزارش سود و زیان و گزارش BAS اثر بگذارند.
آمادهسازی ارسال STP (یا دادههای حقوق و دستمزدی که باید بهعنوان بخشی از انطباق STP به ATO ثبت شوند). این کار باید توسط کاربر STP Responsible، که زیر تعریف شده است، انجام شود.
آمادهسازی خطوط کمک بازنشستگی بهعنوان بخشی از انطباق SuperStream. این کار باید توسط کاربر HR Super Send که زیر انتخاب شده است انجام شود.
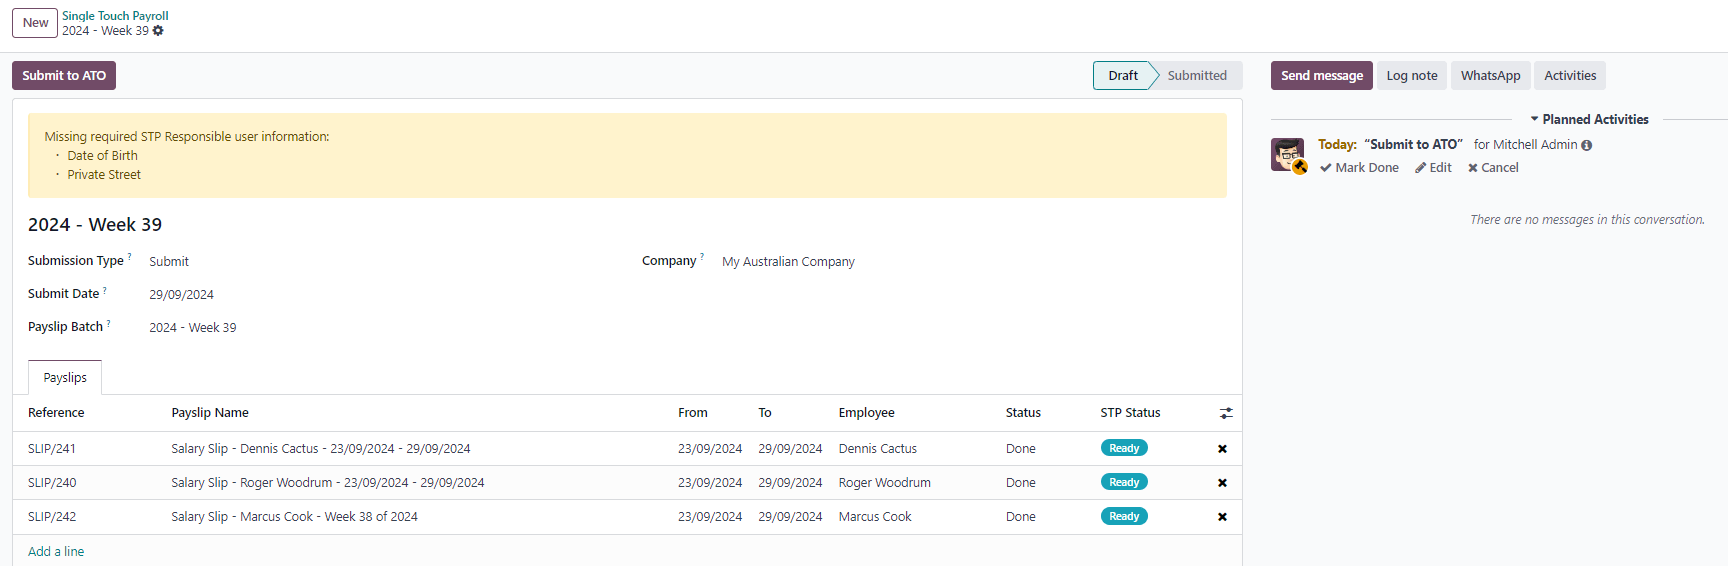
ارسال دادههای حقوق و دستمزد به ATO
مهم
Odoo در حال حاضر در فرآیند تطابق با STP Phase 2 قرار دارد و این گام توصیفشده در بالا هنوز دادهای به ATO ارسال نمیکند.
مطابق با الزامات ATO، ارسال STP برای یک اجرای پرداخت باید در روز پرداخت یا پیش از آن انجام شود. به این دلیل، ابتدا پیش از ادامهٔ پرداخت، دادههای STP خود را به ATO ارسال کنید. برای این کار، روی Submit to ATO روی دستهٔ فیش حقوقی کلیک کنید.
روی رکورد STP برای این اجرای پرداخت، چند اطلاعات مفید نمایش داده میشود:
یک پیام هشدار اگر اطلاعات مهمی گم شده باشد،
یک فعالیت تولیدشدهٔ خودکار برای کاربر مسئول STP، و
خلاصهای از فیشهای حقوقی موجود در این اجرای پرداخت، که از این نما قابل ممیزی است.
پس از اینکه رکورد STP آمادهٔ ارسال شد، روی Submit to ATO کلیک کنید، سپس شرایط و ضوابط مرتبط را بخوانید و بپذیرید.
پرداخت به کارمندان
پس از تکمیل ارسال به ATO، میتوانید به پرداخت به کارمندان خود ادامه دهید. برای تسهیل فرآیند تطبیق پرداخت، به یاد داشته باشید که اسناد حسابداری مرتبط با فیش حقوقی را پیش از اعتبارسنجی یک پرداخت ثبت کنید.
اگرچه ممکن است تصمیم بگیرید بهصورت جداگانه به کارمندان خود پرداخت کنید، توصیه میکنیم یک پرداخت دستهای از دستهٔ فیش حقوقی خود ایجاد کنید. برای این کار، روی پرداخت روی دستهٔ فیش حقوقی کلیک کنید و ABA Credit Transfer را بهعنوان روش پرداخت انتخاب کنید.
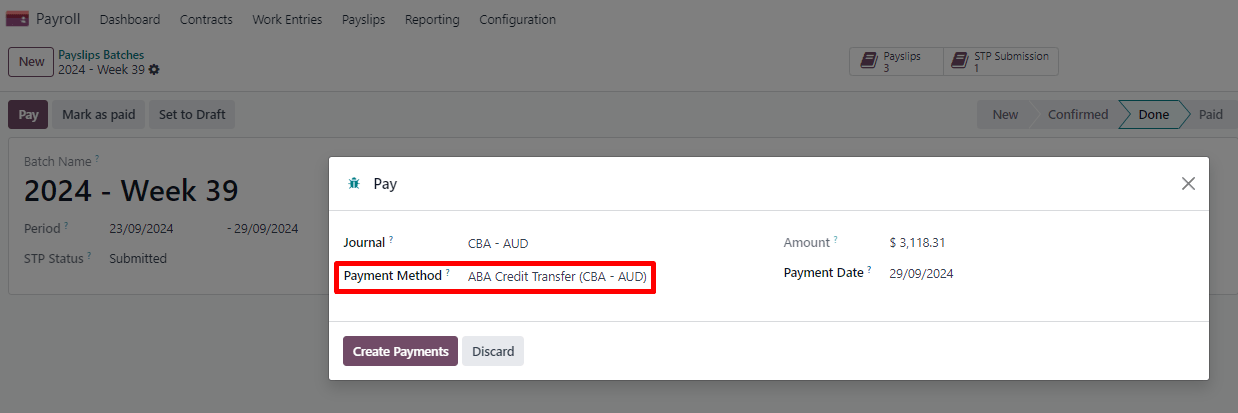
این دو تأثیر دارد:
علامتگذاری دسته و فیشهای حقوقی آن بهعنوان پرداخت شد.
ایجاد یک Payment Batch متصل به دستهٔ فیش حقوقی.
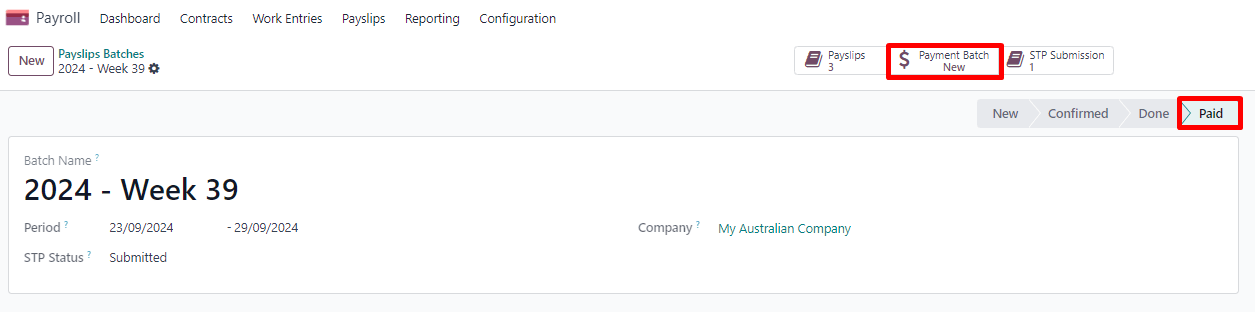
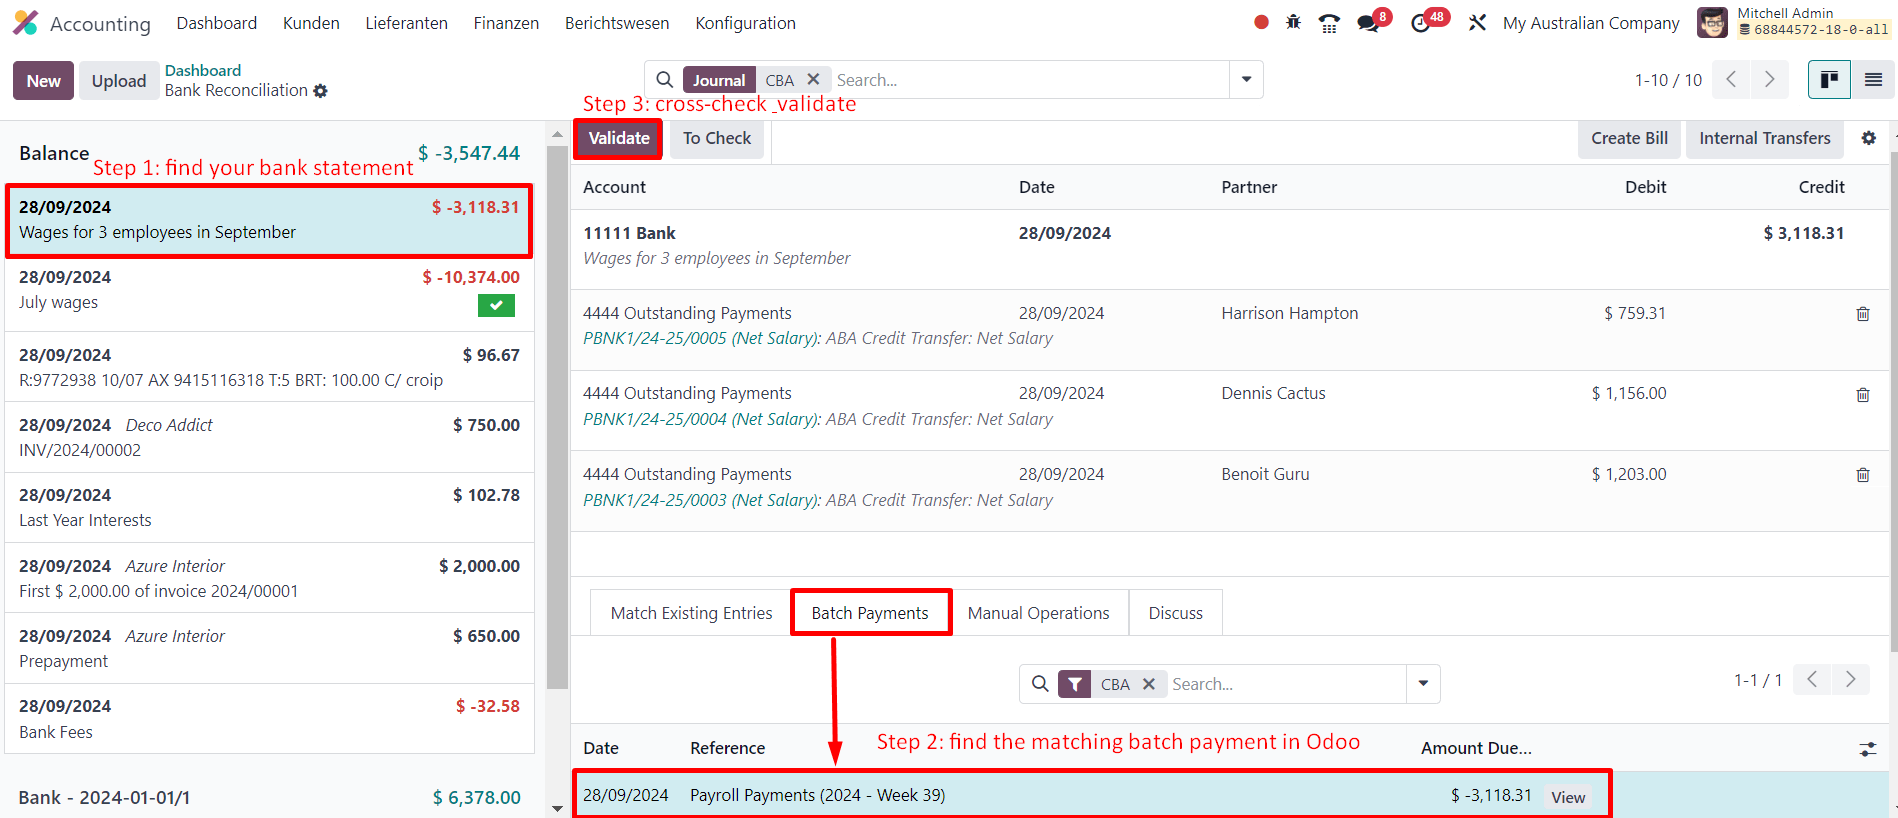
هنگام دریافت صورتحساب بانکی در Odoo، اکنون میتوانید خط صورتحساب را با یک کلیک با پرداخت دستهای تطبیق دهید. پرداخت در برابر دستهٔ فیش حقوقی و همهٔ فیشهای حقوقی منفرد تطبیق داده میشود.
تأثیر بر حسابداری
بسته به پیکربندی کارمند و قرارداد، سند حسابداری متصل به یک فیش حقوقی کموبیش جامع خواهد بود.
Example
برای مثال، اینجا سند حسابداری تولیدشده توسط کارمند Marcus Cook که در بالا پیکربندی شده است آمده است.
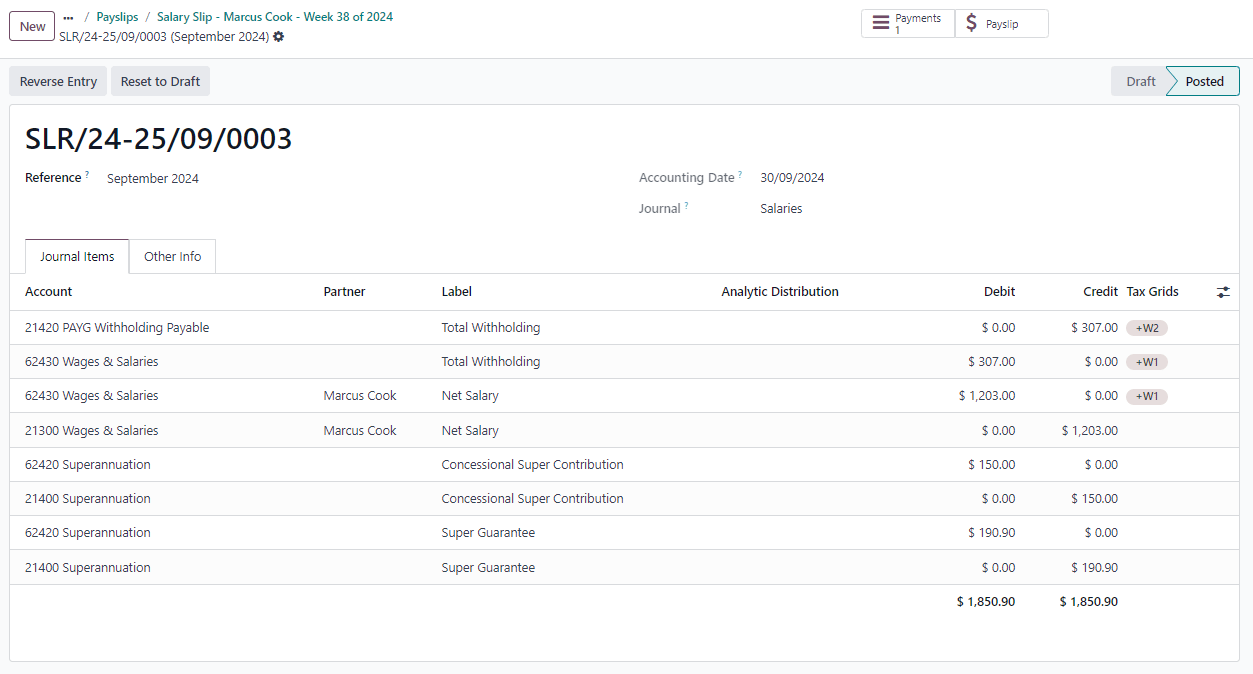
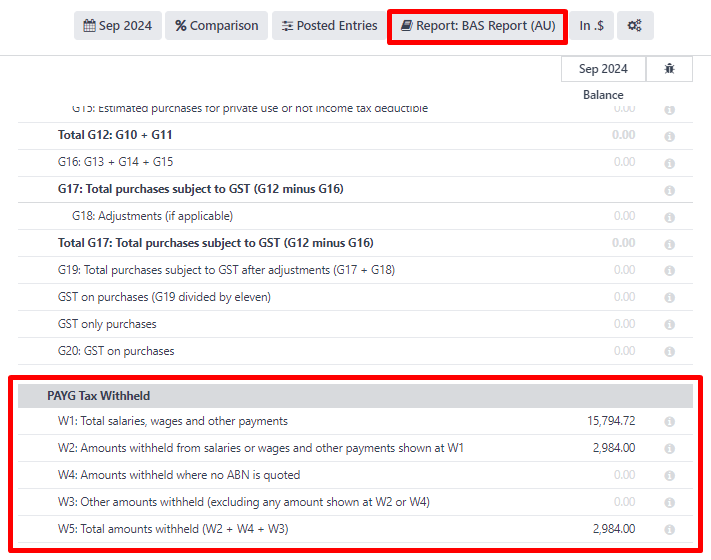
پس از ثبت، حسابهای از پیش تعریفشده روی ترازنامهٔ شرکت (PAYGW، دستمزدها و بدهیهای بازنشستگی) و گزارش سود و زیان (هزینههای دستمزد و بازنشستگی) اثر میگذارند. علاوه بر این، دستمزد ناخالص کارمند و کسر PAYG، گزارش BAS را برای دورهٔ مربوط بهروزرسانی میکنند (به جدول مالیاتی: W1 و W2 مراجعه کنید). حسابها را میتوان با دفتر حسابهای شرکت تنظیم کرد.
سایر جریانهای حقوق و دستمزد
پرداخت کمکهای بازنشستگی
مهم
Odoo با یک اتاق پایاپای شراکت دارد تا هم پرداختهای بازنشستگی و هم دادهها را با یک کلیک، از طریق برداشت مستقیم به صندوقهای درست پردازش کند. Odoo در حال حاضر در فرآیند تطابق با SuperStream قرار دارد و بهمحض اینکه بتوان کمکهای بازنشستگی را از طریق راهکار حقوق و دستمزد Odoo پردازش کرد، اعلامیهای منتشر خواهد شد.
یک بار در هر سهماهه (یا با تناوب بیشتر، در آمادهسازی برای Payday Super)، باید پرداختهای بازنشستگی را به صندوقهای بازنشستگی کارمندان خود پردازش کنید. برای این کار، به بروید.
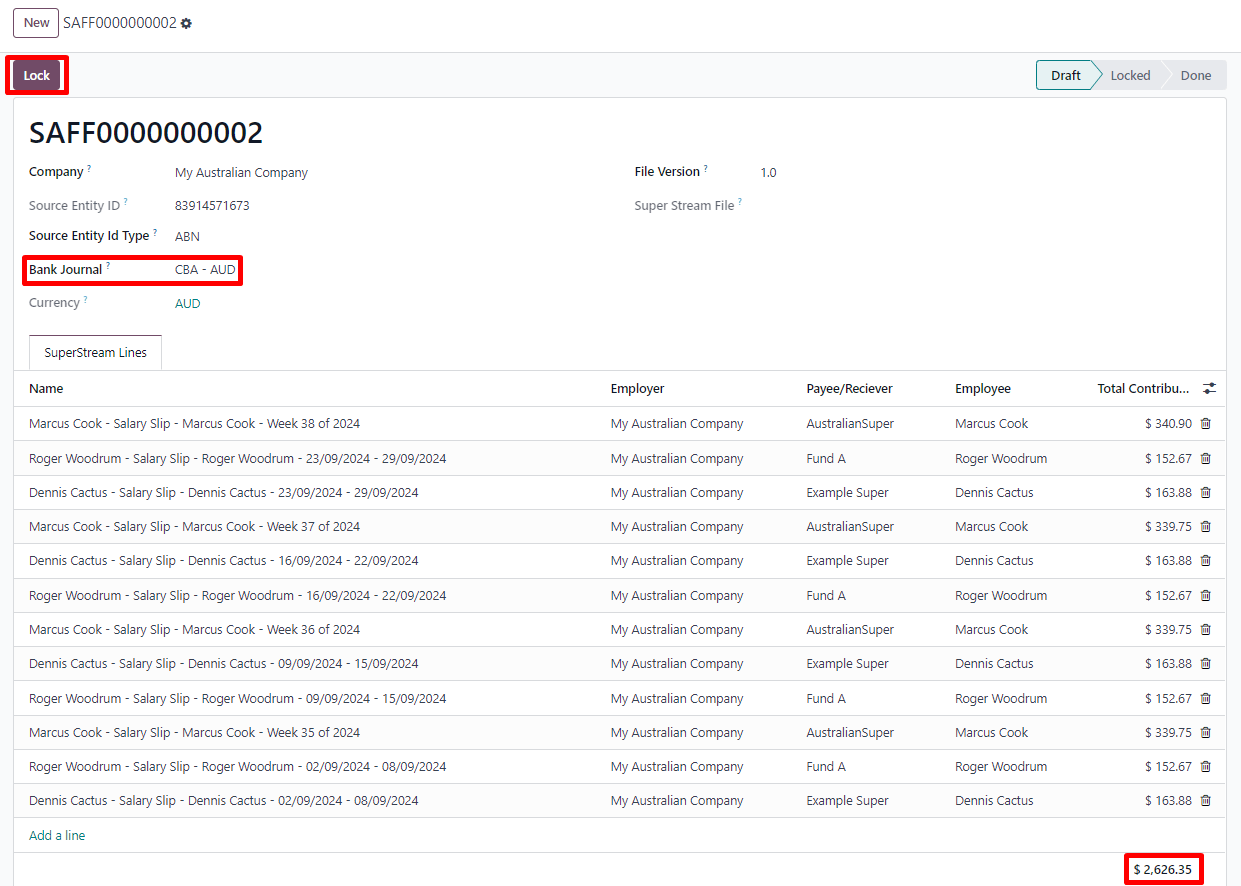
هنگامی که آمادهٔ پرداخت هستید، دفترروزنامه بانک`ای را که برای پرداخت بازنشستگی از آن استفاده میشود اضافه کنید، سپس روی :guilabel:`قفل کلیک کنید تا از افزوده شدن کمکهای فیشهای حقوقی بعدی به آن فایل جلوگیری شود. در عوض، یک فایل بازنشستگی جدید ایجاد خواهد شد.
پس از پردازش پرداخت، میتوان آن را به فایل بازنشستگی ردیابی کرد و با یک صورتحساب بانکی تطبیق داد.
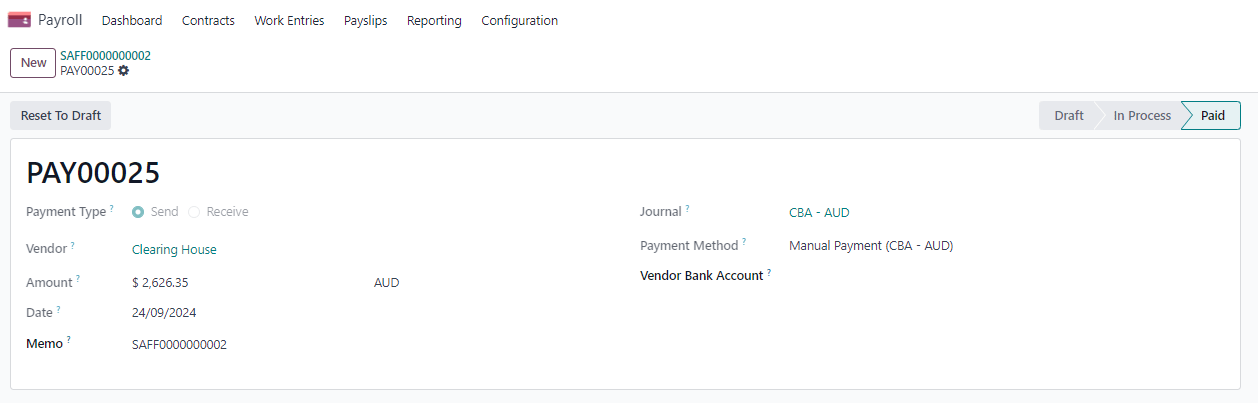
خاتمهٔ کار کارمندان
کارمندان را میتوان با رفتن به خاتمه داد.
فیلدهای زیر باید تکمیل شوند:
تاریخ پایان قرارداد: پس از اعتبارسنجی خاتمهٔ کار، این تاریخ بهطور خودکار به قرارداد افزوده میشود و هنگامی که تاریخ فرا برسد، قرارداد را بهعنوان منقضی شده علامتگذاری میکند.
Cessation Type Code: یک فیلد اجباری برای گزارشدهی STP به ATO.
Termination Type: نوع تعدیل نیرو (واقعی یا غیرواقعی) بر محاسبهٔ کسر مرخصی سالانهٔ استفادهنشده و مرخصی خدمت بلندمدت اثر میگذارد.
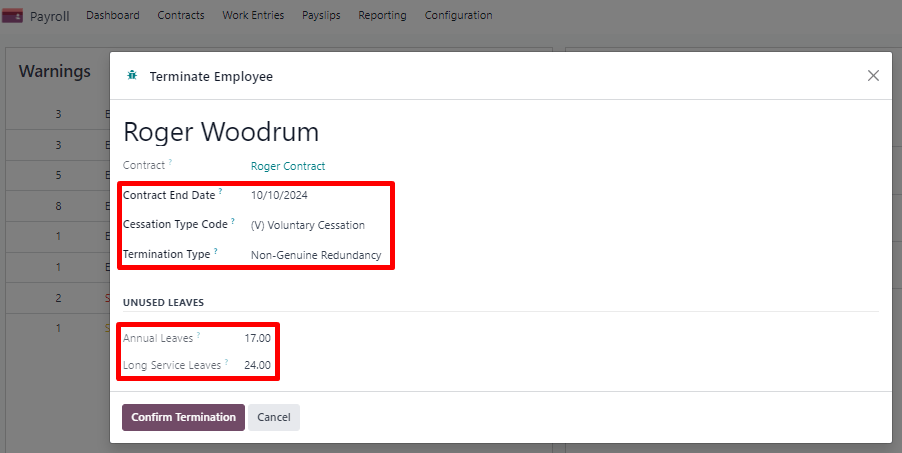
ماندههای مرخصی سالانهٔ استفادهنشده و مرخصی خدمت بلندمدت برای مرجع نمایش داده میشوند.
تأیید خاتمهٔ کار یک فیش حقوقی خارج از چرخه با برچسب final pay ایجاد میکند. این فیش روزهای کارکرد تا تاریخ پایان قرارداد را، علاوه بر استحقاقهای مرخصی سالانه و مرخصی خدمت بلندمدت استفادهنشدهٔ کارمند، محاسبه میکند.
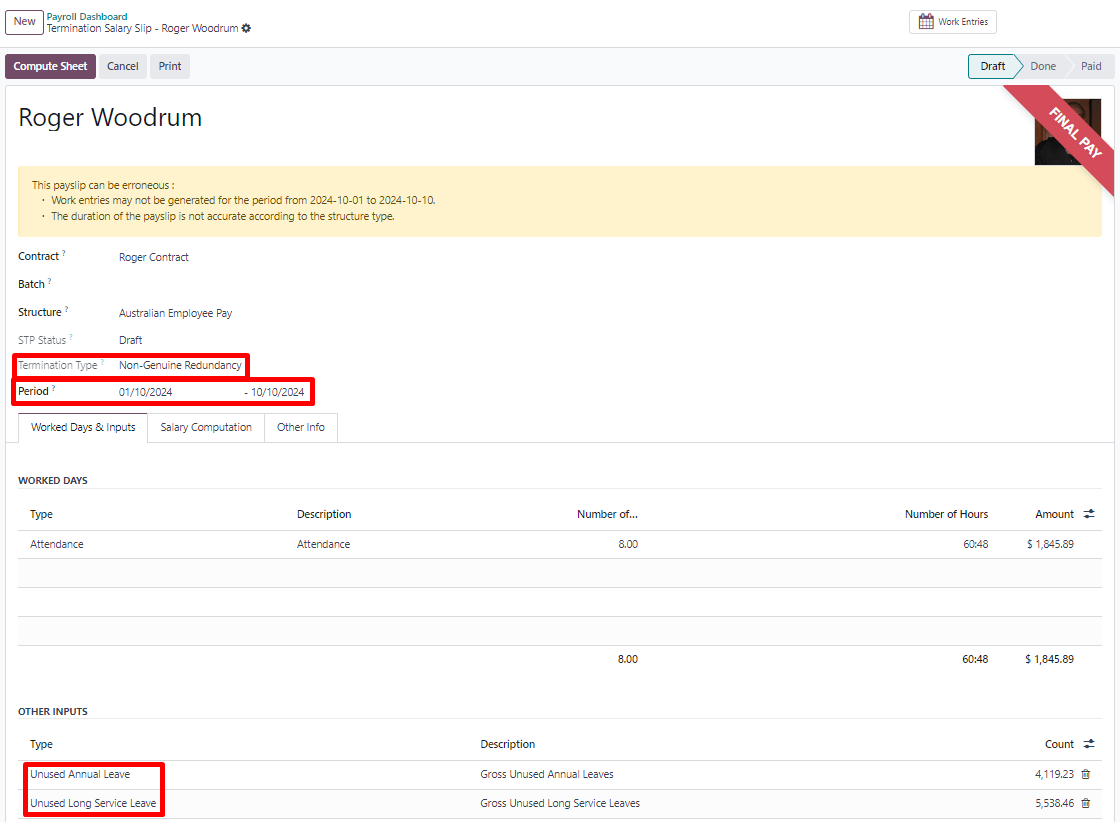
Odoo استحقاقهای مرخصی استفادهنشده را بهطور خودکار بر اساس بار مرخصیِ نرخ ساعتی کنونی کارمند (تنها برای مرخصیهای سالانه) و مانده مرخصی باقیمانده محاسبه میکند. با این حال، در صورت لزوم میتوان این مبالغ را بهصورت دستی در جدول سایر ورودیها ویرایش کرد.
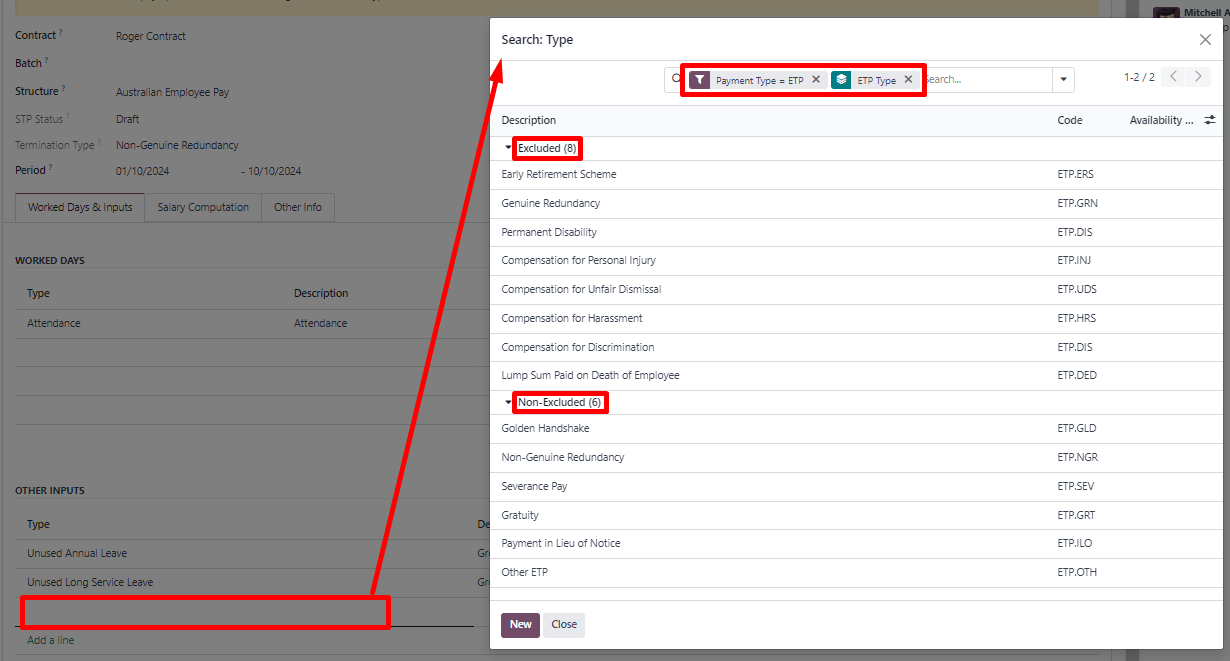
پرداختهای خاتمهٔ استخدام (ETP) را نیز میتوان به جدول سایر ورودیها افزود. Odoo فهرست جامعی از ETPهای مستثنا و غیرمستثنا برای انتخاب توسط شرکتها دارد.
توجه
کسر برای مرخصیهای استفادهنشده و ETPها مطابق با Schedule 7 و Schedule 11 از ATO محاسبه میشود و از اول ژوئیهٔ ۲۰۲۴ بهروزرسانی شده است.
نکته
پس از اینکه یک کارمند خاتمه یافت و آخرین جزئیات استخدام او حلوفصل شد، میتوانید کارمند را با کلیک روی آیکون (عملیات)، سپس بایگانی در نمای فرم کارمند بایگانی کنید.
انتقال از یک نرمافزار STP دیگر به Odoo
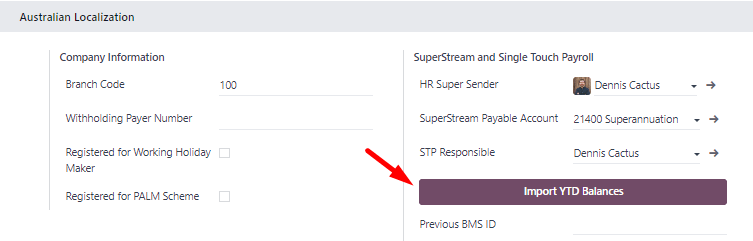
هنگام انتقال از یک نرمافزار دیگر دارای قابلیت STP به Odoo، ممکن است نیاز داشته باشید پیوستگی را در مقادیر YTD کارمندان خود حفظ کنید. Odoo اجازهٔ وارد کردن مقادیر YTD کارمندان را با رفتن به و کلیک روی Import YTD Balances میدهد.
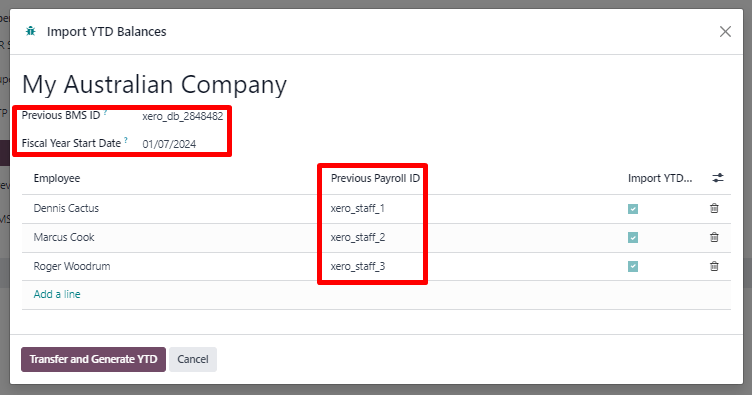
برای اینکه ATO رکوردهای کارمند نرمافزار پیشین شما را بشناسد و پیوستگی را در Odoo حفظ کند، باید موارد زیر را وارد کنید:
Previous BMS ID (یکی به ازای هر پایگاهداده)
Previous Payroll ID (یکی به ازای هر کارمند)
اگر نمیتوانید BMS ID آن یا شناسههای حقوق و دستمزد کارمندان خود را پیدا کنید، از ارائهدهندهٔ نرمافزار پیشین خود بپرسید.
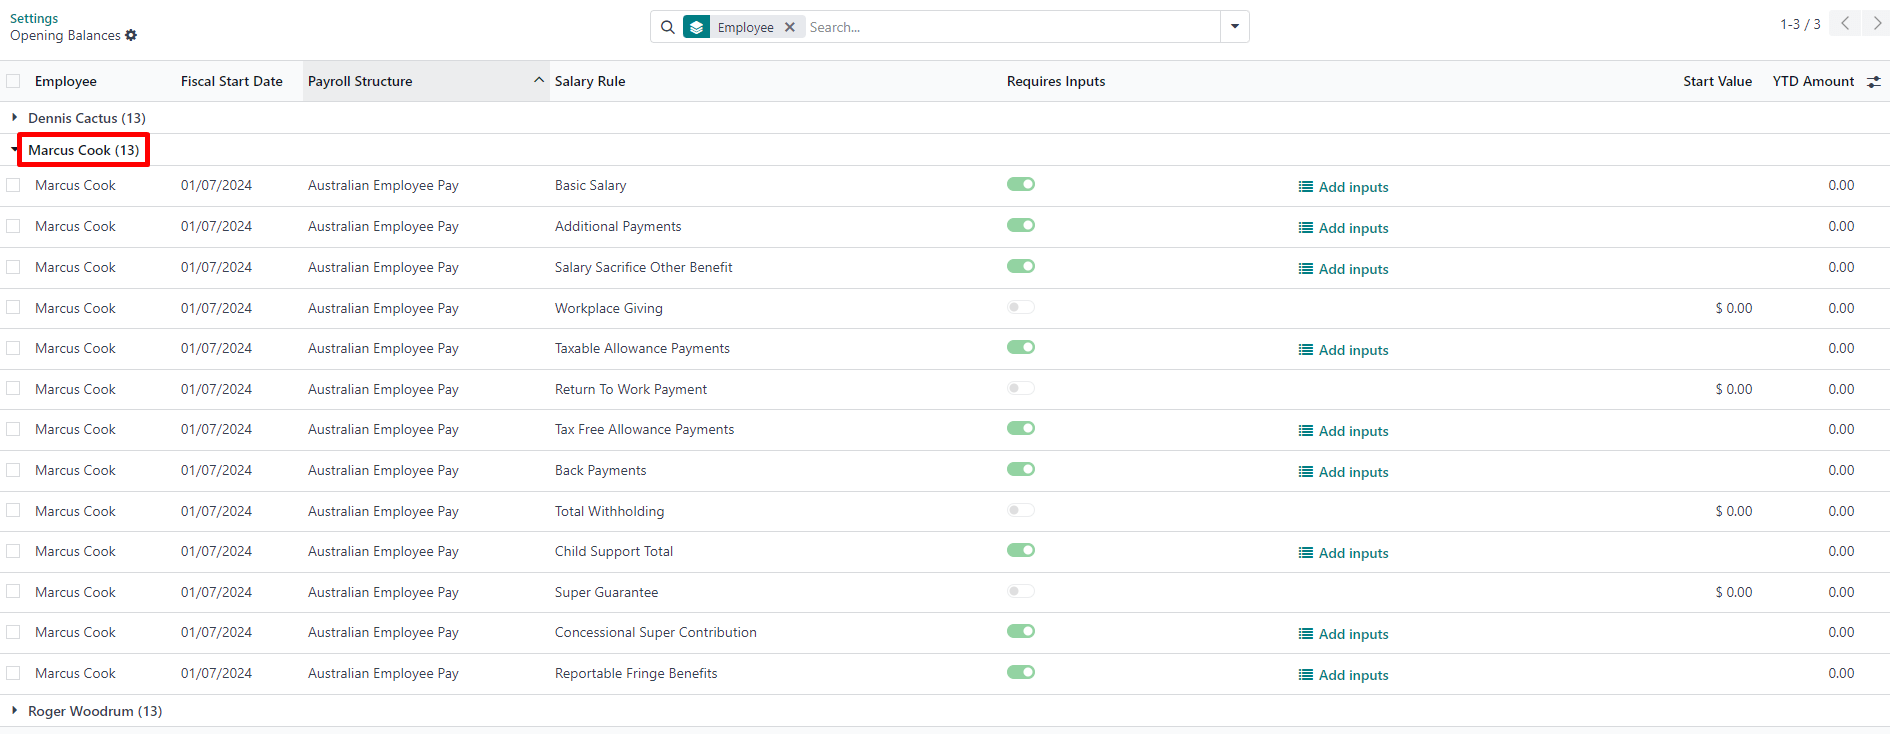
این به شما این فرصت را میدهد تا ماندههای افتتاحیه YTD کارمندان خود را در سال مالی جاری اضافه کنید. ATO انواع مختلفی از YTD را گزارش میدهد. این موارد توسط ۱۳ قواعد حقوقودستمزد زیر در Odoo نمایش داده میشوند.
Example
فرض کنید کارمند Marcus Cook در تاریخ ۱ سپتامبر از یک نرمافزار دیگر دارای قابلیت STP منتقل شده است. Marcus دو فیش حقوقی ماهانه در نرمافزار قبلی خود دریافت کرده است (برای جولای و آگوست). در اینجا ماندههای YTD که شرکت Marcus باید به Odoo منتقل کند، آورده شده است:
دسته YTD |
مانده YTD برای انتقال |
|---|---|
ناخالص (حضور عادی) |
$13,045.45 |
ناخالص (اضافهکاری) |
$1,000 |
مرخصی با حقوق |
$954.55 |
کمکهزینه شستوشو |
$200 |
کل کسورات |
$2,956 |
تضمین بازنشستگی (Super Guarantee) |
$1,610 |
اگر برخی از ماندههای YTD نیاز به گزارش با جزئیات بیشتر به ATO دارند، میتوانید از ورودیهای قانون حقوق استفاده کنید.
Example
بهعنوان مثال، قانون Basic Salary میتواند شامل شش ورودی باشد و سه مورد در مثال ما ضروری است: مبالغ ناخالص عادی، اضافهکاری و مرخصیهای با حقوق. همه این موارد از نظر مبالغ YTD بهصورت متفاوت گزارش میشوند.
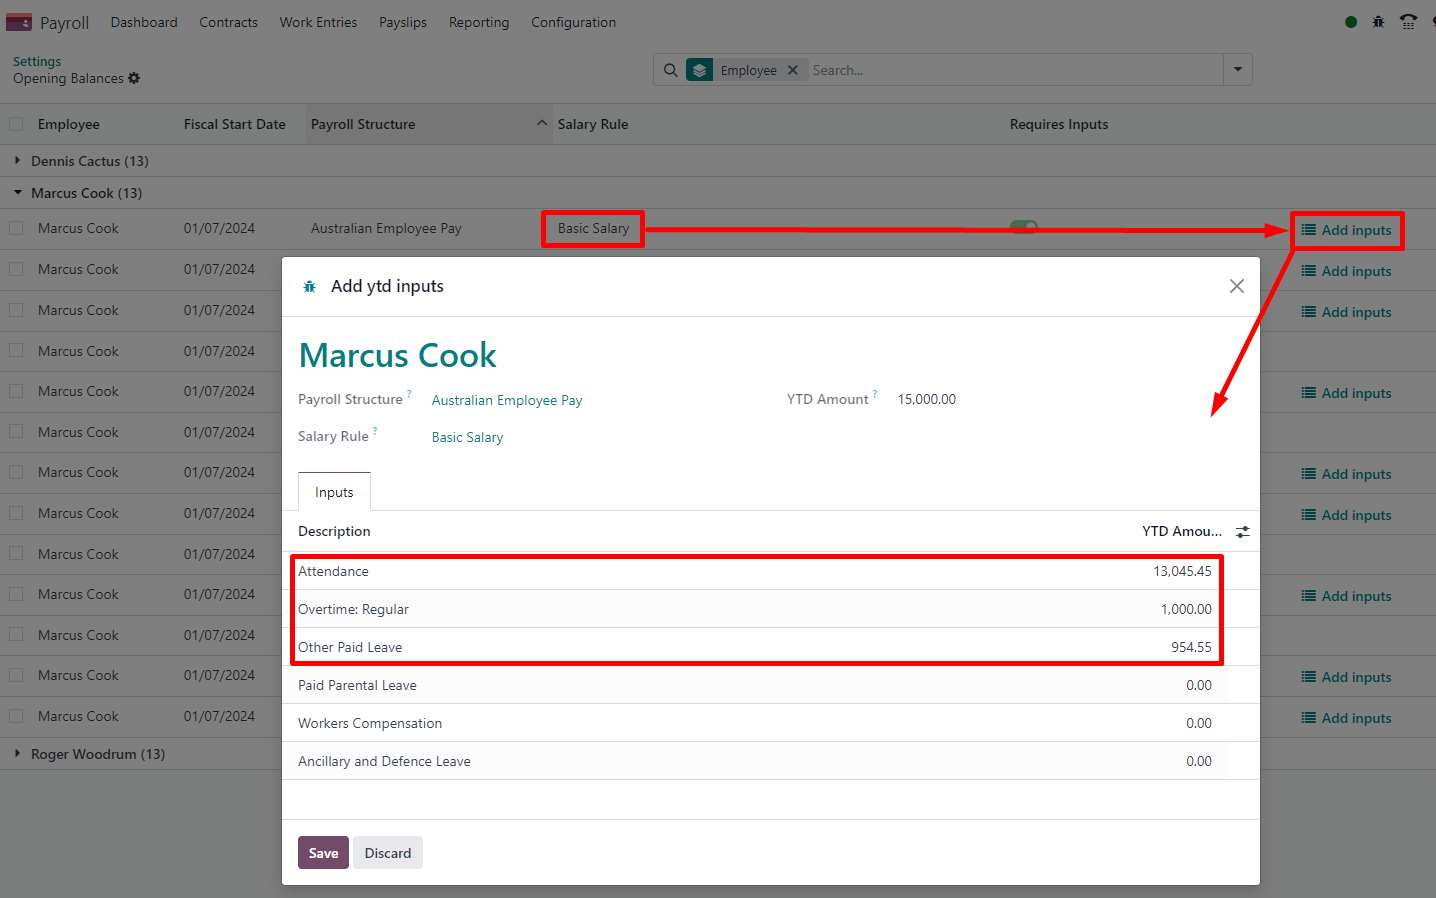
ماندههای افتتاحیه نهایی شده YTD برای Marcus Cook بهصورت زیر است.
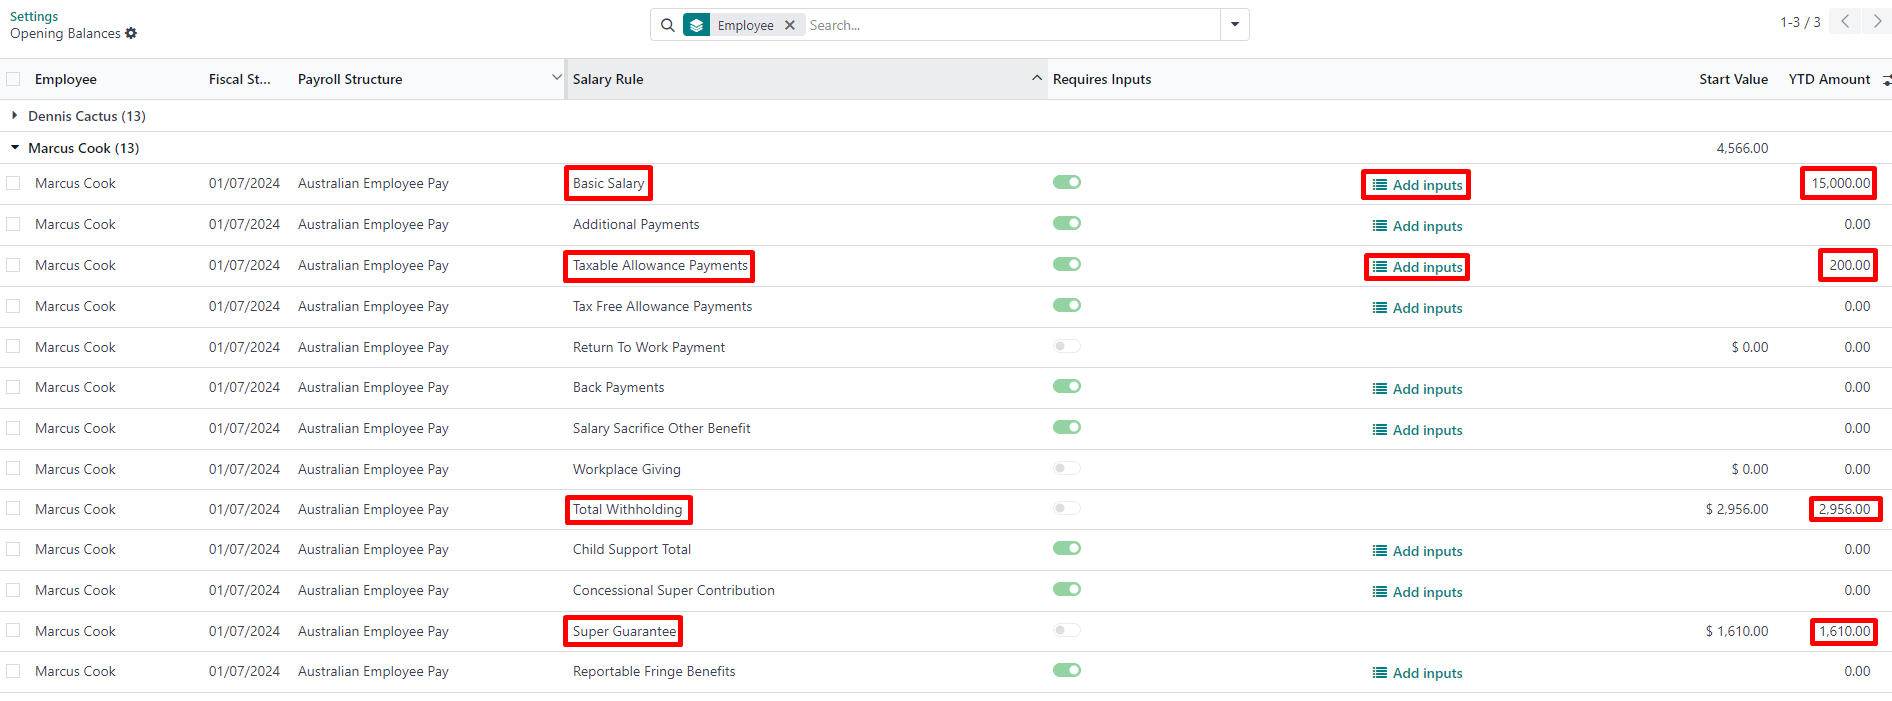
در نتیجه، محاسبات YTD در فیشهای حقوقی بر اساس ماندههای افتتاحیه کارمند انجام میشود به جای اینکه از صفر شروع شود.
نهاییسازی STP
مهم
Odoo در حال حاضر در فرآیند انطباق با STP Phase 2 است و جریانهای نهاییسازی توضیح داده شده در زیر هنوز دادهها را به ATO ارسال نمیکنند.
نهاییسازی EOFY
کارفرمایانی که از طریق STP گزارش میدهند باید تا ۱۴ ژوئیه هر سال اظهارنامه نهاییسازی را ارائه دهند. برای این کار، به بروید.
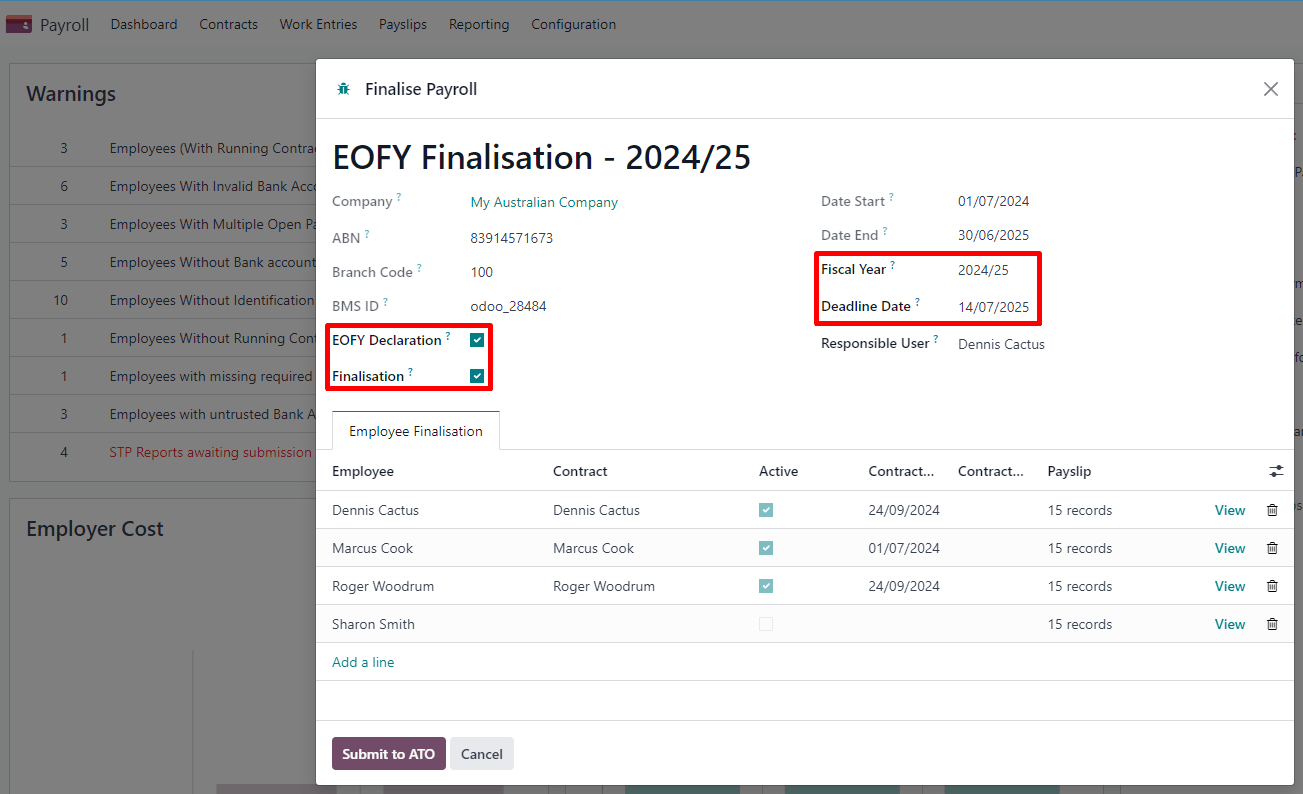
هم کارمندان فعال و هم کارمندان خاتمهیافته برای نهاییسازی نمایش داده میشوند.
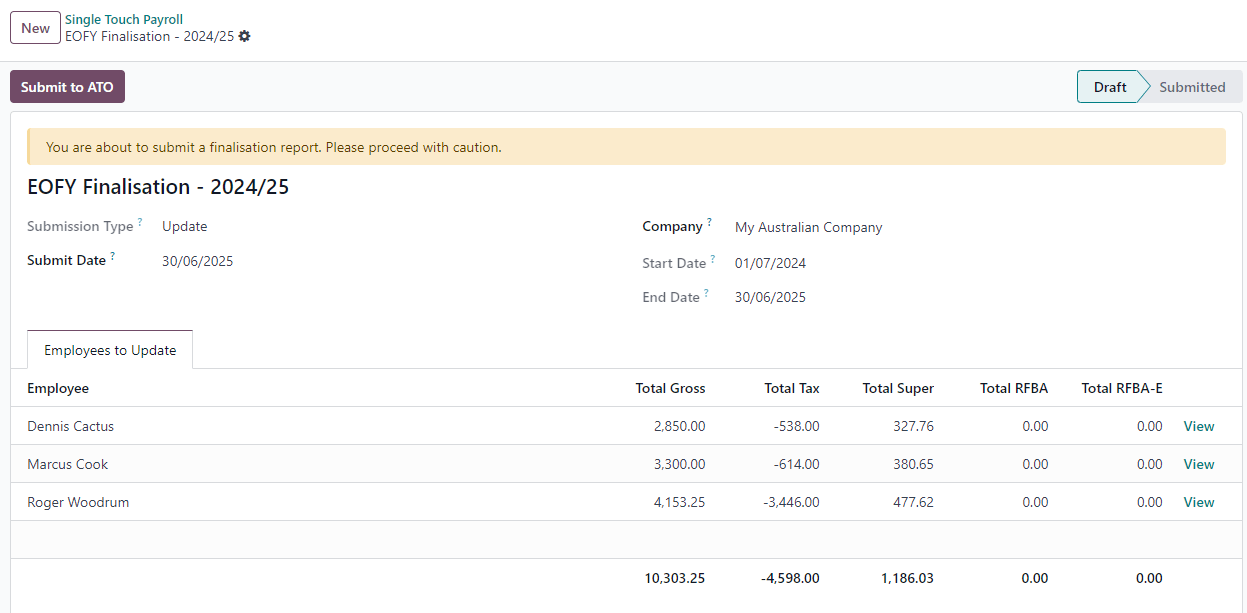
از نمای فرم نهاییسازی، میتوانید با ممیزی نهایی همه فیشهای حقوقی کارمندان در طول سال مالی مربوطه ادامه دهید. وقتی آماده شد، روی Submit to ATO کلیک کنید. وقتی اظهارنامه نهاییسازی را ارائه دادید، کارمندان وضعیت اطلاعات پرداخت خود را در صورت درآمد آنلاین خود پس از پایان سال مالی به Tax ready تغییر یافته خواهند دید.
نهاییسازی فردی
Odoo همچنین به شما اجازه میدهد کارمندان را به صورت فردی در طول سال نهایی کنید. این میتواند زمانی مفید باشد که:
پرداختهای یکباره پس از اولین نهاییسازی انجام میشوند؛ و
نهاییسازی پس از خاتمه استخدام در طول سال.
برای ادامه با یک نهاییسازی فردی، به بروید، چکباکس EOFY Declaration را بدون تیک رها کنید و کارمندان مورد نظر برای نهاییسازی را بهصورت دستی اضافه کنید.
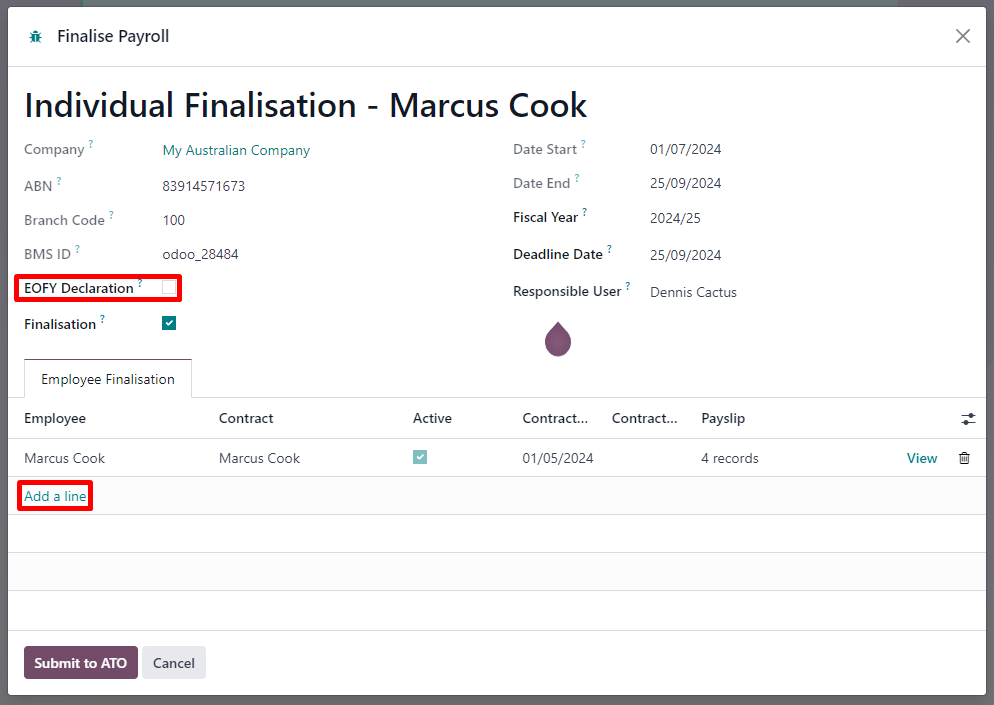
حتی اگر یک رکورد کارمند را در میانه سال مالی نهایی کنید، ATO اطلاعات را تا پایان سال مالی در اظهارنامه مالیاتی کارمند پیشپر نخواهد کرد.
تعدیلات
مهم
Odoo در حال حاضر در فرآیند انطباق با STP Phase 2 است و جریانهای تعدیل توضیح داده شده در زیر هنوز دادهها را به ATO ارسال نمیکنند.
اصلاح نهاییسازی
اگر نیاز دارید مبالغ YTD را برای یک کارمند پس از ارائه اظهارنامه نهاییسازی اصلاح کنید، هنوز امکان حذف نشانگر نهاییسازی برای آن کارمند وجود دارد. برای این کار، به بروید، کارمند را انتخاب کنید و چکباکس Finalisation را بدون تیک رها کنید.
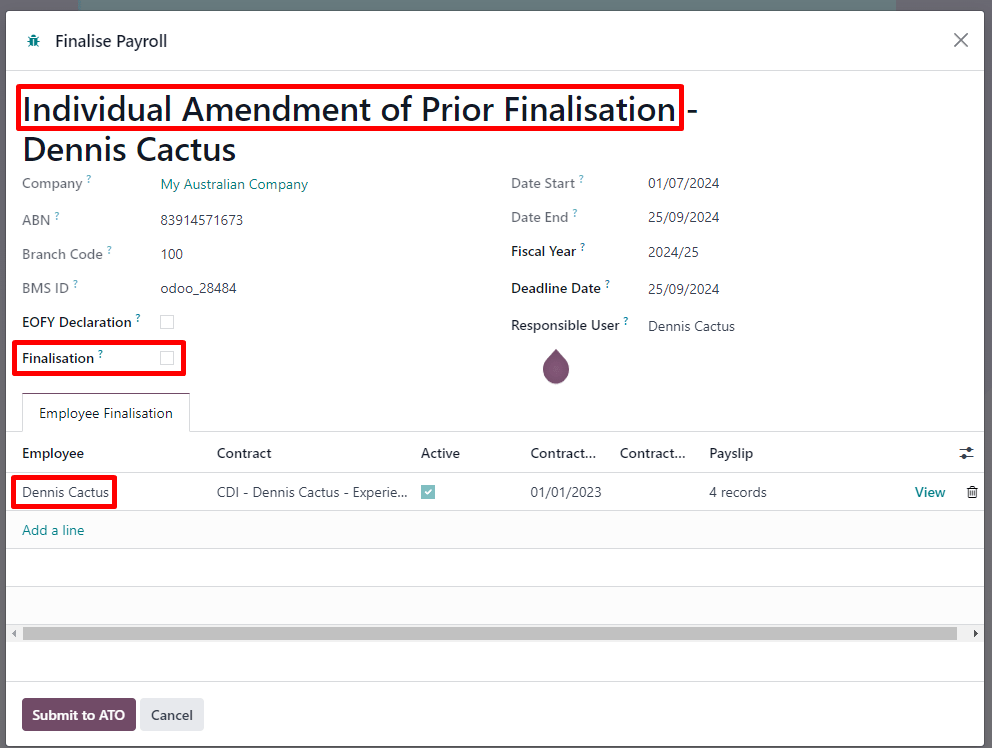
وقتی آماده شد، روی Submit to ATO کلیک کنید تا بهروزرسانی نهاییسازی را به ATO ارسال کنید.
وقتی جزئیات صحیح YTD برای آن کارمند پس از اصلاح آماده شد، آن کارمند را دوباره نهایی کنید.
توجه
ATO از کارفرمایان انتظار دارد که خطاها را ظرف ۱۴ روز از شناسایی اصلاح کنند یا اگر چرخه پرداخت شما بیشتر از ۱۴ روز است (مثلاً ماهانه)، تا تاریخی که موظف به ارائه رویداد پرداخت منظم بعدی هستید. اصلاحات نهاییسازی را میتوان از طریق STP تا پنج سال پس از پایان سال مالی انجام داد.
نهاییسازی و اصلاح نهاییسازی برای یک کارمند منفرد همچنین میتواند هنگام استخدام مجدد یک کارمند در همان سال مالی مفید باشد.
جایگزینیهای کامل فایل
یک کارفرما میتواند جایگزینیهای کامل فایل برای دورههای پرداخت انجام دهد تا آخرین ارسال به ATO را در صورت داشتن دادههای نادرست قابل توجه جایگزین کند.
برای این کار، آخرین ارسال STP را باز کنید و روی Replace File کلیک کنید. سپس، با تیک زدن چکباکس Reset Payslip انتخاب کنید کدام فیشهای حقوقی نیاز به ریست شدن دارند.
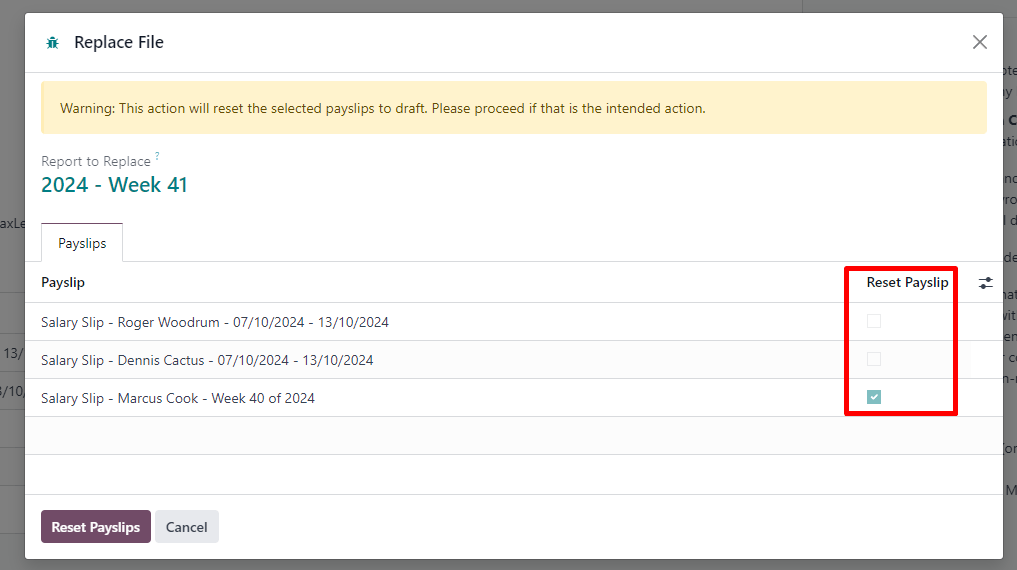
ریست کردن فیشهای حقوقی فیشهای جدید یا دوره پرداخت جدید ایجاد نمیکند، بلکه:
دسته فیشهای حقوقی از پرداخت شد یا انجام شده به تایید شده ریست میشود.
وضعیت فیشهای حقوقی ریستشده به پیشنویس بازمیگردد.
فیشهای حقوقی صحیح پرداختشده باقی میمانند و در برابر پرداخت اصلی تطبیق داده میشوند.
یک ارسال STP جدید برای جایگزینی ارسال قبلی ایجاد میشود. برای اهداف قابلیت ردیابی، ارسال STP قبلی حذف نمیشود بلکه بهعنوان جایگزینشده علامتگذاری میشود.
ابتدا، فیشهای حقوقی ریستشده را اصلاح کنید و ورودی پیشنویس آنها را ایجاد کنید. پس از انجام، Submit to ATO دوباره روی دسته فیش حقوقی ظاهر میشود تا جایگزینی کامل فایل را پردازش کند.
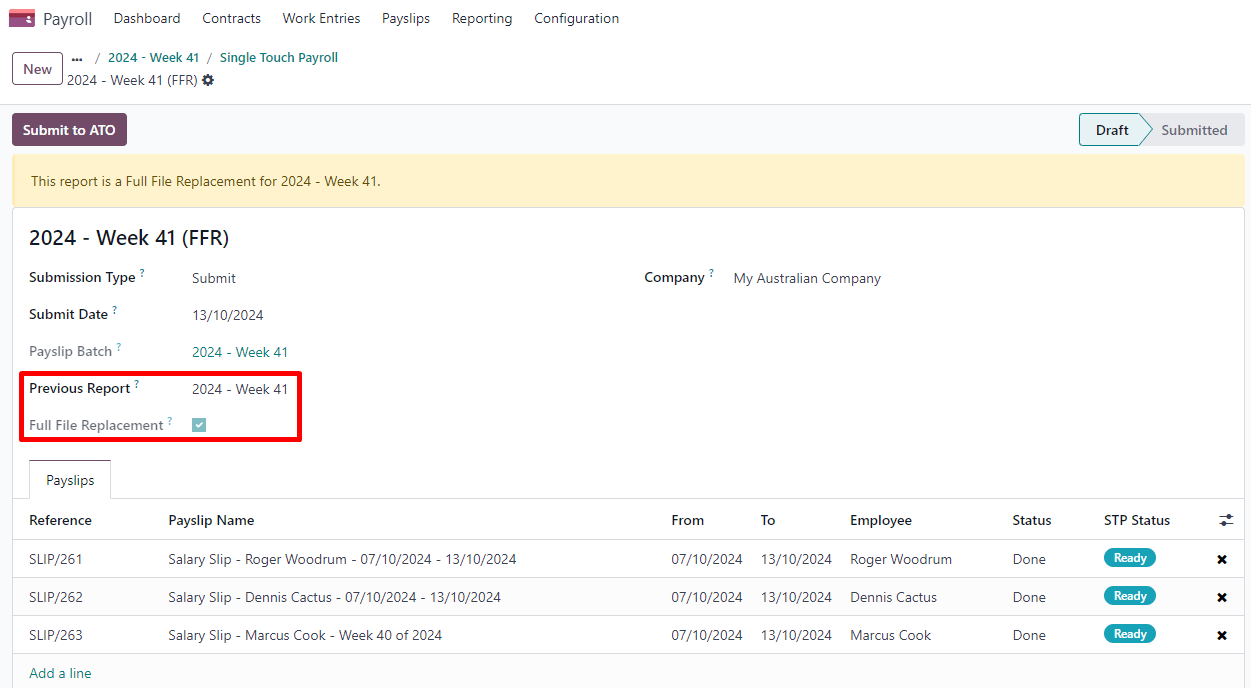
هنگامی که آماده شد، اجرای پرداخت را یک بار دیگر به ATO ارسال کنید. لطفاً توجه داشته باشید که جایگزینیهای کامل فایل تنها بهعنوان آخرین چاره برای اصلاح حجم قابلتوجهی از دادههای نادرست در نظر گرفته شدهاند. در صورت امکان، ATO توصیه میکند فیشهای حقوقی نادرست را با ارسال یک اصلاح بهعنوان بخشی از اجرای پرداخت بعدی یا از طریق رویداد بهروزرسانی تصحیح کنید.
علاوه بر این، ارسال یک جایگزینی کامل فایل دوم از همان ارسال امکانپذیر نیست و جایگزینی کامل فایل تنها هر ۲۴ ساعت یک بار قابل انجام است.
صفر کردن مقادیر YTD
در صورت تغییر چند شناسهٔ کلیدی در میانهٔ سال، مقادیر YTD باید صفر شوند و سپس با شناسهٔ کلیدی بهروزرسانیشده دوباره ثبت شوند.
برای شناسههای شرکت زیر، همهٔ کارمندان باید صفر شوند:
ABN
کد شعبه
BMS ID
برای شناسههای کارمند زیر، تنها کارمندان منفرد را میتوان صفر کرد:
TFN
شناسهٔ حقوق و دستمزد
پیش از بهروزرسانی هر شناسهٔ کلیدی، با رفتن به یک ارسال STP جدید ایجاد کنید و:
Submission Type را به بروزرسانی تغییر دهید.
تیک Zero Out YTD را بزنید.
روی افزودن یک سطر کلیک کنید تا مشخص کنید کدام کارمندان.
روی Submit to ATO کلیک کنید.
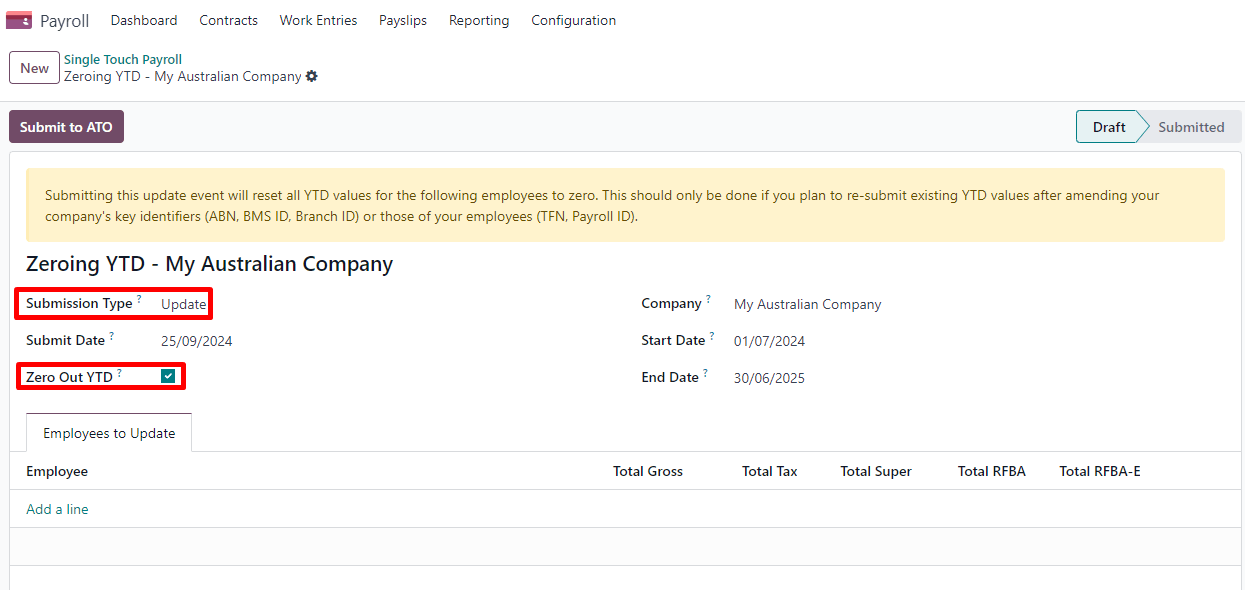
پس از انجام آن، شناسه(های) کلیدی موردنظر برای اصلاح را تغییر دهید.
در نهایت، به بازگردید تا یک بروزرسانی جدید ایجاد و ارسال کنید، این بار بدون تیک زدن تیک Zero Out YTD. این کار به ATO اطلاع میدهد که ماندههای YTD ثبتشدهٔ پیشین باید با شناسههای کلیدی جدید تنظیم شوند.
پیوندهای حقوق و دستمزد به سایر اپلیکیشنها
مرخصی
اپلیکیشن مرخصی بهصورت بومی با اپلیکیشن حقوق و دستمزد در Odoo یکپارچه شده است. انواع مختلف مرخصیها بر اساس مفهوم ورودیهای کاری فیشهای حقوقی را پر میکنند.
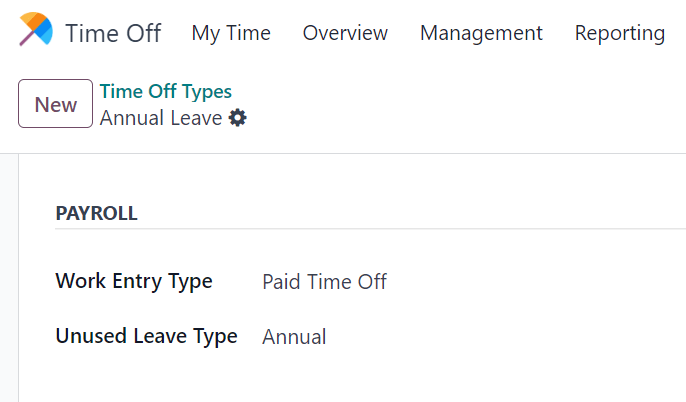
به بروید و برای هر نوع، دو فیلد زیر را در بخش حقوق و دستمزد پیکربندی کنید:
نوع سند کارکرد: تعریف میکند کدام ورودی کاری باید روی جدول روزهای کارکرد فیش حقوقی انتخاب شود.
Unused Leave Type: میان Annual، Long Service یا Personal Leave انتخاب کنید. اگر Personal Leave انتخاب شود، مانده مرخصی باقیماندهٔ این نوع مرخصی در زمان خاتمهٔ کار بهعنوان یک استحقاق نمایش داده نمیشود. مرخصیهای استفادهنشدهٔ نوع Annual در صورت واجد شرایط بودن کارمند، شامل بار مرخصی خواهند بود.
مخارج
اپلیکیشن مخارج نیز بهصورت بومی با اپلیکیشن حقوق و دستمزد در Odoo یکپارچه شده است. ابتدا، به بروید و بازپرداخت در فیشحقوق را فعال کنید.
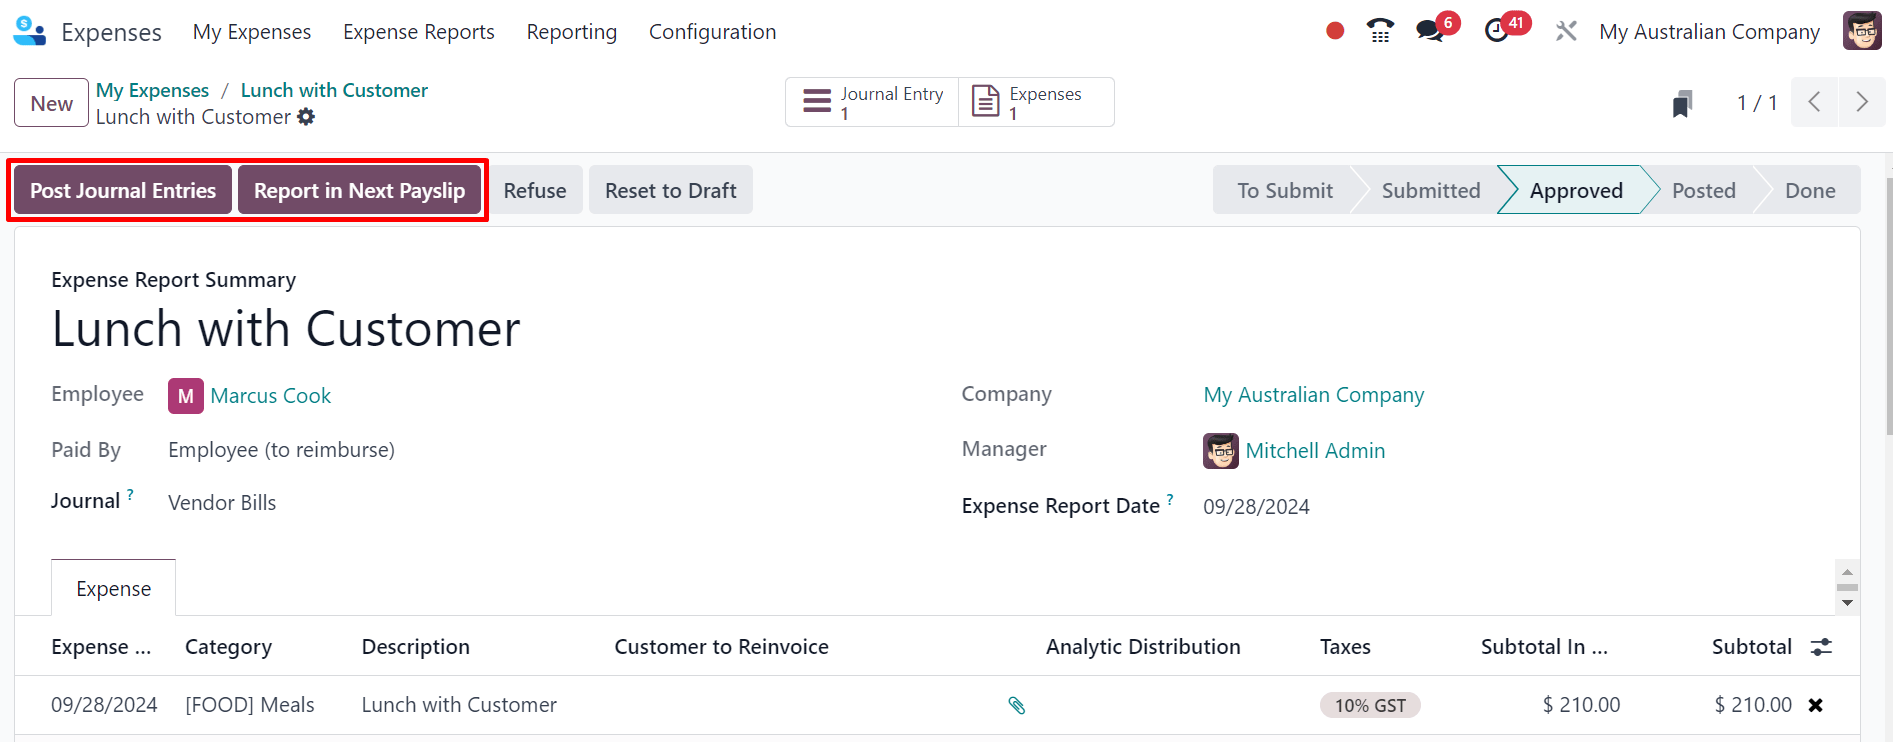
هنگامی که یک کارمند در فهرست حقوق و دستمزد شما یک مخارج تأییدشده را برای بازپرداخت ارسال میکند، میتوانید به دو روش به او بازپرداخت کنید:
اگر مخارج باید خارج از یک اجرای پرداخت بازپرداخت شود، روی ارسال داده های روزنامه کلیک کنید. پرداخت باید بهصورت دستی انجام شود.
اگر مخارج باید بهعنوان بخشی از اجرای پرداخت بعدی بازپرداخت شود، بهجای آن روی گزارش در فیش حقوقی بعدی کلیک کنید.
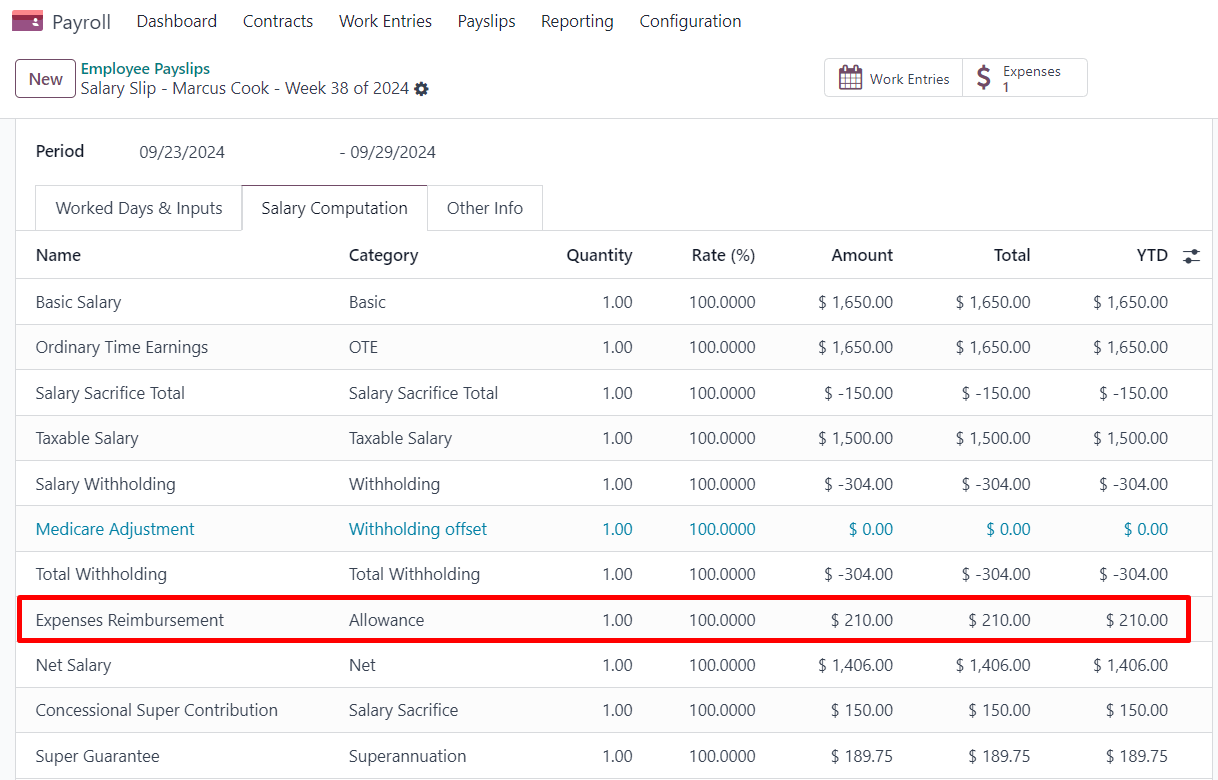
پس از افزوده شدن یک مخارج به فیش حقوقی بعدی، میتوانید آن را در جدول سایر ورودیها پیدا کنید. این نوع ورودی سپس بهعنوان افزودهای به حقوق خالص محاسبه میشود.
پس از پرداخت به کارمند، آیتم ژورنال فیش حقوقی مرتبط با بازپرداخت کارمند بهطور خودکار در برابر صورتحساب فروشندهٔ مخارج تطبیق داده میشود.
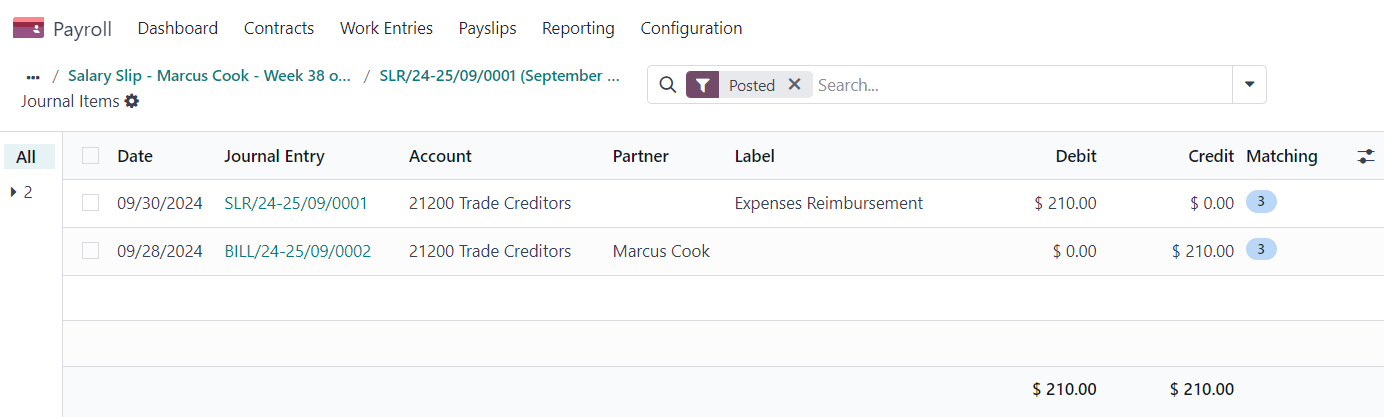
پیکربندیهای پیشرفته
سایر انواع ورودی
میتوانید با رفتن به به سایر انواع ورودی دسترسی پیدا کنید. ۶۳ نوع ورودی دیگر مرتبط با استرالیا وجود دارد. توصیه نمیکنیم سایر آنها را بهعنوان بخشی از راهکار حقوق و دستمزد خود استفاده کنید، زیرا نمیتوان آنها را در چارچوب STP بهکار برد. میتوانید آنها را بایگانی یا حذف کنید.
روی هر نوع ورودی، فیلدهای زیر مهم هستند:
نوع پرداخت انواع ورودی را در شش دستهبندی طبقهبندی میکند:
Allowance: مبلغ جداگانهای که علاوه بر حقوق و دستمزد به کارمندان خود پرداخت میکنید. برخی از این کمکهزینهها توسط جوایز مدرن الزامی شدهاند: شستوشو، حملونقل و غیره.
مهم
اگر قصد دارید از کمکهزینههای مشمول نرخهای متغیر کسر (مانند سنت به ازای هر کیلومتر یا کمکهزینههای سفر) استفاده کنید، با ما تماس بگیرید تا ببینید آیا Odoo در حال حاضر مورد کسبوکار شما را پوشش میدهد.
توجه
از Odoo 18، برخی کمکهزینهها مانند Laundry: Allowance for approved uniforms توسط دو ورودی دیگر مدیریت میشوند: یکی برای ثبت مبلغ پرداختشده تا سقف ATO، و دیگری برای ثبت مبلغ فراتر از سقف ATO. این برای محاسبهٔ درست PAYGW توسط Odoo لازم است.
برخی کسبوکارها ممکن است نیاز داشته باشند گزارشدهی یک کمکهزینه را بسته به کارمند از OTE به Salary & Wages منتقل کنند. در این مورد، باید یک نوع ورودی دیگر موجود را تکثیر و دوباره پیکربندی کنید. برای مثال، کمکهزینهٔ Work-Related Non-Expense بهطور پیشفرض OTE است.
Deduction: حق عضویت اتحادیه و کسورات حمایت از فرزند، کسورات در نظر گرفته میشوند.
ETP: پرداختهای خاتمهٔ استخدام. اینها یا مستثنا یا غیرمستثنا در نظر گرفته میشوند (به صفحهٔ وب ATO دربارهٔ مالیات اجزای ETP مراجعه کنید).
ترک: سایر ورودیهای مرتبط با مرخصی که به یک دورهٔ پرداخت واحد مربوط نمیشوند (مبلغ یکجا، نقد کردن مرخصیها در حین خدمت، مرخصیهای استفادهنشده و غیره).
Lump Sum: بازگشت به کار و مبلغ یکجای E (برای پرداختهای معوق) زیر این دستهبندی قرار میگیرند.
سایر: سایر پرداختها با منطق خاص خودشان.
PAYGW Treatment بر نحوهٔ کسر مالیات توسط Odoo برای این نوع ورودی اثر میگذارد: عادی، No PAYG Withholding و Excess Only (برای کمکهزینهها).
Superannuation Treatment: OTE، Salary & Wages و Not Salary & Wages.
STP Code: تنها در حالت توسعهدهنده قابل مشاهده است، این فیلد به Odoo میگوید چگونه مقدار ناخالص این پرداخت را به ATO گزارش دهد. اگر این فیلد پیشاپیش بهطور پیشفرض تنظیم شده باشد، توصیه نمیکنیم مقدار آن را تغییر دهید.
گروهبندی سایر انواع ورودی بر اساس نوع پرداخت میتواند به شما کمک کند سناریوهای مختلفی را که در آنها میتوان این ورودیها را بهکار برد درک کنید.

انواع ورودی کاری
یک نوع ورودی کاری یک نوع حضور برای کارمندان است (مثلاً حضور و غیاب، مرخصی با حقوق، اضافهکاری و غیره). چند نوع ورودی کاری بهطور پیشفرض در هر پایگاهدادهٔ استرالیایی ایجاد میشوند.
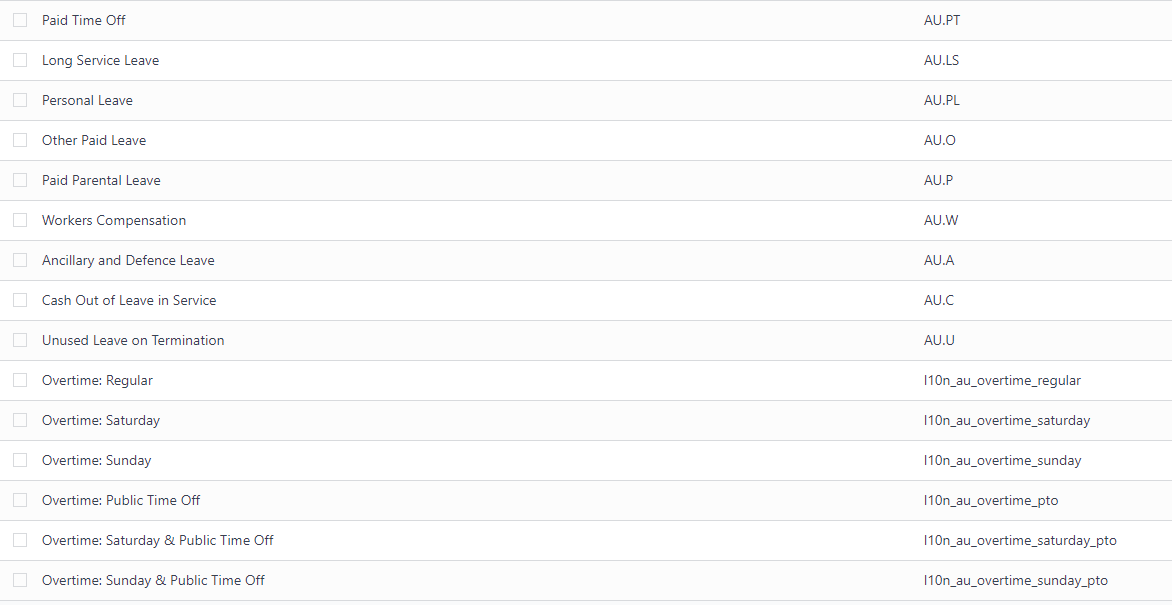
پیش از استفاده از راهکار حقوق و دستمزد Odoo برای استرالیا، توصیه میشود انواع ورودی کاری را با رفتن به کوتاه کنید تا تنها مواردی را که نیاز دارید نگه دارید
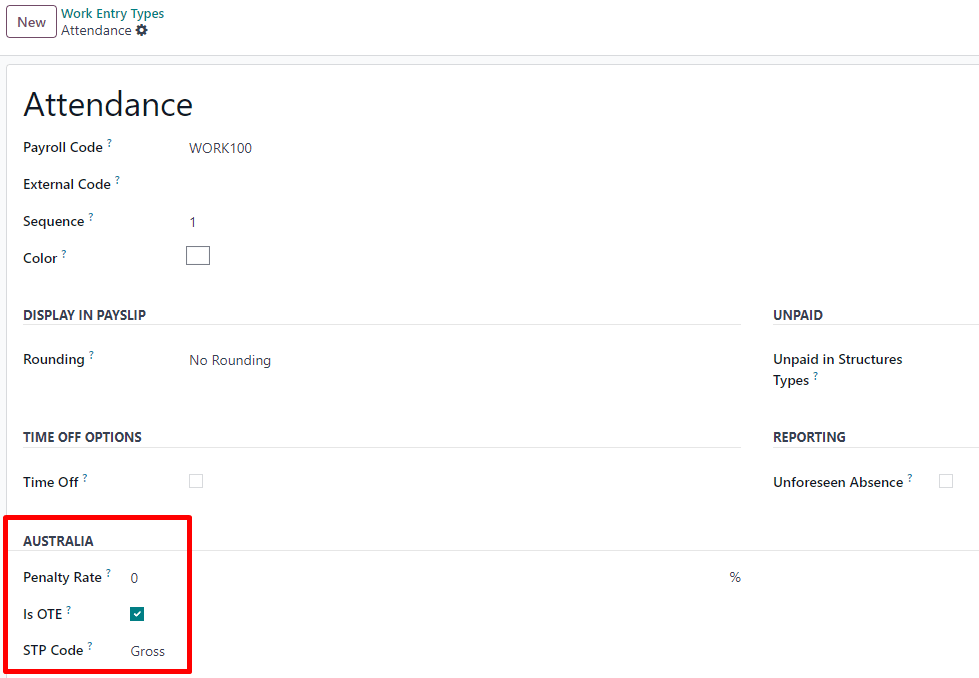
برای هر نوع، مطمئن شوید که فیلدهای زیر را برای استرالیا پیکربندی میکنید:
Is OTE: تعیین میکند که آیا زمان صرفشده در این دستهبندی را میتوان درآمد زمان عادی در نظر گرفت، به این معنا که نرخ ضمانت بازنشستگی اعمال خواهد شد (مثلاً حضور عادی، مرخصی با حقوق و غیره).
Penalty Rate: برای تعیین درصد جریمهای که به زمان صرفشده در این دستهبندی اعمال میشود استفاده میشود. مهم است که نرخ جریمهٔ قابل اعمال در ایالت یا صنعت خود را بر اساس نوع کار (مثلاً نرخ شنبه، نرخ یکشنبه، نرخ اضافهکاری و غیره) پیکربندی کنید.
STP Code: تنها در حالت توسعهدهنده قابل مشاهده است، این فیلد به Odoo میگوید چگونه زمان صرفشده در این دستهبندی را به ATO گزارش دهد. اگر این فیلد پیشاپیش بهطور پیشفرض تنظیم شده باشد، توصیه نمیکنیم مقدار آن را تغییر دهید.
محدودیتهای کنونی
از Odoo 18، توصیه نمیکنیم شرکتها از اپلیکیشن حقوق و دستمزد برای جریانهای کسبوکار زیر استفاده کنند:
انواع جریان درآمد: درآمد اشتغال خارجی
دستهٔ رفتار مالیاتی: بازیگران و هنرمندان
گزارشدهی مزایای فوت
تعهدات گزارشدهی برای WPN (بهجای ABN)
کمکهزینههای مشمول نرخ متغیر کسر مالیات (مانند کمکهزینهٔ سنت به ازای هر کیلومتر و کمکهزینههای سفر)
اگر میخواهید مطمئن شوید که آیا Odoo با الزامات حقوق و دستمزد شما در استرالیا تناسب دارد یا خیر، با ما تماس بگیرید.
یکپارچهسازی Employment Hero
اگر کسبوکار شما هماکنون با Employment Hero راهاندازی شده و در حال کار است، میتوانید از این رابط بهعنوان یک راهکار جایگزین حقوق و دستمزد استفاده کنید. ماژول Employment Hero سندهای حسابداری فیش حقوقی (مانند مخارج، هزینههای اجتماعی، بدهیها، مالیاتها) را بهصورت خودکار از Employment Hero به Odoo همگامسازی میکند. مدیریت حقوق و دستمزد همچنان در Employment Hero انجام میشود؛ Odoo تنها سندهای حسابداری را ثبت میکند.
پیکربندی
ماژول Employment Hero Payroll (
l10n_employment_hero) را نصب کنید.با رفتن به ، API مربوط به Employment Hero را پیکربندی کنید. پس از تیک زدن تیک Enable Employment Hero Integration، فیلدهای بیشتری نمایان میشوند.
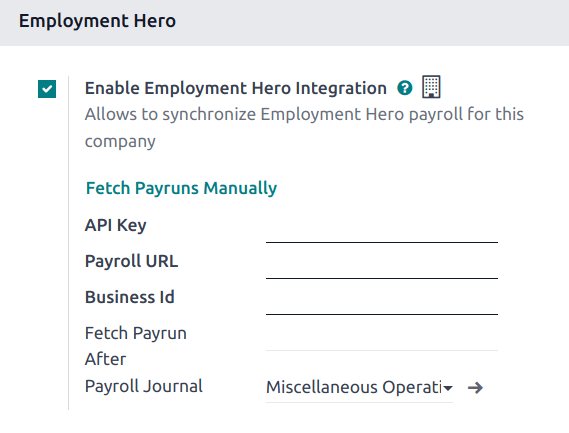
کلید API را در بخش حساب من از پلتفرم Employment Hero بیابید.
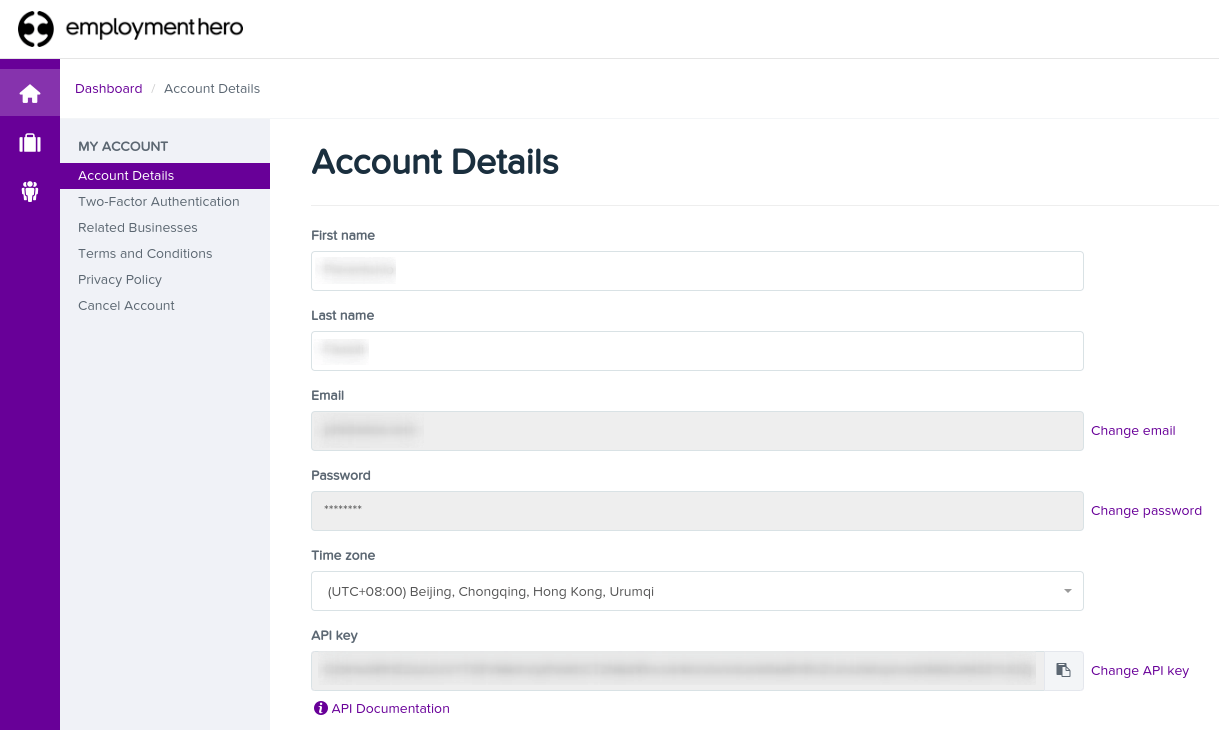
Payroll URL از پیش با
https://keypay.yourpayroll.com.auپر شده است.هشدار
Payroll URL از پیش پرشده را تغییر ندهید.
Business Id را در URL مربوط به Employment Hero بیابید (مثلاً
189241).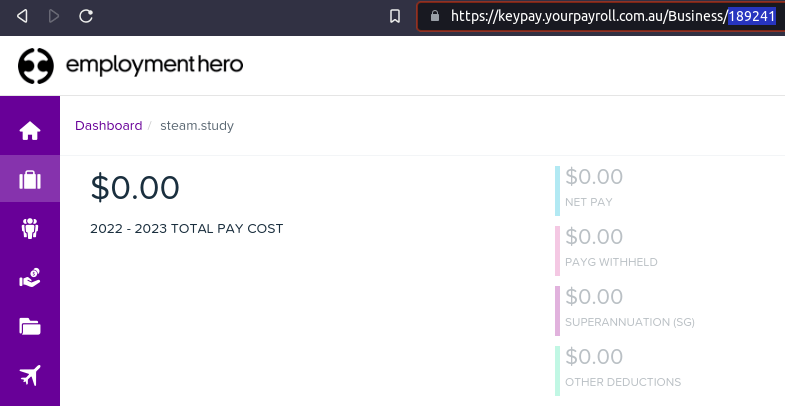
برای ثبت سندهای فیش حقوقی، هر ژورنال Odoo را بهعنوان Payroll Journal انتخاب کنید.
با رفتن به ، مالیات را پیکربندی کنید. مالیاتهای لازم برای سندهای فیش حقوقی Employment Hero را ایجاد کنید. کد مالیاتی Employment Hero را در فیلد وارد کنید.
توضیح API
API سندهای حسابداری را از Employment Hero به Odoo همگامسازی میکند و آنها را در حالت پیشنویس باقی میگذارد. مرجع، شناسهٔ سند فیش حقوقی Employment Hero را درون پرانتز شامل میشود تا کاربر بتواند بهراحتی همان رکورد را در Employment Hero و Odoo بازیابی کند.
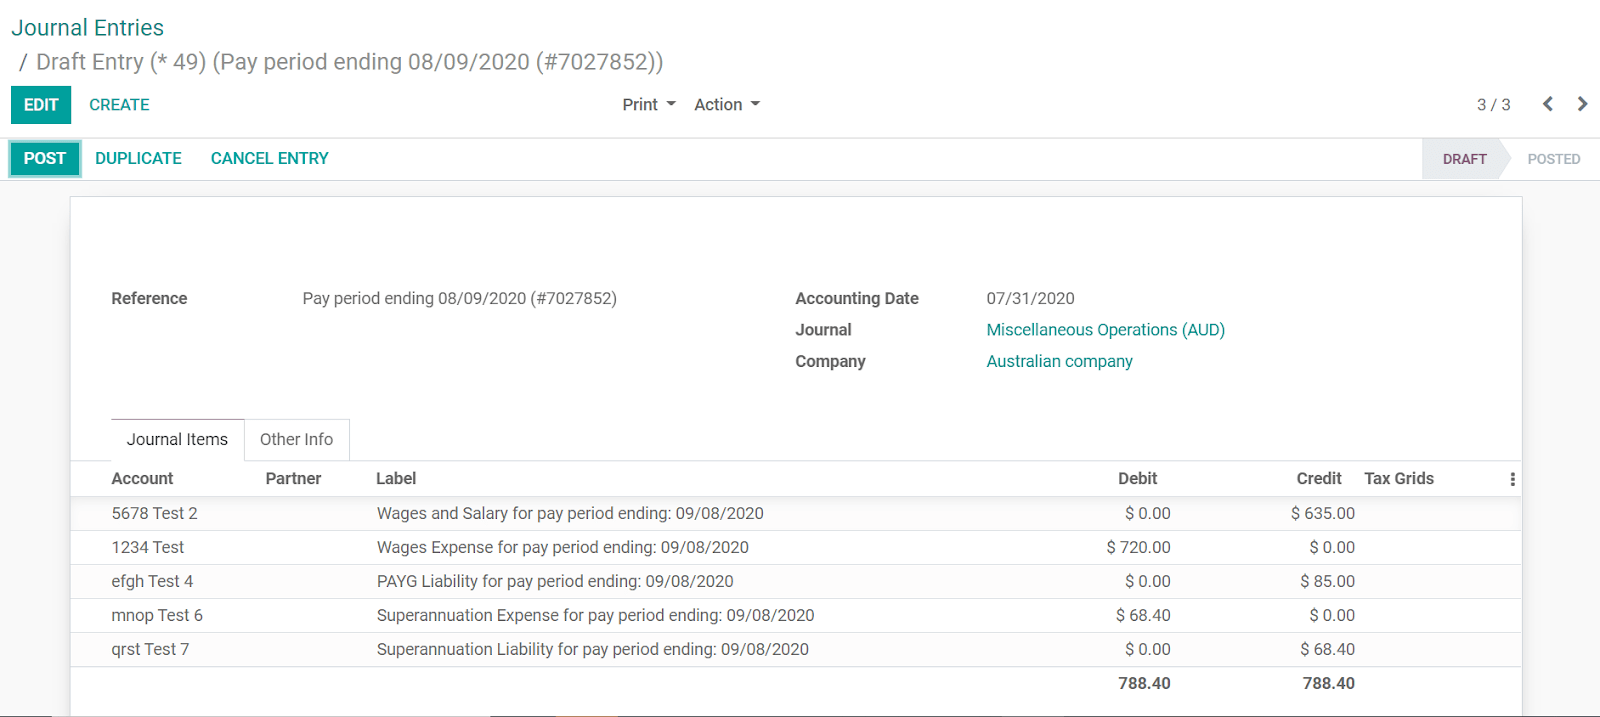
بهصورت پیشفرض، همگامسازی هفتهای یکبار انجام میشود. میتوان رکوردها را بهصورت دستی با رفتن به و کلیک روی Fetch Payruns Manually در بخش Employment Hero دریافت کرد.
سندهای فیش حقوقی Employment Hero نیز بر اساس حسابداری دوطرفه کار میکنند. حسابهایی که توسط Employment Hero استفاده میشوند، در بخش تنظیمات حقوق و دستمزد تعریف شدهاند.
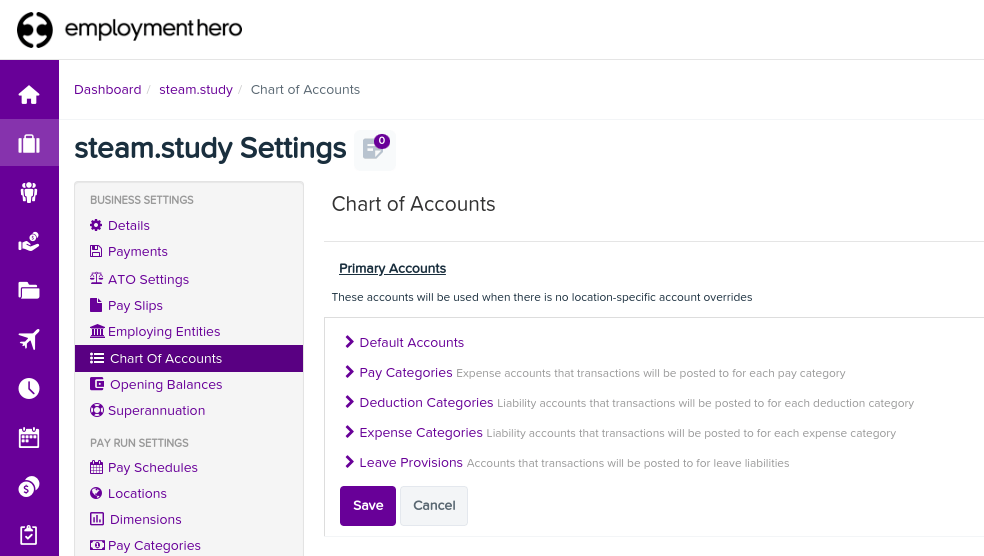
برای آنکه API کار کند، باید همان حسابهای پیشفرض کسبوکار Employment Hero خود (با همان نام و همان کد) را در Odoo ایجاد کنید. همچنین لازم است نوع حسابهای صحیح را در Odoo انتخاب کنید تا گزارشهای مالی دقیق تولید شوند.