
اروگوئه
مقدمه
با بومیسازی اروگوئه، میتوانید اسناد الکترونیکی همراه با XML، شناسهٔ مالیاتی (fiscal folio)، امضای الکترونیکی و اتصال به مرجع مالیاتی Dirección General Impositiva (DGI) از طریق Uruware تولید کنید.
اسناد پشتیبانیشده عبارتند از:
e-Invoice، e-Invoice Credit Note، e-Invoice Debit Note؛
e-Ticket، e-Ticket Credit Note، e-Ticket Debit Note؛
Export e-Invoice، Export e-Invoice Credit Note، Export e-Invoice Debit Note.
این بومیسازی به یک حساب Uruware نیاز دارد که به کاربران امکان میدهد اسناد الکترونیکی را درون Odoo تولید کنند.
واژهنامه
اصطلاحات زیر در سراسر بومیسازی اروگوئه به کار میروند:
DGI: Dirección General Impositiva نهاد دولتی مسئول اجرای پرداختهای مالیاتی در اروگوئه است.
EDI: Electronic Data Interchange به ارسال اسناد الکترونیکی اشاره دارد.
Uruware: سازمان شخص ثالثی است که تبادل اسناد الکترونیکی بین شرکتها و دولت اروگوئه را تسهیل میکند.
CAE: Constancia de Autorización de Emisión سندی است که از وبسایت مرجع مالیاتی درخواست میشود تا صدور فاکتور الکترونیکی امکانپذیر شود.
پیکربندی
نصب ماژولها
برای دریافت همهٔ ویژگیهای بومیسازی اروگوئه، ماژولهای زیر را نصب کنید:
نام |
نام فنی |
توضیحات |
|---|---|---|
Uruguay - Accounting |
|
بستهٔ بومیسازی مالی پیشفرض. این بسته خصوصیات حسابداری را برای بومیسازی اروگوئه اضافه میکند، که حداقل پیکربندی موردنیاز برای فعالیت یک شرکت در اروگوئه بر اساس دستورالعملهای تعیینشده توسط DGI را نشان میدهد. نصب ماژول بهصورت خودکار موارد زیر را بارگذاری میکند: دفتر حسابها، مالیاتها، انواع اسناد و انواع پشتیبانیشدهٔ مالیاتی. |
Uruguay Accounting EDI |
|
شامل همهٔ الزامات فنی و کارکردی برای تولید و اعتبارسنجی اسناد الکترونیکی بر اساس مستندات فنی منتشرشده توسط DGI است. اسناد مجاز در بالا فهرست شدهاند. |
توجه
Odoo هنگامی که یک پایگاه داده با Uruguay بهعنوان کشور انتخابشده نصب شود، ماژول پایهٔ Uruguay - Accounting را بهصورت خودکار نصب میکند. با این حال، برای فعالسازی صدور فاکتور الکترونیکی، ماژول Uruguay Accounting EDI (l10n_uy_edi) باید بهصورت دستی نصب شود.
شرکت
برای پیکربندی اطلاعات شرکت خود، اپلیکیشن Settings را باز کنید، به بخش شرکتها اسکرول کنید، روی بروزرسانی اطلاعات کلیک کنید و موارد زیر را پیکربندی کنید:
نام شرکت
نشانی، شامل خیابان، شهر، وضعیت، کد پستی و کشور
شناسه مالیاتی: شمارهٔ شناسایی را برای نوع مؤدی مالیاتی انتخابشده وارد کنید.
DGI Main Branch Code: این بخشی از XML هنگام ایجاد یک سند الکترونیکی است. اگر این فیلد تنظیم نشود، همهٔ اسناد الکترونیکی رد خواهند شد.
برای یافتن DGI Main Branch Code، این گامها را دنبال کنید:
از حساب DGI خود، به بروید.
را انتخاب کنید.
فایل PDF تولیدشده را باز کنید تا DGI Main Branch Code را از بخش Domicilio Fiscal Número de Local به دست آورید.
پس از پیکربندی شرکت در تنظیمات پایگاه داده، به بروید و شرکت خود را جستجو کنید تا موارد زیر را تأیید نمایید:
نوع شرکت روی شرکت تنظیم شده باشد.
نوع فیلد Identification Number برابر RUT / RUC باشد.
راهاندازی یک حساب Uruware
برای راهاندازی یک حساب Uruware، این گامها را دنبال کنید:
تأیید کنید که یک اشتراک معتبر Odoo دارید.
با رفتن به ، تنظیمات اعتبارنامههای Uruware را پیدا کنید.
به پایین تا بخش Uruguayan Localization اسکرول کنید و محیط را انتخاب کنید (تولید یا Testing).
روی Create Uruware Account کلیک کنید.
با انجام این کار، یک ایمیل حاوی رمز عبور برای ورود به پورتال Uruware و راهاندازی حساب شما، به آدرس مرتبط با اشتراک Odoo شما ارسال میشود.
نکته
ایمیل حاوی اعتبارنامهها فوری نیست؛ ممکن است ایجاد حساب تا ۴۸ ساعت طول بکشد.
برای امکان ایجاد یک حساب Uruware، شناسه مالیاتی شرکت باید تنظیم شود.
رمز عبور ارسالشده پس از ۲۴ ساعت منقضی میشود. در این صورت، آن را با استفاده از لینک Forgot Password در پورتال Uruware بازنشانی کنید.
توجه
این اقدام یک حساب در Uruware با اطلاعات زیر ایجاد میکند:
نام قانونی (razón social)
RUT شرکت
نام کاربری (ایمیل اشتراک Odoo یا
RUT.odoo. برای مثال:213344556677.odoo)لینک پایگاه دادهٔ Odoo
برای اطمینان از ایجاد صحیح حساب خود، لطفاً هرگونه اطلاعات گمشده از موارد بالا را اضافه کنید.
پس از ایجاد حساب و دریافت ایمیل حاوی اعتبارنامهها، حسابهای خود را مستقیماً در پورتال آزمایشی یا پورتال تولید سرویس Uruware پیکربندی کنید:
از اعتبارنامههای حساب موجود در ایمیل برای ورود به پورتال مربوطه (آزمایشی یا تولید) استفاده کنید.
در پورتال Uruware، برای امکان صدور فاکتور از Odoo، گامهای زیر لازم است:
اطلاعات شرکت را تکمیل و تصحیح کنید.
گواهی دیجیتال خود را اضافه کنید.
برای هر نوع سندی که قصد صدور آن را دارید، CAEs خود را اضافه کنید.
قالب PDF را که قرار است چاپ و به مشتریان شما ارسال شود، پیکربندی کنید.
مهم
حتماً دو حساب پیکربندی کنید، یکی برای آزمایش و یکی برای تولید. گواهی در هر دو محیط لازم است، اما CAEs فقط در محیط تولید لازم است.
همچنین ببینید
دادههای فاکتور الکترونیکی
برای پیکربندی دادهٔ فاکتور الکترونیکی، یک محیط و اعتبارنامهها باید پیکربندی شوند. برای این کار، به بروید و به پایین تا بخش Uruguayan Localization اسکرول کنید.
ابتدا محیط UCFE Web Services را انتخاب کنید:
تولید: برای پایگاههای دادهٔ تولید. در این حالت، اسناد الکترونیکی از طریق Uruware برای اعتبارسنجی به DGI ارسال میشوند.
Testing: برای پایگاههای دادهٔ آزمایشی. در این حالت، جریانهای اتصال مستقیم را میتوان آزمایش کرد، بهطوریکه فایلها از طریق Uruware به محیط آزمایشی DGI ارسال میشوند.
آزمایشی: فایلها در حالت دمو بهصورت خودکار ایجاد و پذیرفته میشوند اما به DGI ارسال نمیشوند. به همین دلیل، خطاهای رد در این حالت ظاهر نخواهند شد. هر اعتبارسنجی داخلی را میتوان در حالت دمو آزمایش کرد. از انتخاب این گزینه در یک پایگاه دادهٔ تولید بپرهیزید.
توجه
استفاده از حالت آزمایشی به یک حساب Uruware نیاز ندارد.
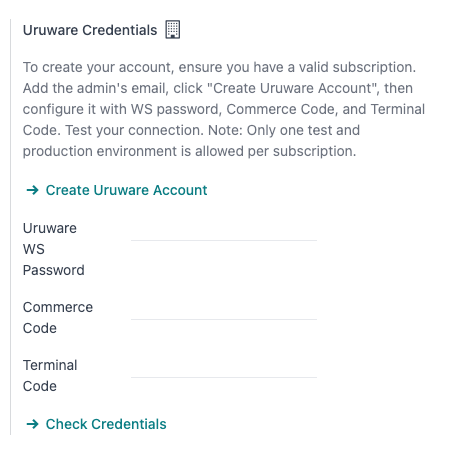
سپس، Uruware Data را وارد کنید:
Uruware WS Password
Commerce Code
Terminal Code
توجه
این دادهها را میتوان پس از پیکربندی حساب Uruware از پورتال Uruware به دست آورد.
برای دریافت Uruware WS Password، به بروید و به دنبال تب Validators and Additional Information بگردید تا WS Password را بیابید.
برای دریافت Commerce Code، به بروید.
برای دریافت Terminal Code، به بروید.
دادههای اصلی
دفتر حسابها
chart of accounts بهطور پیشفرض بهعنوان بخشی از مجموعه دادههای گنجاندهشده در ماژول بومیسازی نصب میشود، حسابها بهطور خودکار در مالیاتها، accounts payable پیشفرض و accounts receivable پیشفرض mapped میشوند.
حسابها میتوانند بر اساس نیازهای شرکت اضافه یا حذف شوند.
همچنین ببینید
مخاطبین
برای ایجاد یک مخاطب، به بروید و جدید را انتخاب کنید. سپس اطلاعات زیر را وارد کنید:
نام شرکت
نشانی:
خیابان: برای تأیید یک فاکتور الکترونیکی الزامی است.
شهر
استان
کد پستی
کشور: برای تأیید یک فاکتور الکترونیکی الزامی است.
Identification Number:
نوع: یک نوع شناسایی را انتخاب کنید.
شماره: برای تأیید یک فاکتور الکترونیکی الزامی است.
مالیاتها
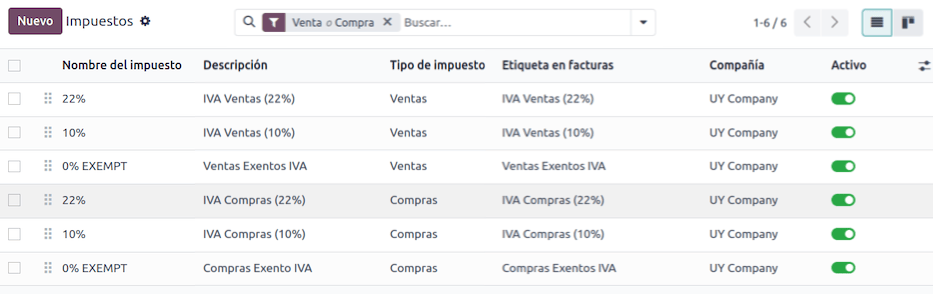
بهعنوان بخشی از ماژول بومیسازی اروگوئه، مالیاتها بهصورت خودکار همراه با پیکربندی و حسابهای مالی مرتبط آنها ایجاد میشوند.
انواع اسناد
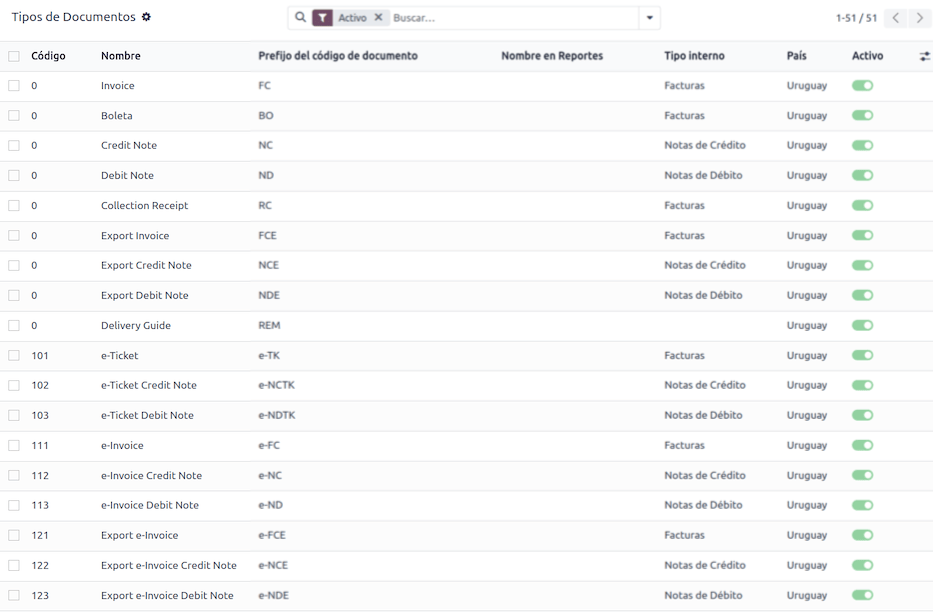
برخی از تراکنشهای حسابداری، مانند فاکتورهای مشتری و صورتحسابهای فروشنده، بر اساس انواع اسناد طبقهبندی میشوند. اینها توسط مراجع مالی دولتی، در این مورد توسط DGI، تعریف میشوند.
هر نوع سند میتواند بهازای هر ژورنالی که به آن اختصاص داده میشود، یک توالی منحصربهفرد داشته باشد. دادهها هنگام نصب ماژول بومیسازی بهصورت خودکار ایجاد میشوند و اطلاعات موردنیاز برای انواع اسناد بهصورت پیشفرض گنجانده شدهاند.
برای بررسی انواع اسناد گنجاندهشده در بومیسازی، به بروید.
توجه
در اروگوئه، CAEs باید در Uruware آپلود شوند. توالیها (و فایلهای PDF) بر اساس CAEs آنها، در Odoo از Uruware دریافت میشوند. CAEs تنها در محیط تولید استفاده میشوند. هنگام آزمایش، فقط محدودهای از توالیهای استفادهشده در Uruware باید تنظیم شود.
ژورنالهای فروش
برای تولید و تأیید یک سند الکترونیکی که توسط DGI اعتبارسنجی خواهد شد، ژورنال فروش باید با موارد زیر پیکربندی شود:
Invoicing Type: بهصورت پیشفرض گزینهٔ Electronic تنظیم شده است. این برای ارسال اسناد الکترونیکی از طریق وبسرویس به دولت اروگوئه از طریق Uruware لازم است. گزینهٔ دیگر، دستی، برای فاکتورهای بازی است که پیشتر در سیستم دیگری مهر شدهاند، برای مثال در DGI.
Use Documents?: این گزینه را فعال کنید اگر این ژورنال قرار است از اسناد موجود در فهرست انواع اسناد در Odoo استفاده کند.
گردشهای کار
پس از پیکربندی پایگاه دادهٔ خود، میتوانید اسنادتان را ایجاد کنید.
اسناد فروش
فاکتورهای مشتری
فاکتورهای مشتری اسنادی الکترونیکی هستند که پس از اعتبارسنجی، از طریق Uruware به DGI ارسال میشوند. این اسناد میتوانند از سفارش فروش شما یا بهصورت دستی ایجاد شوند. آنها باید حاوی دادههای زیر باشند:
مشتری: اطلاعات مشتری را وارد کنید.
تاریخ سررسید: برای محاسبهٔ اینکه فاکتور هماکنون یا بعداً سررسید است (بهترتیب contado یا crédito).
روزنامه: ژورنال فروش الکترونیکی را انتخاب کنید.
نوع سند: نوع سند در این قالب، برای مثال
(111) e-Invoice.محصولات: محصول(ات) را با مالیاتهای صحیح مشخص کنید.
توجه
هر نوع سند، یادداشت بستانکار و یادداشت بدهکار مخصوص خود را دارد (مثلاً نوع سند (111) e-Invoice دارای یک (112) e-Invoice Credit Note است).
یادداشت بستانکار مشتری
یادداشت بستانکار مشتری یک سند الکترونیکی است که پس از اعتبارسنجی، از طریق Uruware به DGI ارسال میشود. برای ثبت یادداشت بستانکار، داشتن یک فاکتور اعتبارسنجیشده (ثبتشده) ضروری است. روی فاکتور، روی دکمهٔ چک پول کلیک کنید تا به فرم Create credit note دسترسی پیدا کنید، سپس اطلاعات زیر را تکمیل کنید:
علت: دلیل یادداشت بستانکار را وارد کنید.
روزنامه: ژورنالی را انتخاب کنید که باید الکترونیکی باشد و گزینهٔ Use Documents? آن فعال باشد.
نوع سند: نوع سند یادداشت بستانکار را انتخاب کنید.
تاریخ معکوس: تاریخ را وارد کنید.
یادداشت بدهکار مشتری
یادداشت بدهکار مشتری یک سند الکترونیکی است که پس از اعتبارسنجی، از طریق Uruware به DGI ارسال میشود. برای ثبت یادداشت بدهکار، داشتن یک فاکتور اعتبارسنجیشده (ثبتشده) ضروری است. روی فاکتور، روی آیکون (action menu) کلیک کنید، گزینهٔ یادداشت بدهی را برای دسترسی به فرم Create credit note انتخاب کنید، سپس اطلاعات زیر را تکمیل کنید:
علت: دلیل debit note را تایپ کنید.
روزنامه: ژورنالی را انتخاب کنید که باید الکترونیکی باشد و گزینهٔ Use Documents? آن فعال باشد.
کپی کردن سطرها: تیک را بزنید تا سطرهای فاکتور به یادداشت بدهکار کپی شوند.
تاریخ یادداشت بدهی: تاریخ را وارد کنید.
توجه
فاکتور را تأیید کنید تا با یک ارجاع داخلی ایجاد شود. برای ارسال سند به DGI از طریق Uruware، روی ارسال کلیک کنید و تیک Create CFE را بزنید. توالی (شمارهٔ) سند قانونی پس از پردازش سند، از Uruware دریافت میشود. اطمینان حاصل کنید که CAEs در Uruware در دسترس دارید.
توجه
فایل PDF سند اعتبارسنجیشده مطابق با مشخصات تعیینشده توسط دولت اروگوئه (DGI) از Uruware دریافت میشود.
Addendaها و افشاها (disclosures)
Addendas و disclosures یادداشتها و نظرات تکمیلی هستند که به یک سند الکترونیکی افزوده میشوند و میتوانند الزامی یا اختیاری باشند. برای ایجاد یک addenda جدید، به بروید و روی جدید کلیک کنید.
اطلاعات زیر را وارد کنید:
نام: نام addenda یا افشای الزامی.
نوع: نوع ملاحظه را انتخاب کنید، این کار آن را به بخش مشخصی در XML اضافه میکند.
Is legend: اگر متن یک افشای الزامی است این تیک را بزنید، اگر اطلاعات تکمیلی است آن را خالی بگذارید.
محتوا: متن کامل addenda یا افشا را اضافه کنید.
Leyenda و اطلاعات تکمیلی در محصول
برای افزودن leyenda یا اطلاعات تکمیلی به محصول و XML، باید addenda و disclosure از پیش پیکربندیشده در سطر فاکتور به محصول اضافه شود. leyenda را در فیلد Disclosure محصول مشخصشده در سطر اضافه کنید.
Leyenda و اطلاعات تکمیلی
برای افزودن leyenda یا اطلاعات تکمیلی به فاکتور الکترونیکی و XML، به فاکتور دسترسی پیدا کنید، به تب اطلاعات دیگر بروید و addenda موردنظر را در فیلد Addenda and Disclosure انتخاب کنید. addenda و disclosure افزودهشده در اینجا در XML و بهصورت قابلمشاهده در سند PDF ظاهر میشوند.
این مورد برای انواع addenda زیر اعمال میشود:
سند
صادرکننده
گیرنده
Addendas
توجه
برای افزودن یک یادداشت موقت به سند الکترونیکی، از فیلد شرایط و ضوابط استفاده کنید. این اطلاعات در addenda فاکتور ارسال میشود، اما برای اسناد آینده ذخیره نخواهد شد.