
Create a rental order
In Odoo Rental, quotations can be created and sent to customers. Similar to Sales quotations, once a quotation is confirmed, it becomes a rental order and can be invoiced and paid for. Only after a rental order is confirmed can rental products be picked up.
Important
To configure quotation settings, the Sales app must be installed. Refer to Quotation settings for detailed instructions.
Create a rental quote
To create a rental order in the Rental app, navigate to , and click New. Doing so reveals a blank rental order form.
Start by adding a Customer, then set the desired rental duration in the Rental period field. To adjust the rental duration, click the first date in the Rental period field, and select the range of dates and times to represent the rental duration from the pop-up calendar form that appears.
Once complete, click Apply in the calendar pop-up form. After that, the pop-up form disappears, and the rental’s designated time period is displayed in the Duration field.
Important
There can only be one rental period per rental order. Multiple rental product orders with different rental periods require a rental order for each rental period.
Next, add a rental product in the Order Lines tab by clicking Add a product and selecting the desired rental product to add to the form.
Note
If a rental product is added before the Rental period field is properly configured, the user can still adjust it accordingly.
Select the desired date range to represent the rental duration, then click Update Rental Prices in the Duration field.
Doing so reveals a Confirmation pop-up window. If everything is correct, click Ok, and Odoo recalculates the rental price accordingly.
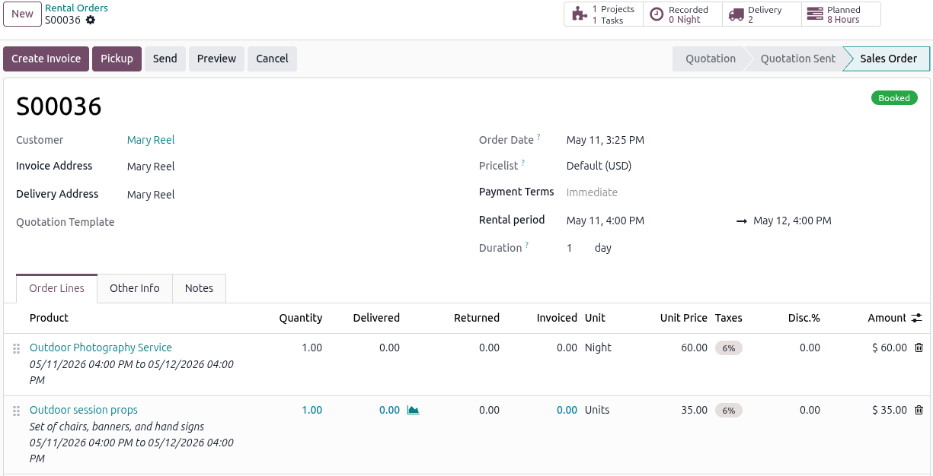
Once all the information has been entered correctly on the rental order form, click Send to send the quotation to the customer. When the customer confirms the quotation, click Confirm to finalize the order. A Booked banner displays on the rental order.
When a rental order is confirmed, the following smart buttons appear at the top of the form:
Tasks: Linked to the Projects app and shows any projects or tasks related to the rental order.
Recorded: Linked to the Timesheets app and shows how many hours are related to the rental order.
Planned: Linked to the Planning app and shows how many shifts are related to the rental order.
Delivery: Linked to the Inventory app and shows any delivery and warehouse receipts related to the rental order.
Important
For the appropriate smart buttons to display, the Project, Timesheet, Planning, and Inventory apps are needed. The selected service product on the rental order must be properly configured to integrate with the recommended apps.
Request a customer signature
Odoo can request the customer sign a rental agreement, outlining the arrangement between the company and customer, before they pick up the rental products. Such documents can ensure everything is returned on time and in its original condition.
Note
Requesting a signature can be done during any stage of the order. This feature also requires the Sign app.
If signatures are required, go to the Rental app and from the default Rental Orders dashboard, select the desired rental order. Go to the (Actions) icon, and click Request Signature.
In the New Signature Request pop-up window, either select an existing document template or create a new one. After sending the request, a link to the signature request appears in the record’s chatter. The document is accessible to the customer via the customer portal or email.
See also
Manage employee shifts for rental services
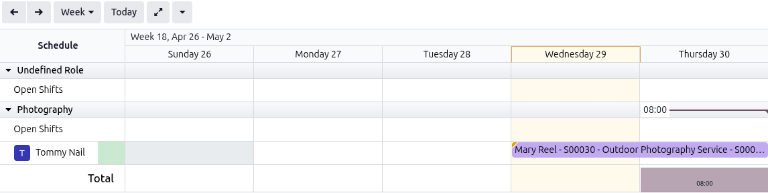
Confirmed rental orders containing service products trigger the automatic creation of shifts. These shifts are generated for the assigned employee role when the availability matches the designated rental period. This automation is made possible by the integration with the Planning app and by configuring the service product.
Click the Planned smart button to open the Schedule by Resource page. The page defaults to a Gantt view of all the open shifts and shifts for the associated role that are available for the rental period of the rental order. Customize the shifts as needed.
Tip
Project templates allow for automated task assignment. When integrated with the Planning app, the system automatically schedules and publishes an employee’s shift if their availability matches the rental period. Priority is given to employees with the relevant roles if applicable.
Manage a project created from a rental order
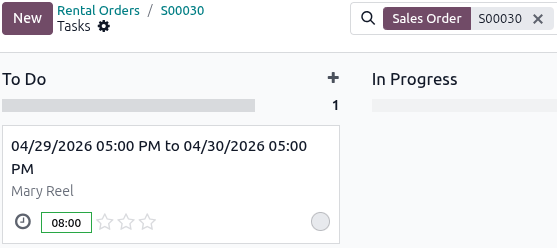
Click the Tasks smart button on the top of the rental order to display a Kanban view of all the tasks automatically created when confirming the rental order. Customize the project’s tasks as needed.
Tip
Configuring the use of Project templates on the product form creates new projects with predefined tasks, priority levels, and assigned employees.
Enter the time for the rental service task
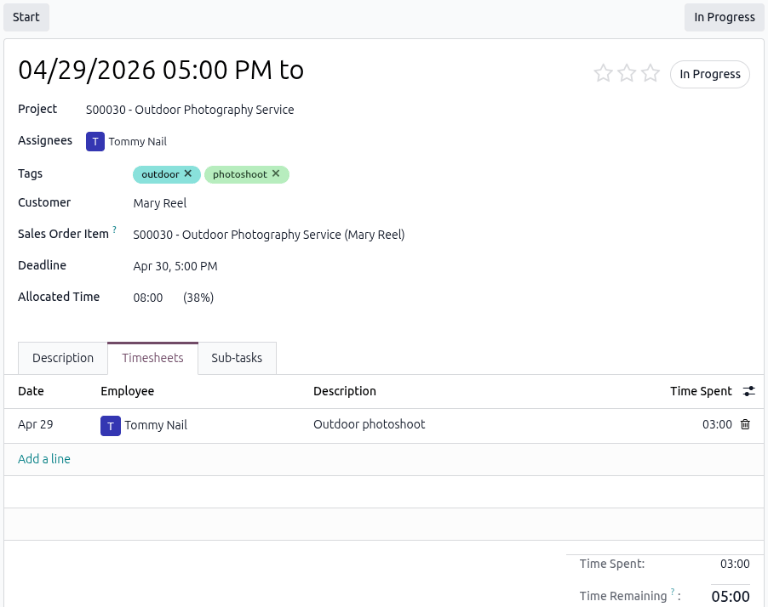
To enter time worked on a service product, select the respective service task, then click the Timesheets tab. Click Add a line to enter the:
Date: The date the work was performed.
Employee: The employee who performed the work.
Description: A brief description of the work performed.
Time Spent: The number of hours worked on the task for that entry.
Click the Sales Order smart button to return to the rental order.
Note
Once time is added in the Timesheets tab of a task, the rental order status is automatically changed to Picked-up, and the Return button appears.
Track delivered time on a rental order
When time is entered on the Timesheets tab of an associated task, the delivered time is automatically tracked on the rental order. To view the delivered time, navigate to the desired rental order and click the Recorded smart button at the top of the rental order. The total hours worked appear in the Recorded Time field.
Create an invoice
Navigate to the desired invoice in the Rental app. On the Rental Orders dashboard, in the Invoice Status section in the left navigation bar, click To Invoice to view all rental orders that need to be sent.
Click the desired rental order, then click Create Invoice. Select Regular invoice from the Create invoice(s) window and click Create Draft.
Finalize time for physical service products
For physical service products, such as hotel rooms, workstations, and conference rooms, a final adjustment to the time may be needed on the invoice.
Enter the amount in the Quantity column. If new charges were accrued during the rental period, click Add a line to include them in the invoice draft.
Confirm and pay
If all the details are correct on the invoice draft, either click Confirm and click Send to email the invoice to the customer, or click Print and then click Pay if the customer is in person. In the Pay pop-up window, select a Journal and click Create Payment.
Click the Payments smart button that appears at the top of the rental order. Click Validate on the Payment page.