
Preparation display
The preparation display helps manage POS orders that require preparation prior to completion. It is intended for use in environments where ordered items must be assembled, cooked, or otherwise processed before they are handed over to the customer.
Use cases
For retail: Once an order is completed and paid in the POS register, it is sent to the preparation display. This notifies the preparation team to collect and prepare the purchased items for customer pickup.
For restaurants: Once orders are placed in the POS register, they are sent to the preparation display to inform the kitchen about the meals that need to be prepared.
Configuration
To create and set up a preparation display, go to , click New, and configure it:
Enter a descriptive Name (e.g.,
Main Kitchen,Bar,Pickup zone).Select the Point of Sale that sends orders to this display. Leave the field empty to link it to all points of sale.
Specify the POS product categories to be sent to this display. Leave the field empty to allow all categories.
Enable the Auto clear option to automatically remove orders from the order status screen after a given time.
Define the steps required for orders to be processed in the Stages tab:
Click Add a line to add a stage.
Optionally, assign colors to stages for better visibility.
Set an Alert timer (min) for each stage to define the expected processing time. Orders are highlighted when this time is exceeded.
Tip
Configure communication channels for the preparation display to keep customers informed. To do so:
Install the POS Enterprise SMS Whatsapp module.
Go to the preparation display form.
Activate SMS Enabled and/or WhatsApp Enabled in the Communication tab.
Select templates for Order received and Order is ready.
To edit an existing preparation display, click (Dropdown menu) on the display’s card and select Configure.
Preparation display
To view all preparation displays and their related order status screens, go to .
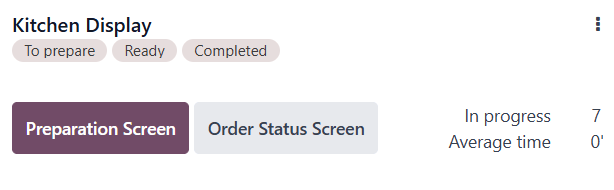
The display card shows:
The configured stages, e.g.,
To prepare,Ready,Completed.The number of orders currently In progress.
The Average time employees usually take to complete an order.
The Order Status Screen button.
Tip
A default preparation display named Kitchen Display is automatically configured when creating a new restaurant point of sale through the onboarding screen and selecting the Restaurant card.
The Kitchen Display app is automatically installed whenever a restaurant point of sale is created and provides quick access to the Preparation Display overview from the main dashboard.
If at least one restaurant point of sale is configured, the order status screen is installed by default. To use it in a shop environment, install the PoS Order Tracking Customer Display module.
Note
To use the preparation display, log in via a web browser on a mobile device or a touchscreen connected via USB or HDMI. IoT boxes are not supported.
Preparation display interface
To open the preparation display, click Preparation Screen on the Kanban card. The interface consists of a top bar, a collapsible side panel, and the order cards section.
Top bar
The top bar shows the progress of All orders across configured stages, such as
To prepare/To cook, Ready, and Completed, along with the number of orders per stage. Click a
stage to see the related orders.

The top bar offers the following buttons:
Recall: Undo the most recent order stage move. This is only possible if this move was made on the selected stage.
Done: Delete all completed orders in the last stage at once.
Close: Exit the display.
Side panel
The side panel is folded by default. Open it by clicking the icon in the upper-left corner. Then, filter orders by:
Time, such as Today or Tomorrow
Preset, such as Dine in or Delivery, if applicable
POS categories defined on the display form, such as Food or Drinks
The total number of orders/category items is displayed next to the corresponding filter. Each filter section consists of a breakdown of the individual elements.
Use the and zoom control at the bottom of the side panel to adjust the card view size, and the Clear All Orders button to move all orders in the current stage to the next one.
Order cards
Order cards represent individual orders and display the following information:
Number of guests.
Presets, if configured.
The selected time and date, if orders are managed by time for the preset.
Stages, i.e., the status such as
To prepare,Ready, etc., highlighted in the defined color (only shown when All orders are displayed).Waiting time, with visual indicators, if the elapsed time exceeds the predefined alert time.
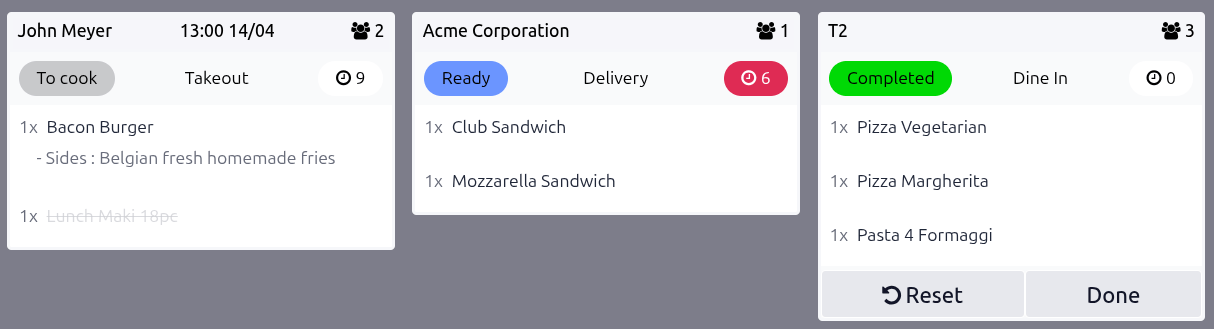
To update order progress from the order card, click individual items to cross them off individually or click the order card itself to mark all items at once. Once all items are completed, the order automatically moves to the next stage. Click Reset on Completed orders to move them back to the first stage if needed.
Example
The preparation display shows several orders to process:
Order 1: The
Lunch Maki 18pcfor takeout with order nameJohn Meyer, scheduled for14/04at13:00, is ready (crossed out). TheBacon Burgeris still being prepared.Order 2: The delivery order for the customer
Acme Corporationis marked red because it has exceeded the expected time in theReadystage.Order 3: Table 2
T2has aDine inorder with 3 dishes and 3 guests ( icon) at this table. You can clickDoneto archive the order or Reset to move it back to theTo cookstage.
Order status screen
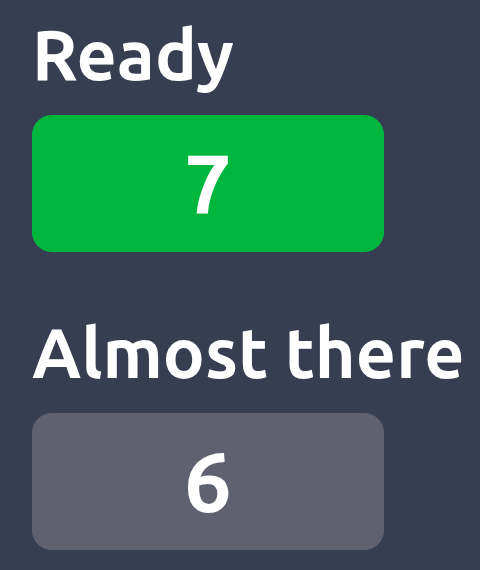
The Order Status Screen is automatically enabled once a preparation display is created. It is an additional display showing customers an overview of orders that are:
Ready for pickup.
Almost there, indicating they are taken care of.
To open this customer interface, click Order Status Screen on the preparation display card.
Note
The order number can be found at the top of the customer’s receipt.
To use the order status screen, log in via a web browser on a mobile device or a screen connected via USB or HDMI. IoT boxes are not supported.